
PHP version 5.3 (or greater) MySQL version 5 (or greater)
Please note that activating HeroMaps Premium will not affect your website appearance in any way – HeroMaps makes use of shortcodes that are added to the posts or pages that you wish to display your maps on.
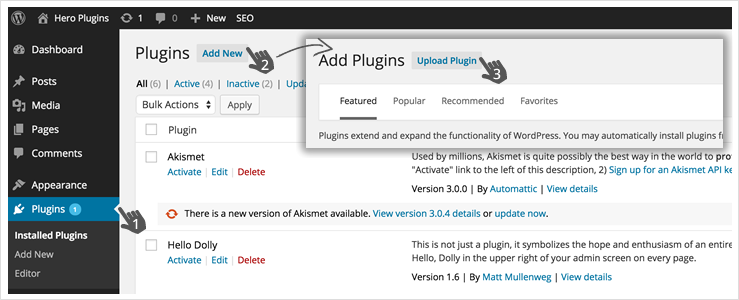
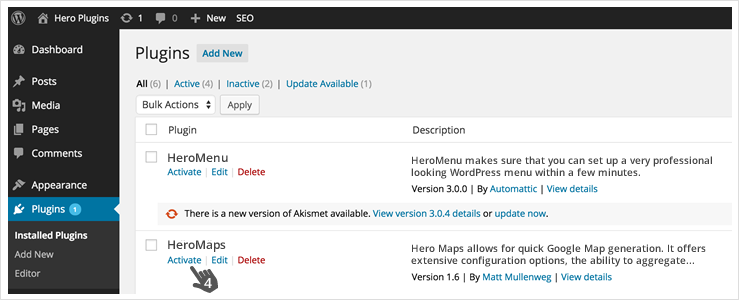
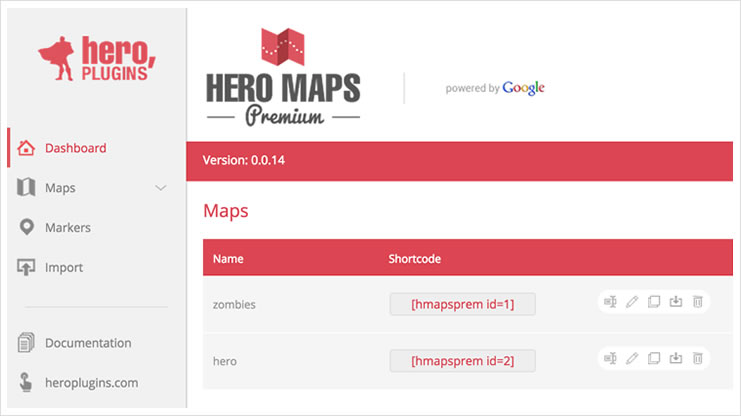
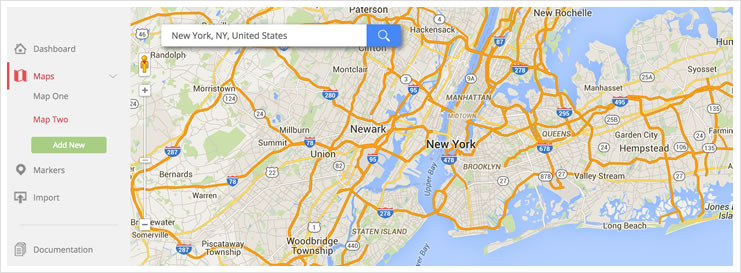
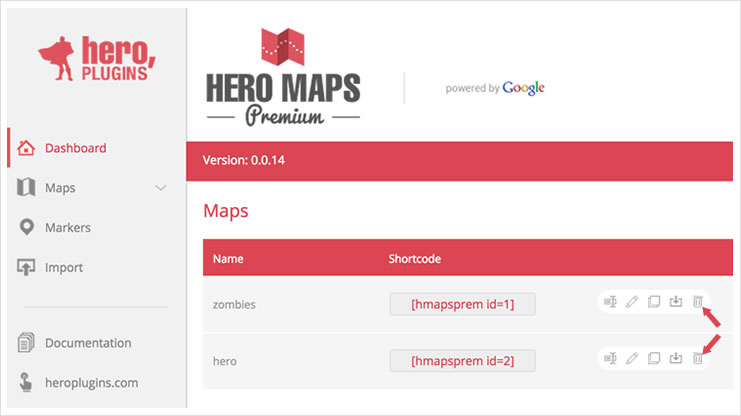
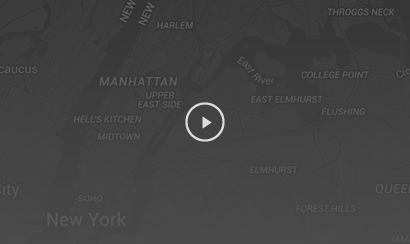
Once HeroMaps Premium has been activated, browse to HeroMaps in your Admin area The first screen you see will be the HeroMaps Dashboard (pictured below) To create your first map, click on Maps, and click on the Add New button Type your map name in the text box that opens and click on the Add New button
Congratulations – you have just created your first map. Hello World!!
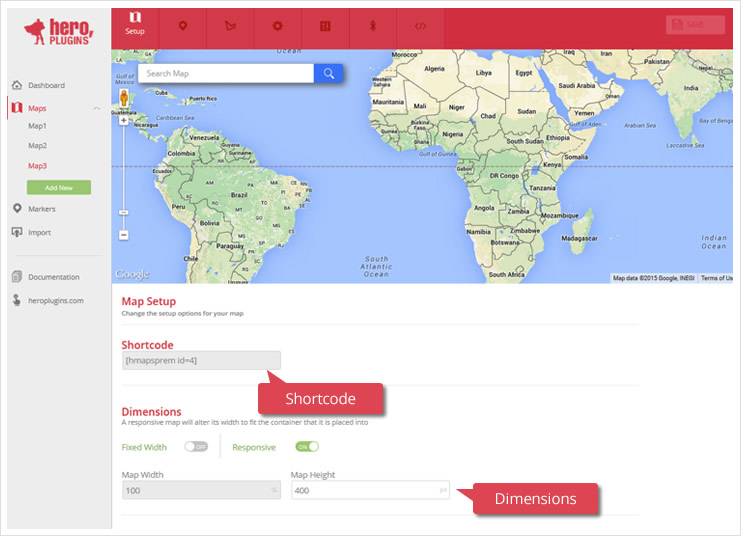
Once your map has been created, you will be taken to the setup screen and your screen will appear similar to the one below:
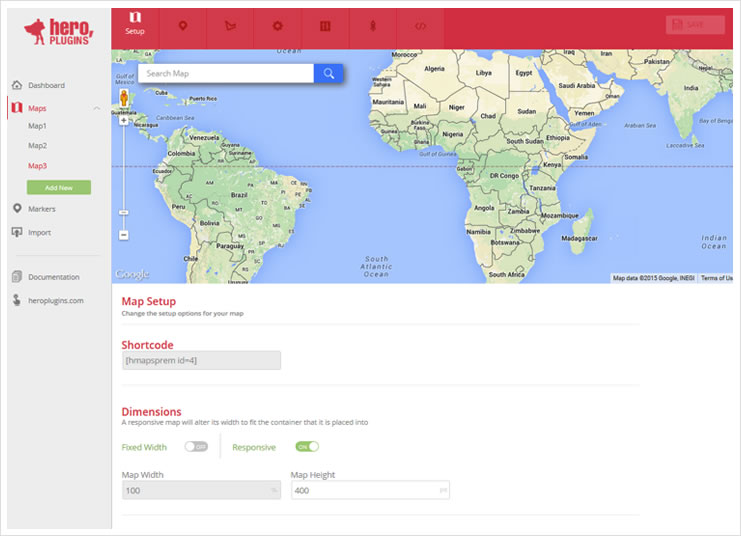
This screen will contain the default map – you can left-click on the map and drag to center it where you want to – or alternatively, make use of the Search Box. Zooming in and out with the mouse-wheel is disabled by default, but you can zoom in and out using the standard control on the left-hand side of the map.
Secondly, you will see your map’s shortcode – this is what you will use when adding a map to a page or post.
Finally, you will see your map dimension settings. You can choose between Fixed Width and Responsive settings – and set the size for your map.
Please note that if you choose the responsive option, your map needs to be placed in a container that is responsive as well.
While it isn’t strictly speaking necessary to save between each step, we do recommend clicking on the Save button in the top right-hand corner when you have completed making your adjustments.
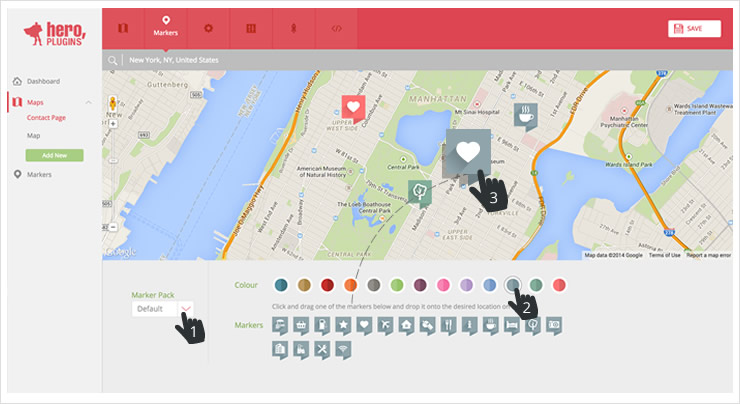
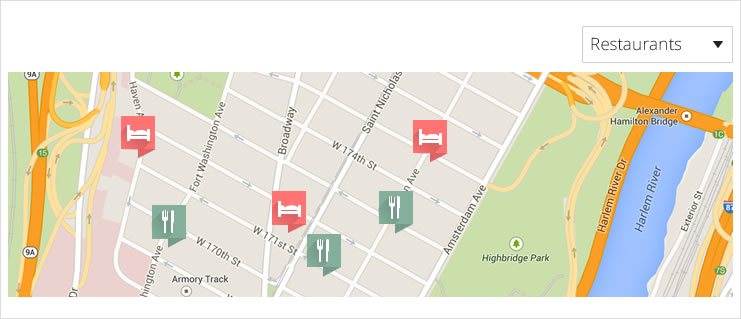
The second panel contains markers you can add to your map to highlight points of interest. Assuming you have adjusted your map to the zoom and the area you would like to see, you should see something like this:
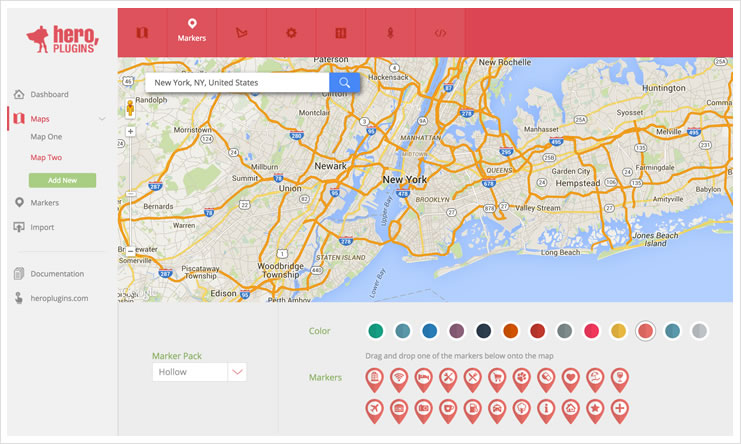
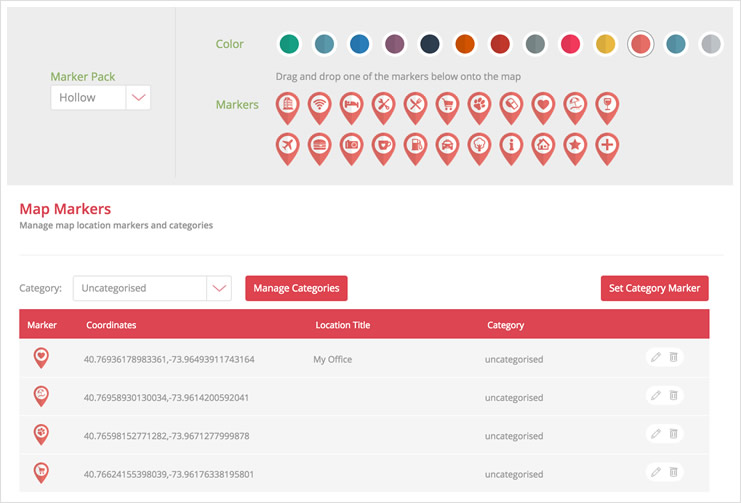
Below the map, on the left, you can use the dropdown to select your Marker Pack from the installed Marker Packs.
Directly below the map are the marker color sets. Choose your colour before dragging markers onto the map, as markers already added to the map will not change colours after the fact. You can have markers of different colors on the same map.
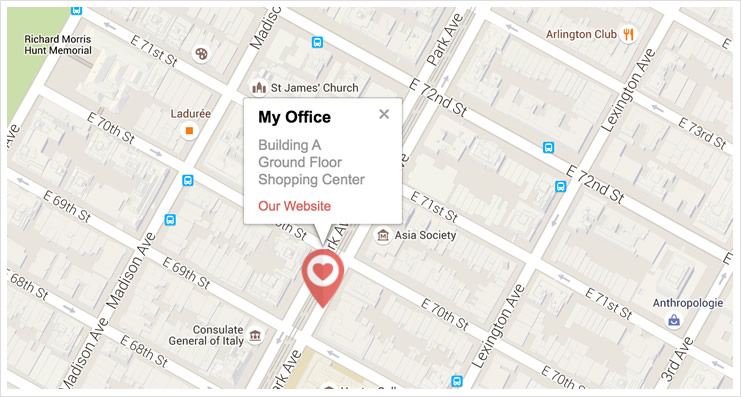
To add a marker to the map, simply click and drag the marker to your desired location. Once you are satisfied with the location of the marker, click on the marker to add details – the Info box will slide out from the right.
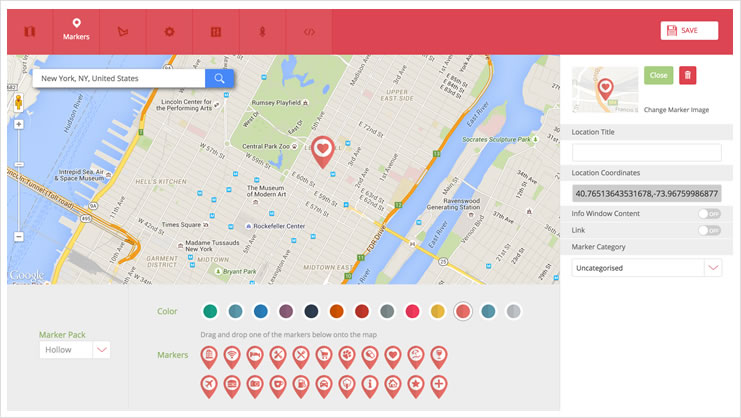
The Info Box also contains options to add additional info and link information – these options are off by default but can be turned on using the switches. Add your desired information and click on Done when you are finished.
If you would like to delete a marker already placed on the map, click on the marker, and then on the rubbish bin icon in the info box.
Once again, be sure to click Save when done.
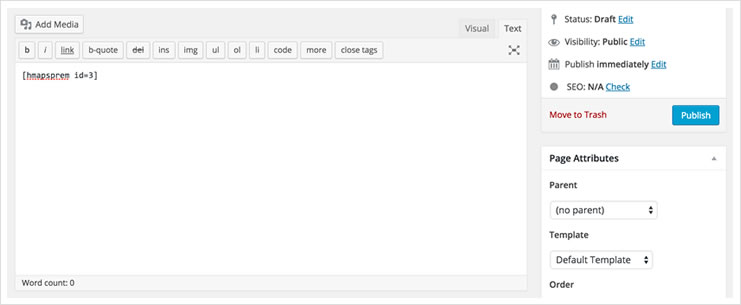
In order to add your map on a page or post, copy your short code (found in the Setup page) and add it to any text area where you would like it to display. You can also get the shortcode from the HeroMaps dashboard area:
1. Highlight and copy your shortcode

2. Paste the shortcode into your post or page
3. Update/publish and visit the page to check your resulting map
Browse to the HeroMaps Dashboard, and click on the rubbish bin icon of the map you want to delete. Please note that this action cannot be undone.
For an overview of the more advanced functions available, please visit our full documentation.
The Setup Tab contains the basic settings for your map.
Use the Search Box to search for your location; alternatively you can click and drag the map and use the Zoom Control on the map to refine your positioning and level of zoom.
The shortcode text box contains the shortcode which you will add to the page you want the map to appear on.
A Google Maps API key is required to be added in on the ‘Setup’ tab for a map in order to comply with the Google Maps API requirements. This must be added in order for the map to function. A key can be obtained from the ‘click here’ link provided.
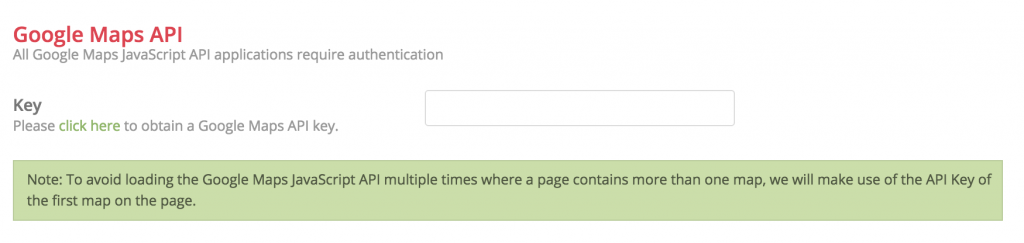
A single key can be used multiple times however the same quote will apply and all instances will count towards it.
In the case of multiple maps used on the same page it would only be necessary to add an API key for the first map.
You can set your map to be either Fixed Width or Responsive. These options are mutually exclusive – so switching the one option on will switch the other off.
With the Fixed Width option toggled on, you will be able to specify the width and height for your map (in px).
With the Responsive option toggled on, you will only be able to specify the height for your map – the width will default to 100%.
Note: When using the responsive option, ensure that your container is also responsive.
On the Markers tab, you have the ability to add, remove and edit markers for your map.
Assuming you have additional Marker Packs installed, you can use the Marker Pack dropdown to select the pack you want to use. Please note that Color selection is not supported for Custom Marker Packs.
To add a marker, first select your color, click-and-drag your chosen marker onto the map to your desired location.
Note: Pick your color before adding your marker to the map. Changing the color retroactively will not update markers already added to the map. This enables you to use more than one color for your markers.
By default, markers added to the map contain no additional information, and will simply zoom in when a user clicks on them.
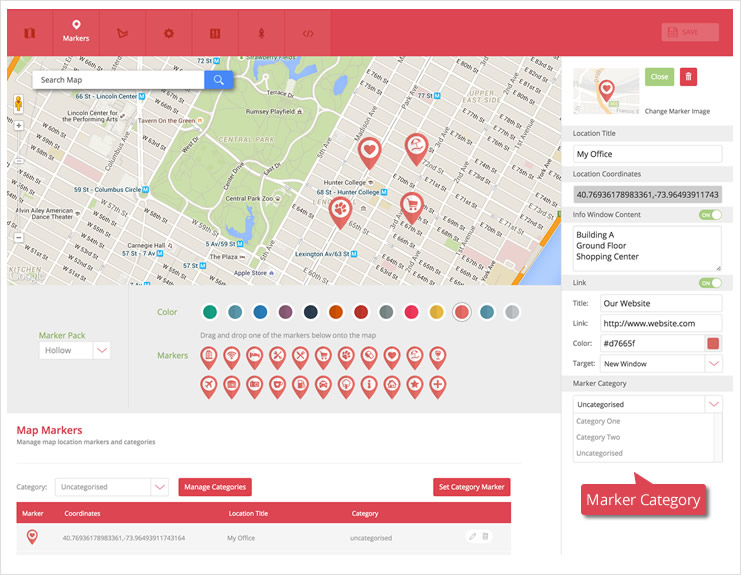
In order to add additional information to your markers, simply click on the marker you wish to edit – the edit panel will appear on the right-hand side of your screen. This panel contains a number of fields and options:

Once the information has been added/edited to your satisfaction, click on the Done button to close the panel.
Note: It is important to click the Save button (top right) to save your work – the Done button will not save your information.
Result below:
To delete a marker you added to the map, simply click on the rubbish bin icon in the top-right corner of the panel.
On the bottom half of the Markers tab you will find your marker management panel. You can also use this panel to edit and delete markers from the map, as well as add categories, and set a default marker for each category.
This panel will list all the markers currently added to your map.
Clicking on the Manage Categories button (in the image above) will open the Marker Categories panel.
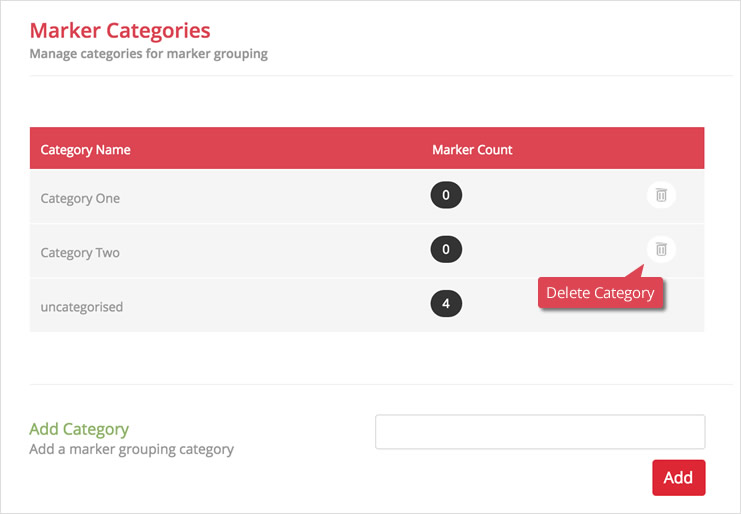
To add categories, simply type the category name in the text box provided and click Add. The new category will appear in the list. Once you have added all your categories, you can click close. New markers will be assigned to the uncategorized category by default.
You can now assign categories to your markers by clicking on the edit link and selecting the relevant category from the dropdown box at the bottom:
To select a default marker for a category – select the category for which you wish to do this in the dropdown, and click on Set Category Marker. This will open a box into which you drag the marker you wish to use as the default.
Note that doing this will immediately update all markers in that category to the new default you set. This includes markers already on the map if they have been added to the category you are updating.
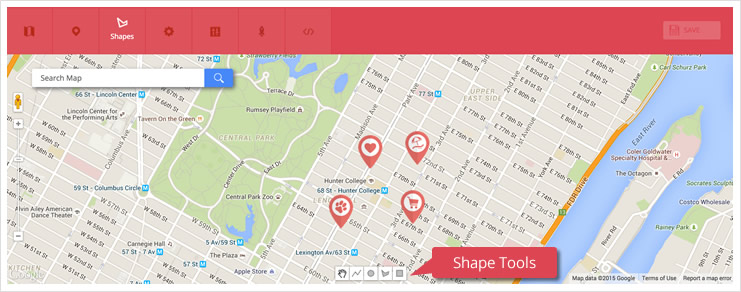
HeroMaps Premium includes the ability to add basic shapes and lines to your maps to display additional information. The four available shapes are:
When you are on the shapes page, you will see the tools for adding shapes and lines to your map at the bottom of your map screen.
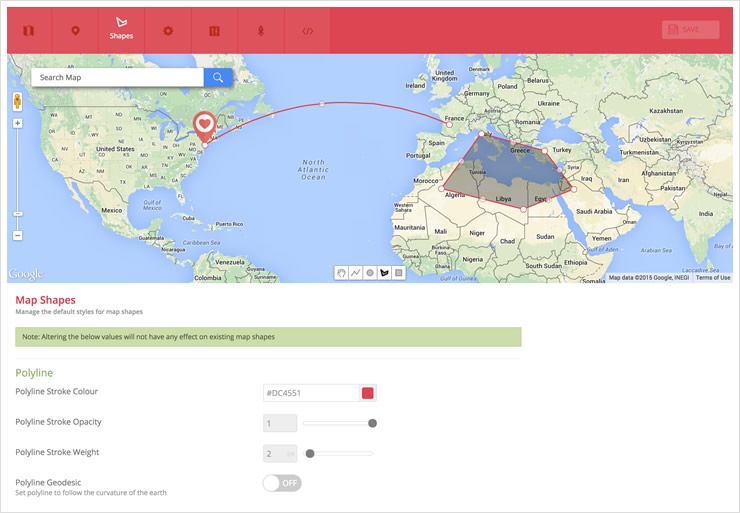
Four options are available to adjust the appearance of your line. You should set these before adding your line to the map, since changes made afterwards will not affect shapes already added to the map.
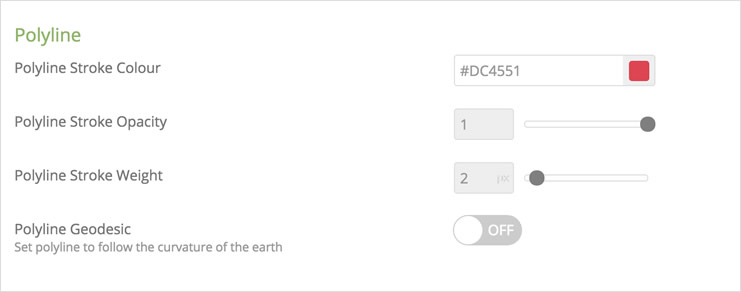
Stroke color – sets the line color. Set your color by using the color picker tool, or entering the HEX value of your color.
Stroke opacity – sets the opacity. Values include 0.1 (nearly transparent) to 1.0 (fully opaque)
Stroke weight – affects the thickness of your lines.
Polyline Geodesic – sets your polyline to follow the curvature of the Earth
To add your line, click the Line Tool, and then click on the point of the map where you would like your line to start. You can then move your mouse-cursor to the next location where you will either:
Once you have set your lines, click on the hand tool to drag the map around freely.
Each line has handles – which appear as semi-transparent points on the line – which you can use to manipulate the line. To do this, hover your cursor over the point, then click and drag the point to alter the curvature of the line.
You can format lines already added to your map by clicking on the line – an edit box will slide out from the right, containing the same settings used when creating the line. You can alter them here, and the line will change on the map as you make your changes. If you would like to delete the line, click on the rubbish bin icon in the top-right corner.
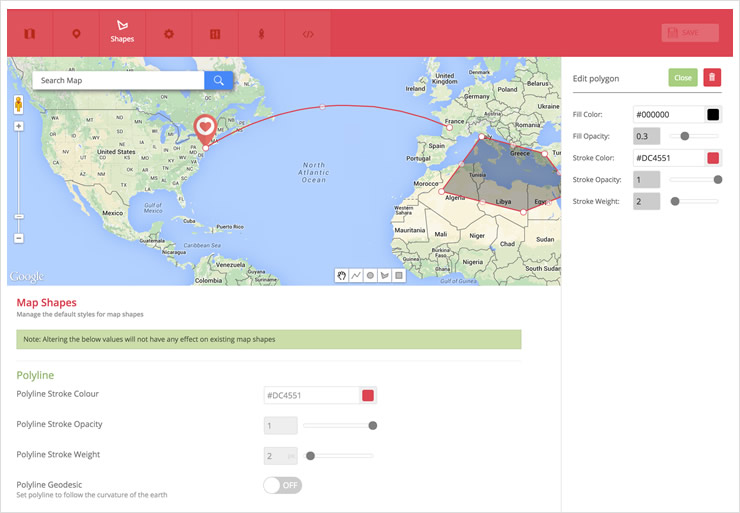
As with the polyline example above, settings for the appearance of your shape need to be set before adding your shape to the map, although clicking on the shape will open the edit box which will allow you to edit shapes already added to the map.
Each shape section contains five options that adjust the appearance of your shape:
Fill color – the color for the interior fill of the shape
Fill opacity – adjusts the transparency of the fill from 0 (completely transparent) to 1 (completely opaque)
Stroke color – sets the color for the outline of your shape
Stroke opacity – adjusts the transparency of the outline of your shape from 0.1 (nearly transparent) to 1 (completely opaque)
Stroke weight – adjusts the thickness of the outline of your shape
In order to draw the circle and rectangle, position your cursor, then click and drag. Release the mouse-button to complete your shape. These shapes can be resized by selecting the hand tool, hovering your cursor over one of the handles (or points) on the shape, and by clicking and dragging.
You can reposition the shape by positioning your cursor anywhere within the shape, and by clicking and dragging, and releasing the left mouse button when you are satisfied with the positioning.
In order to draw a polygon shape, position your cursor, and then click to add each of the points that represents a corner. Clicking on the first point you placed will complete the shape. You can reshape and resize the shape by hovering over any of the handles, and clicking and dragging it to a new position on the map – please ensure that you have selected the hand tool before attempting this.
You can reposition the shape by positioning your cursor anywhere within the shape, and by clicking and dragging, and releasing the left mouse button when you are satisfied with the positioning.
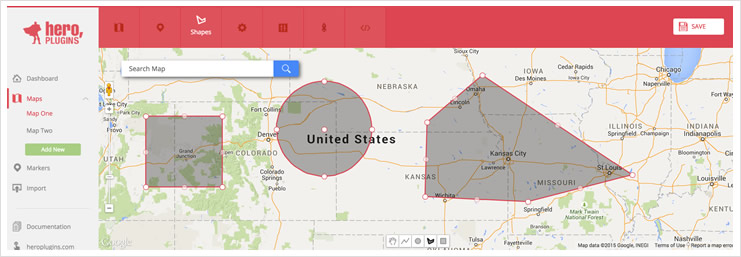
Below is an example map containing each of the three shapes:
To change the appearance of a specific shape, click anywhere within the shape – the edit box will slide out from the right, and you can adjust the settings – the shape will update on the map as you make changes. To delete your shape, click on the rubbish bin icon (top right corner). For an example, see the Polyline section above.
These shapes are useful when you would like to indicate things like service delivery area, or directions.
The Map Settings tab contains the basic settings for your map.
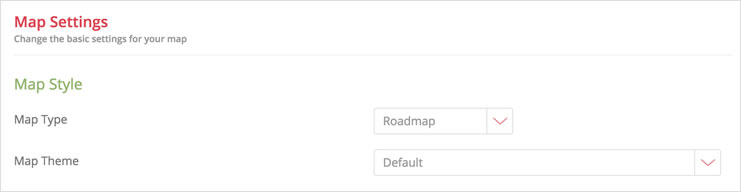
Use the dropdown to switch between the different map types available in Google Maps: Roadmap, Satellite, Hybrid and Terrain.
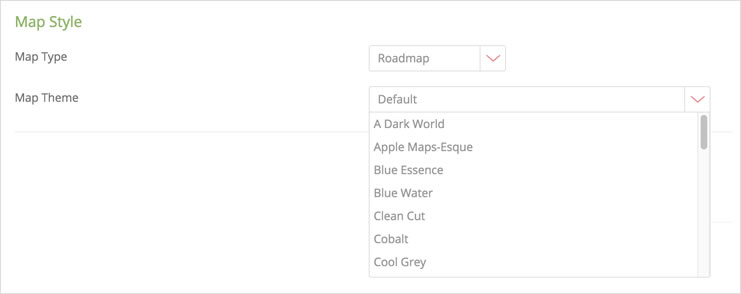
Use the dropdown to switch between different map color schemes.
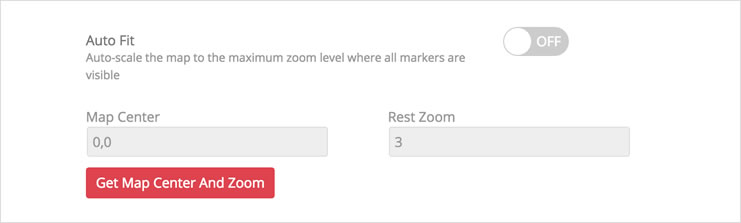
When switched on (default setting) this option will automatically scale your map in order to display all markers added. When switched off, you can manually adjust your map to your desired location and zoom, and click on the Get Map Centre and Zoom button.
This will then become the default loading set up for your map.
This setting allows you to enable or disable the ability to zoom in and out of our map using your mouse’s scroll wheel. This option is off by default.

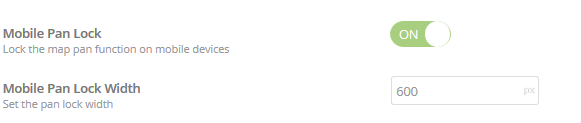
In situations where mobile users are faced with a map that fills the entire screen, enabling this feature will allow them to scroll down the page past the map to any information or content placed below the map on the page.
If you have set up Marker Categories, this option will provide you with two options which allow user control for how the various marker categories are displayed on your map. These two options are:
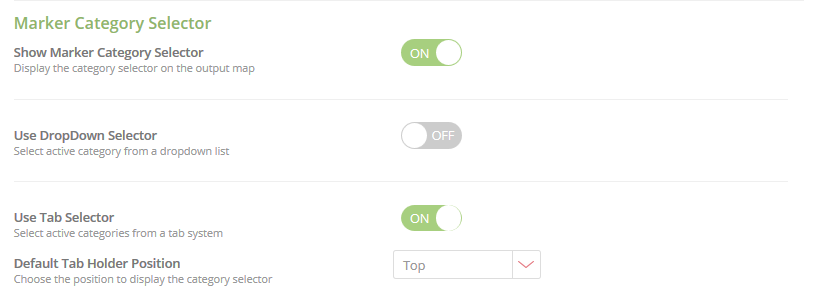
These two options are mutually exclusive – enabling one option will disable the other one. Also note that if you make use of Category Selection, all of your markers have to belong to a named category, ie. not uncategorized. Uncategorized markers will not be displayed on the map.
The category selector will include your categories created and one “Show All” selection. The text for the “Show All” can be edited here to a phrase of your choosing.
This setting will contain the default category that displays when your map loads.
Choose where you would like your selector to appear, relative to your map. Available choices are Top Left or Right, and Bottom Left or Right.
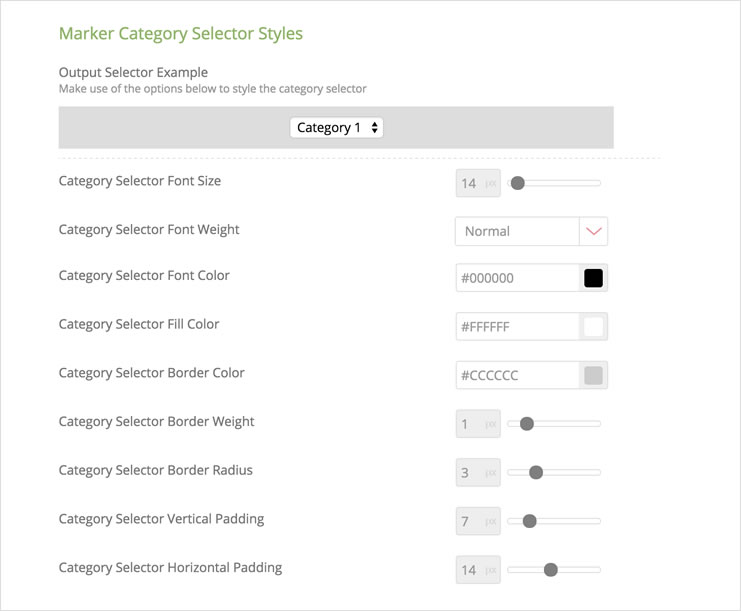
Applying styles to your selector is accomplished using the settings below the Output Selector Example. As you update your settings, the Example will update to reflect your changes.
Font color – Sets the color of the font in the selection box
Fill color – sets the color of the selection box background
Border weight – adjusts the width of the selection box border (in px)
Border radius – adjusts the curvature of the selection box corners
Vertical padding – adjusts the interior vertical padding of the selection box
Horizontal padding – adjusts the interior horizontal padding of the selection box
It is possible to achieve additional styling by adding a Category Selector CSS class on the Developer page.
Since the dropdown selector gives users an all-or-single-category approach to displaying markers on a map, the alternative is to use the category tabs, which acts as a filter. In effect, users of a map can then select one – or multiple categories – when viewing a map. As with the Dropdown selected, all your markers MUST belong to a named category or they will not be displayed.
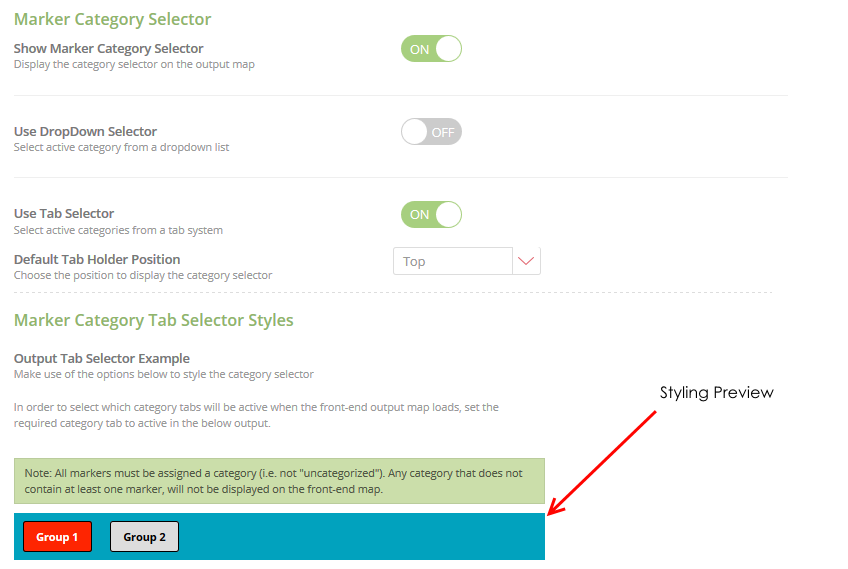
Options to style the appearance of your category filter buttons can be found below the preview area – and you can also specify which markers will be active by default when the map loads by setting the buttons as Active in the preview panel. In the example above, markers that are in category Group 1 will appear when the map loads, while Group 2markers will not.
It is possible to select multiple categories to be active when the map loads.
Switching this option on will allow a ‘Get Directions’ button to appear in your marker info boxes. When tapping on this button, a separate tab will open in their browser with the Google Maps interface loaded and providing directions. On mobile, users will have the option of opening either a browser or the Google Maps app.

The settings on this tab control the appearance and positioning of various map controls found in Google Maps.
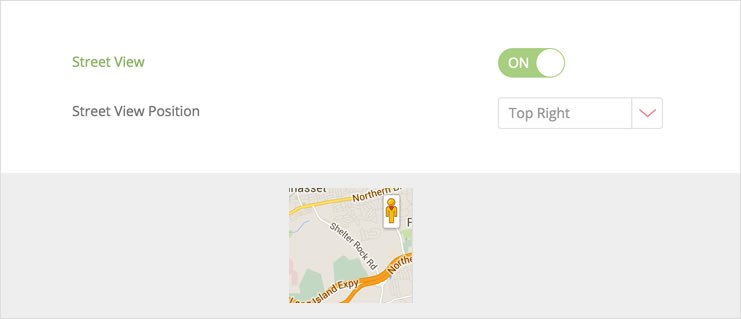
Switches street view on/off and sets the positioning of the street view control on the map.
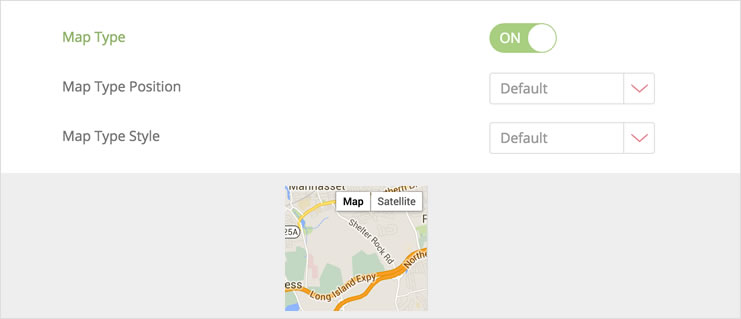
Switches the map type selector on/off and controls its appearance and positioning on the map.
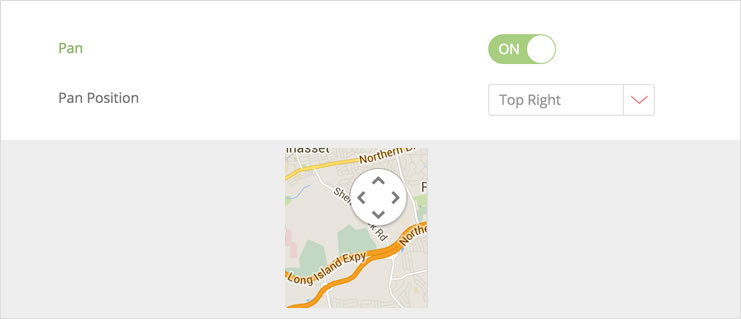
Enables/Disables a Pan Control for the map, and controls it’s positioning on the map.
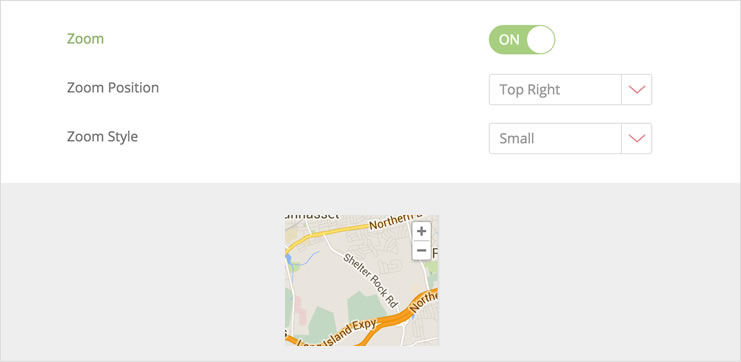
On by default, this setting controls the position and display of the Zoom tool on the map.
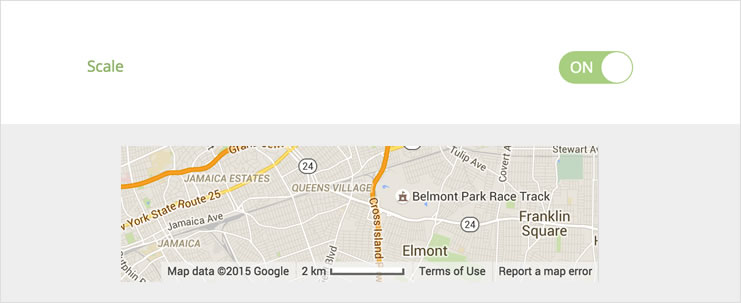
Enables/Disables the display of the map scale and overview. These two elements do not have options for positioning.
Additional settings and tweaks to adjust how your map appears.
Sets the delay (ms) between the map load and the appearance of your markers.
Select between three different marker appearance animation styles. Please note that when selecting the bounce animation, the markers will keep bouncing indefinitely.
Sets the delay between the placing of each marker in ms.
Enable/disable tooltips when hovering over markers on the map. These tooltips contain the location title of your marker.
Sets the delay (in ms) between the map load and the appearance of shapes placed on the map.
Use these settings to determine the level of zoom you want on your map when it loads, and when you click on a marker. Please note that these settings do not override the Auto Fit setting found in the settings tab. In order to set these, zoom your map to the desired level and click on the Get Current Zoom button.
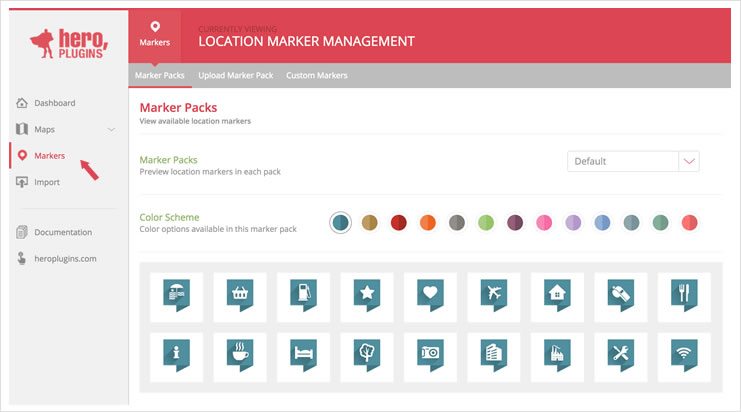
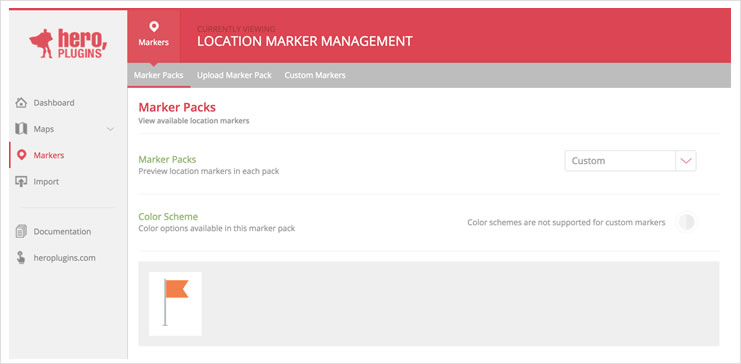
To manage installed markers and marker packs, navigate to the Markers section in the plugin admin. By default it will open on the Marker Packs tab, where you can preview installed marker packs. Note that Custom Marker Packs do not support color schemes:
In this tab you can upload purchased and downloaded marker pack files (in .zip format). The packs will be automatically installed and available to be previewed in the Marker Packs Tab as soon as you upload them.
Additional Marker Packs will be added to the store in the near future.
HeroMaps allows you to upload and use your own custom markers. Custom marker images must be in PNG format with a width and height between 15px and 150px.
Click on the Choose File button and browse to your custom marker, select it and click open to upload. If the upload is successful you will see your marker appear in a list below, with an Upload Success message.
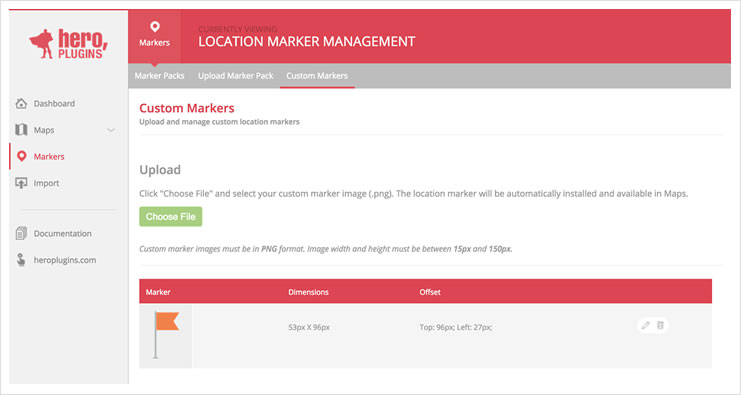
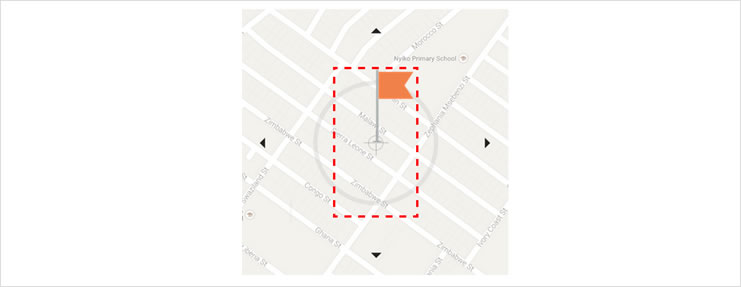
You can delete a custom marker by clicking on the rubbish bin icon. When clicking on the edit button, you can adjust the marker offset in the window that opens – this will also provide you with a preview of what your marker will look like when placed on a map.
You will also notice, when browsing back to the Marker Packs tab, that any custom markers you add to Maps will appear when you select Custom from the Marker Packs dropdown.
To export your settings for use in another HeroMaps Premium installation, navigate to the HeroMaps Dashboard, and click on the Export button for the map you wish to export.
This will let you save your Map as a text file. A default file name is provided, but you are free to rename this file.
To import your export file to HeroMaps, navigate to the Import Manager in the HeroMaps admin. Click on the upload button, browse to your text file and click Open.
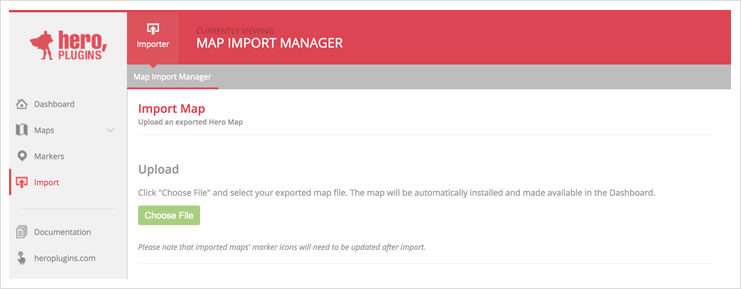
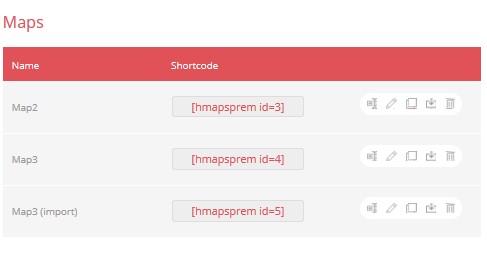
Provided the upload is successful, you will see the imported map appear in your list of maps in the HeroMaps Dashboard, with (import) appended to its name.
HeroMaps Premium supports the ability to import CSV files that contain the details of a list of markers to your maps.
In order to import your CSV file, navigate to the Import Management page from your HeroMaps dashboard, and navigate to the Marker CSV Import Manager Tab.
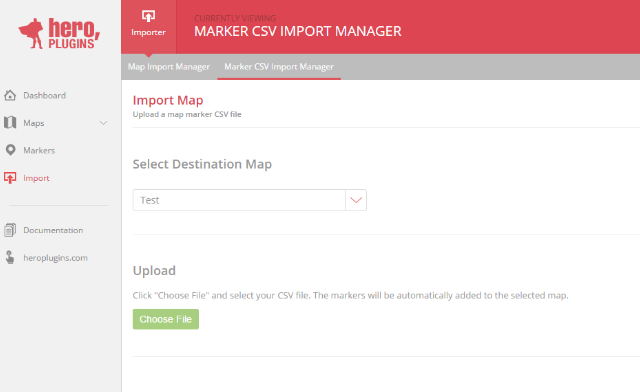
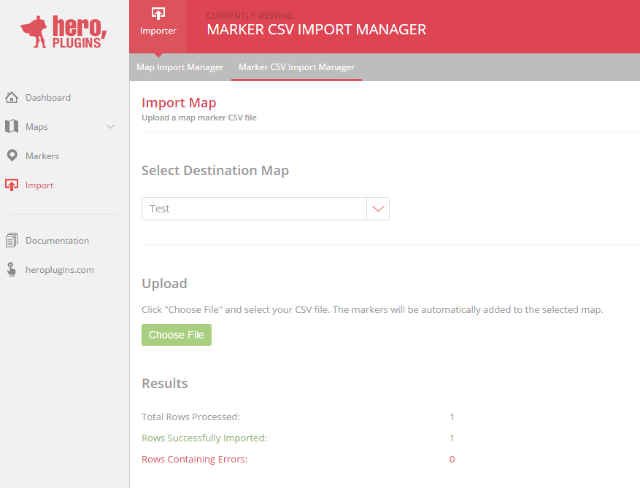
Select the map you want to add the markers to from the dropdown, and then click on the Choose File button. Browse to the location of your CSV file and click Open.
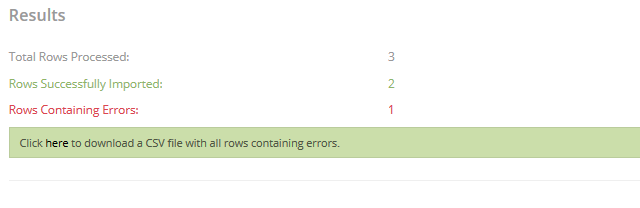
The file will be uploaded and processed, and at the end of the process you will see a status report which will inform you of successful and failed imports.
Please note: When importing a CSV file, you have to have a map available to import to. If you do not have any maps, create a blank map first.
There are a number of methods and programs that can be utilized to create a CSV file for import – we’re going to cover each of them below.
When creating a CSV file, keep in mind that there is a set format the file needs to follow, which contains the following fields (all of which corresponds with the fields found in the marker edit box):
We have created a number of template files which we refer to below – you can get them by by downloading this zip file and unzipping it in a location of your choosing.
You can create a CSV file using any available text editor – you can also use the provided CSV file from the zip archive and edit or enter your values in the fields between the quotation marks (“). Be careful to not delete any of the commas or quotations or that particular line will return an error.
A completed CSV file may look similar to the below (click on the image for the full size):

In the above example, both “Test Loc 1” and “Test Loc 3” are valid lines. “Test Loc 2”, however, will return an error because it is missing a required field – Longitude
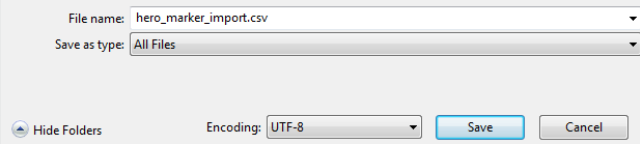
Ensure that when saving you save the file as your-file-name.csv and that you select All (*.*) as the file-type, as shown in the example below.
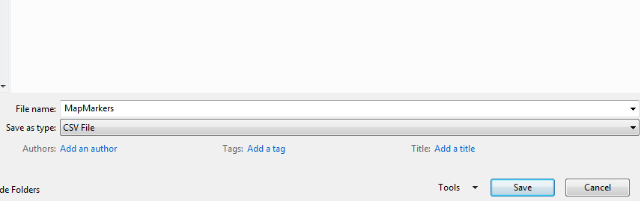
You can create a CSV file using Microsoft Excel, using the provided XLXS file included in the zip archive. It follows the same template, and as with the example above, we have three lines – two of which are valid, and one which is not.

Unfortunately however, Excel does not export the CSV correctly, which will lead to errors when uploading the CSV file. In order to prevent this from happening, we have provided a macro you can run in Excel which will format the CSV file properly – follow the steps below:
Alt-F11


Alternatively, you can make use of the macro-enable XLXS file provided in the zip archive – when opening this file you will very likely get a warning that Excel has disabled macros from running. Click the Enable Content button.
Once you have all your marker details added, press Alt-F11, and follow the same steps as above.
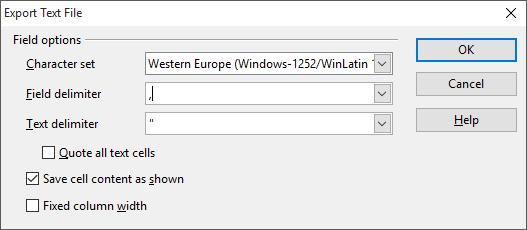
OpenOffice Calc presents no problems when exporting the CSV file – however, when using Calc there are some settings you will need to be aware of when saving your file.
Calc will, by default, attempt to save the file with a ODS extension – when saving make sure to select Text CSV in the Save as File Type dropdown.

Also, make sure that the Edit Filter Settings option is ticked before saving:

When you click on Save, a new box will open (image below) – ensure that your Field Delimiter is set to comma(,) and your Text Delimiter is set to quotation marks (“). Click on OK and your CSV file will be ready for import.
In the case where one or more of your listings has an error, the upload results will display the import results, and provide you with a link where you can download a CSV file that will contain all the lines that had errors in them.
Import the CSV provided into your editor of choice and make the required changes – using the details above – before re-uploading.
If all your uploads have been successful, your markers will now be available on your map for you to edit and modify as you wish
NOTE: It's that festive time of year again and we will be taking a short break to recharge from the 16th of December 2020 until the 3rd of January 2021. During this time our support will be limited but we will try to respond to high priority tickets as best we can. Have a great holiday!
OUR HEROES WILL BE HANGING UP THEIR CAPES FOR A SHORT BREAK!
We'll be out of office from the 2nd of August until the 18th of August 2019. Please note that during this time we will not be available to assist with support queries but will be right back to assist from Monday the 19th of August 2019. We appreciate your patience and support!
While we will always do our best to get back to you within an hour or two, we ask that you please allow for a maximum of 24 hours for feedback.
Monday to Friday, 9am to 5pm in the UTC+2 Timezone.
Bug fixing
How to questions
Assistance with integration
Support for 3rd party plugins
Custom Coding
Theme customization
Stay informed about all new releases and product updates