Once you have installed the latest version of WordPress (wordpress.org), then you can start with the theme install.
For 1st time WordPress users, please have a look at the install guide from WordPress. http://codex.wordpress.org/Installing_WordPress
Download the theme from your ThemeForest Downloads page. You will need to first unzip this file and within the folder locate the ‘invogue.zip’ file which will then be used for the theme installation.
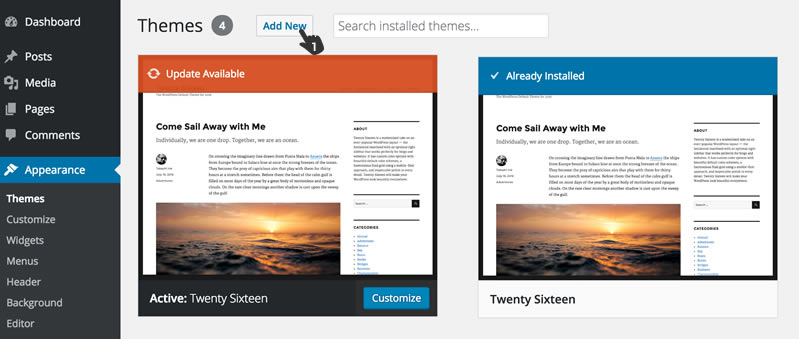
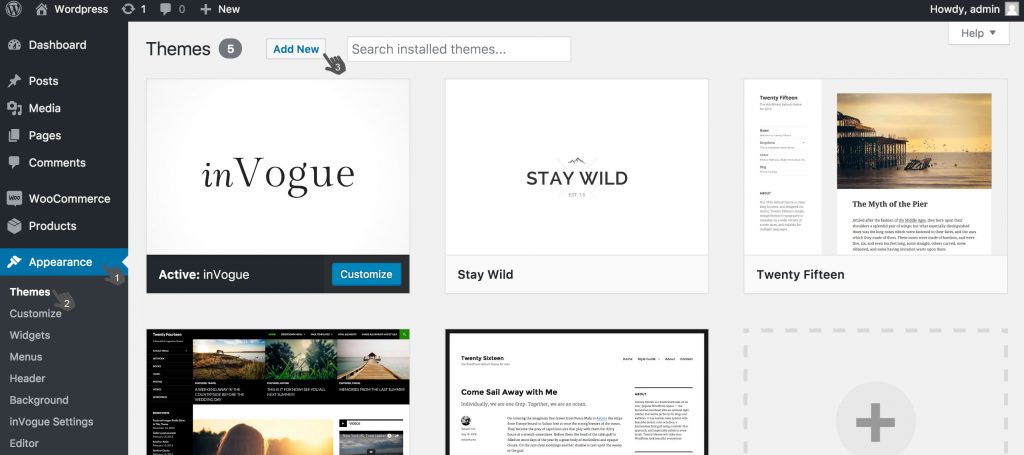
Open your WordPress backend and browse to “Appearance” in the side navigation.
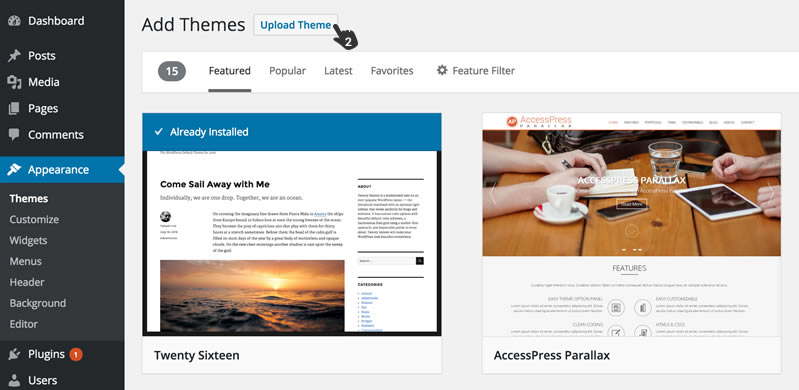
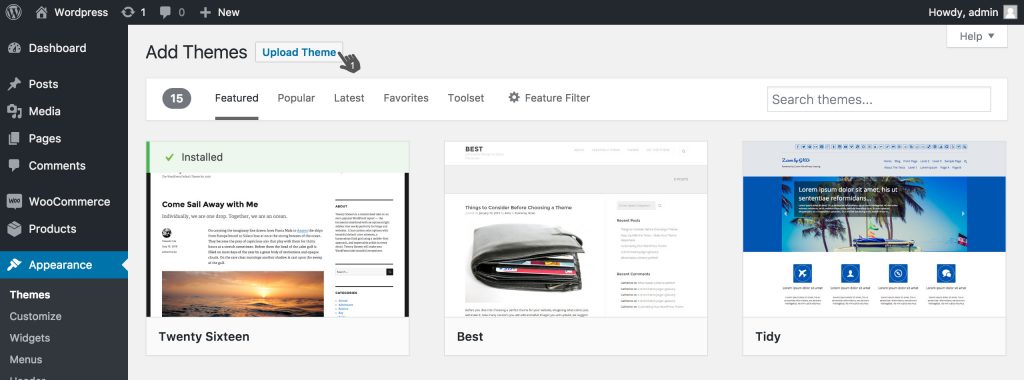
Click on “Themes”. On this page you will find an “Add New” button at the top. Click it and go to the “Add Themes” page. Here you will find an “Upload Theme” button. Click it and upload your ‘invogue.zip’ zip file.
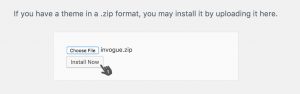
You will now see an “Install Now” button, which you can now click to install. This process will take a few seconds.
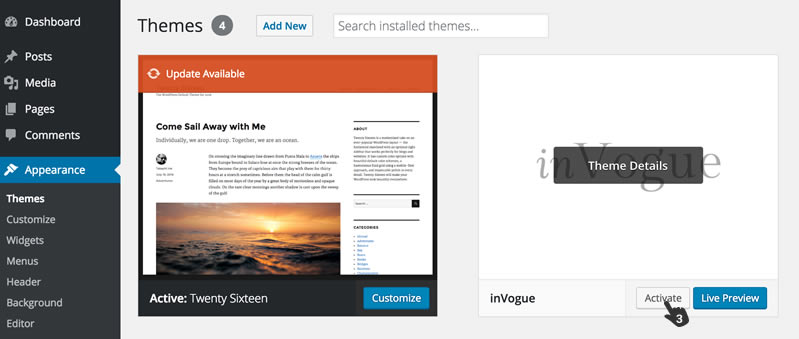
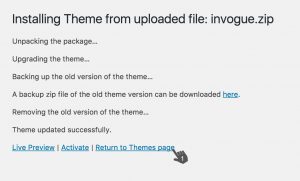
After successfully uploading of the theme, you will now see the theme displayed with the other standard themes and you can now activate InVogue by clicking on the “Activate” Button.
After you have activated the theme, you will be presented with a notification at the top of the screen that suggest you install the plugins required for the theme to function properly.
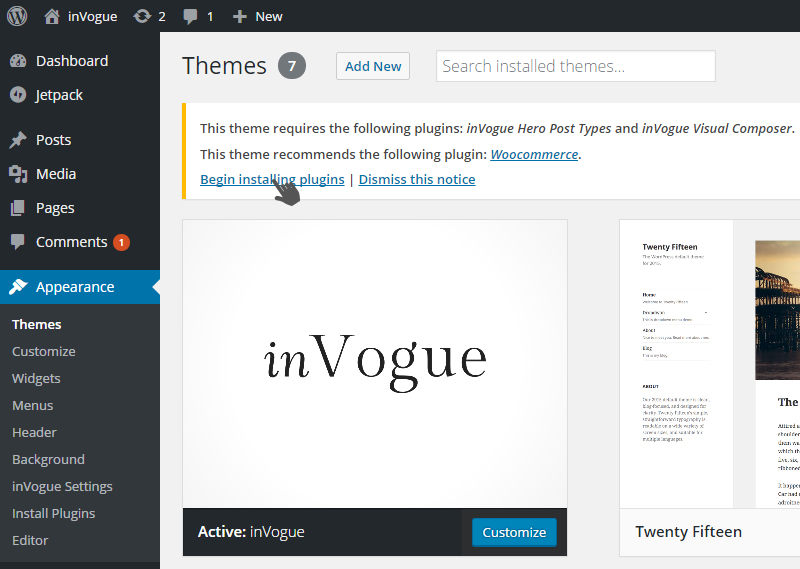
Please install and then activate “inVogue Utility Plugin”, “inVogue WPBakery Page Builder”, “inVogue Slider Revolution” and “WooCommerce”.
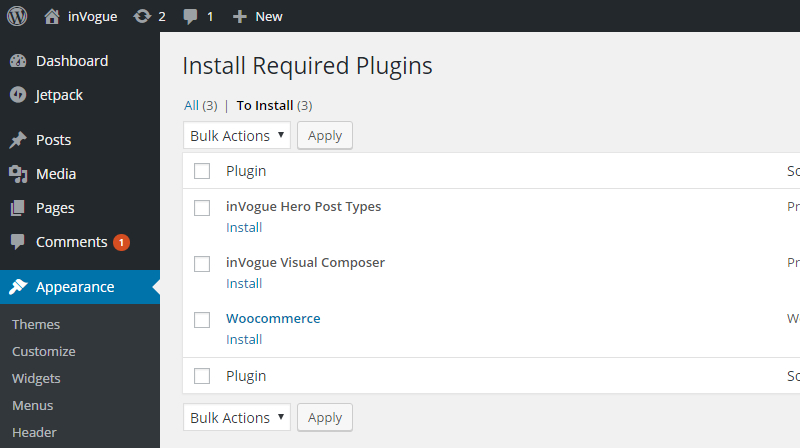
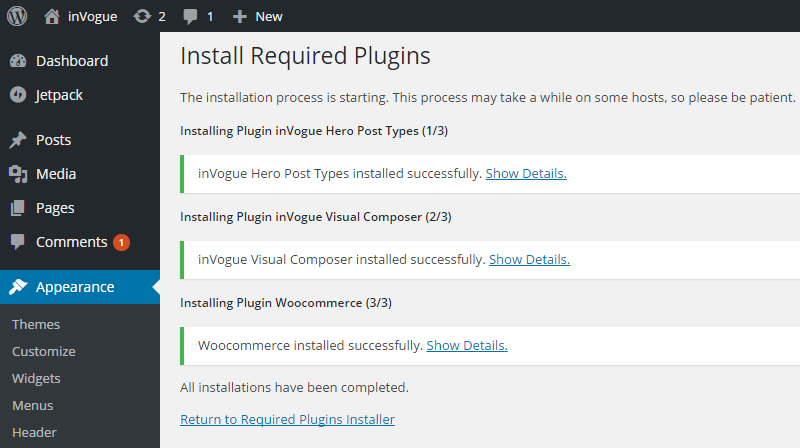
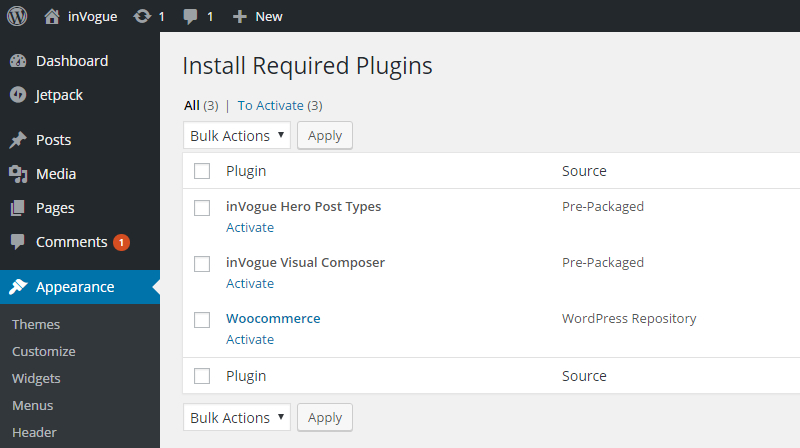
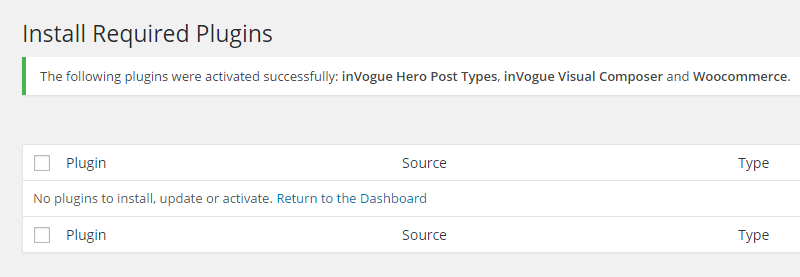
Please note that inVogue theme requires these 3 plugins to function correctly.
You will now see an alert box at the top of your screen in the WP backend that notifies you to run the WooCommerce setup wizard.

Please finish all 5 steps and start upload your products. Uploading and adding products will be covered further down the page.
Lets start off by setting up a few pages.
Browse to “Pages” in your WP side bar.
Add new page.
Create the pages needed for your website. Home, Shop, Contact, About etc.
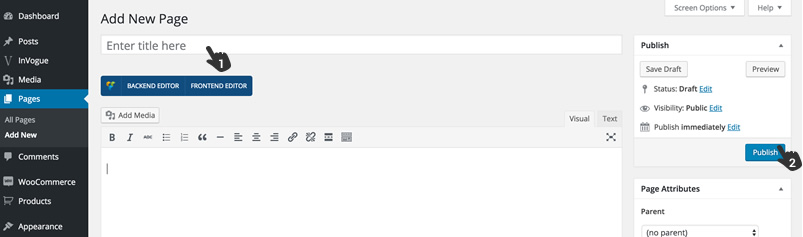
Create a page by adding a page and then press “Publish” in your right hand side bar.
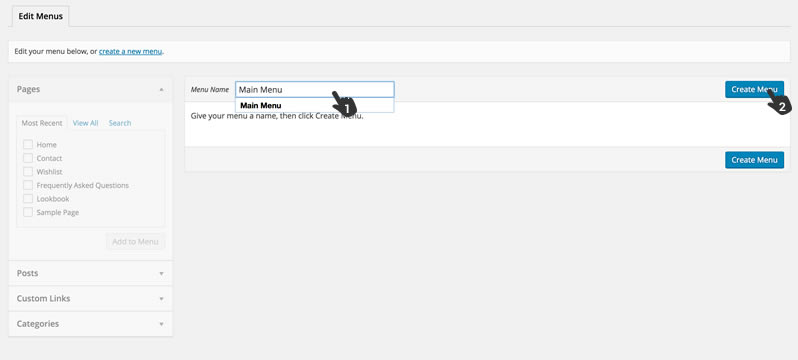
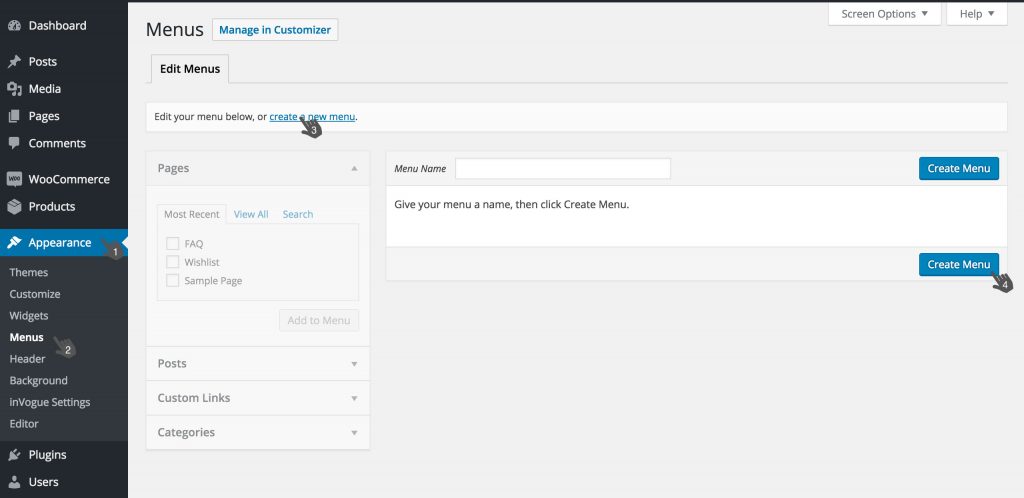
Browse to Appearance / Menus in your WP sidebar
Create a main menu for your site by typing the main menu name and then clicking “Create Menu”
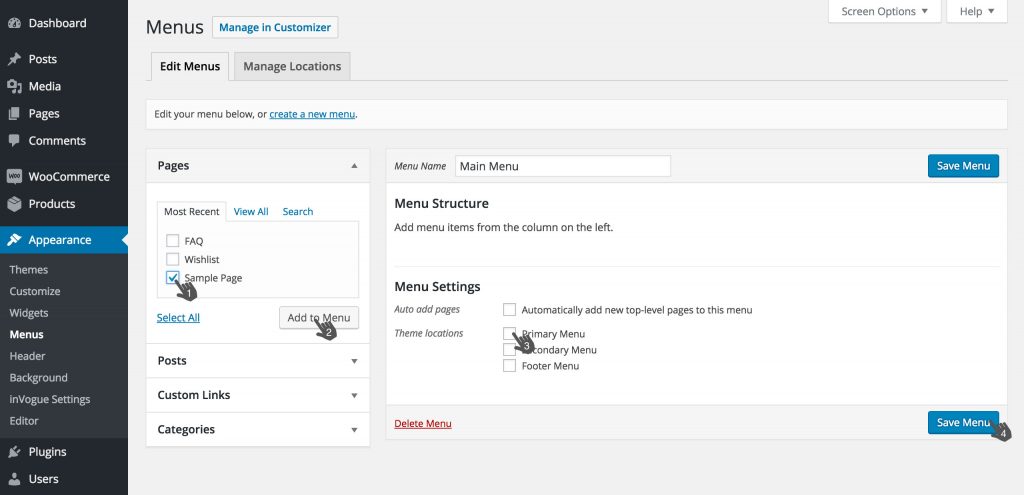
You will see a list of pages on the left.
Select the ones that you want to display in your main menu and click “Add to Menu”
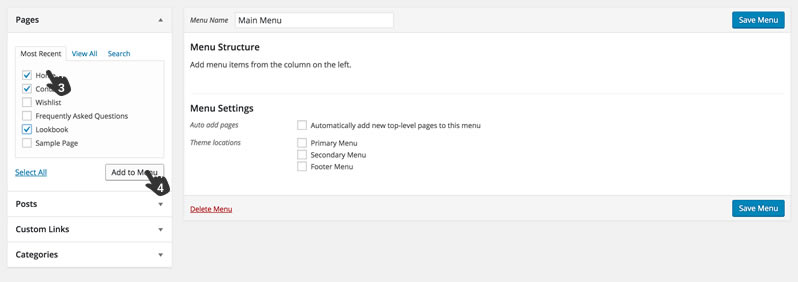
Also make sure that you assign the menu to the right area of the site by going to “Manage Locations” or setting it to Primary Menu as shown below.

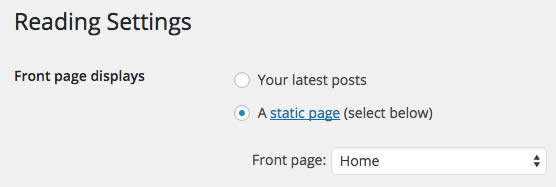
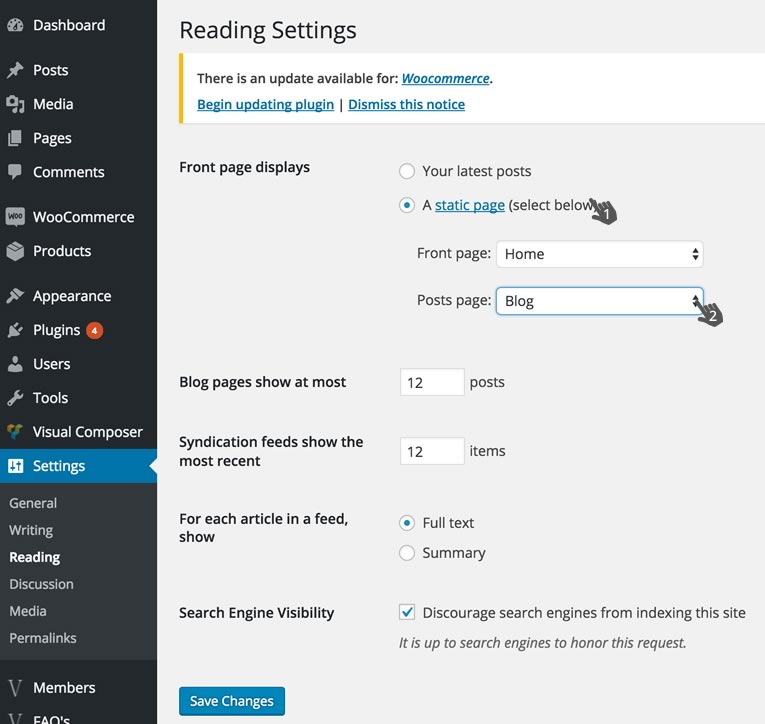
Browse to “Settings / Reading” and click Static Page and then click on the “Front Page” dropdown and select your Home page and Save.
Browse to “Settings / Reading” and click Static Page and then click on the “Post Page” dropdown and select your Post page and Save.
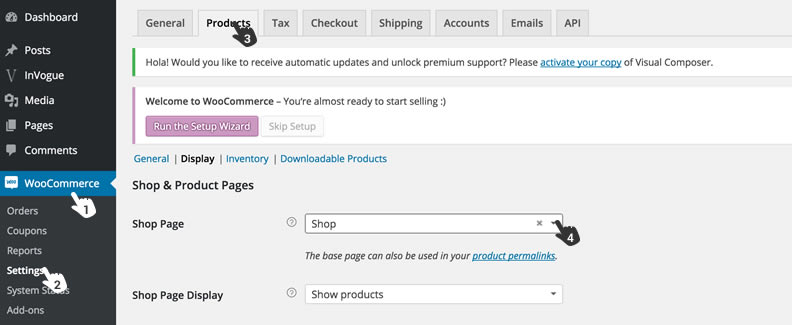
First set up a Shop page like all other pages. Make sure you assign it to the Primary Navigation. Now browse to WooCommerce / Settings / Products. Now assign your “Shop” page from the dropdown in step 4.
WPBakery Page Builder is included to build a responsive website and manage your content easily with an intuitive WordPress Front end editor. No programming knowledge required – create stunning and beautiful pages with award winning drag and drop editor.
Please note: For all page elements that contains products or blog posts, you must set these up first. Browse to products in the sidebar and add your products. Also browse to Posts in your sidebar and add your blog posts. Adding products to WooCommerce can be found further down this page.
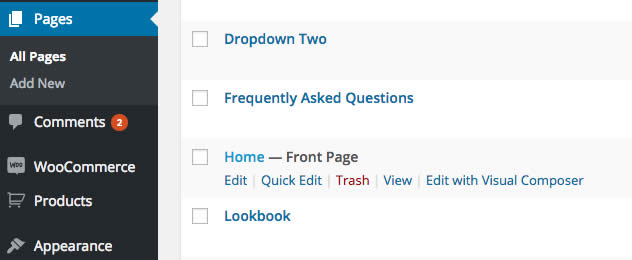
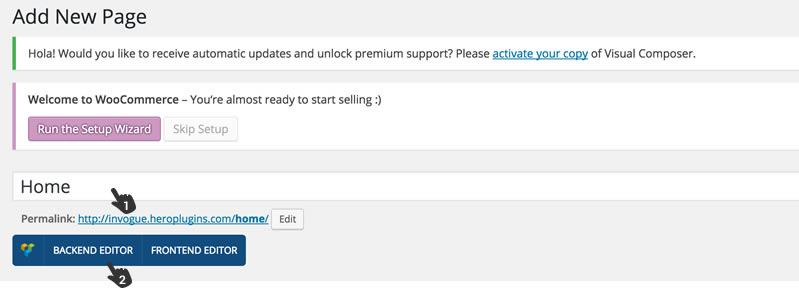
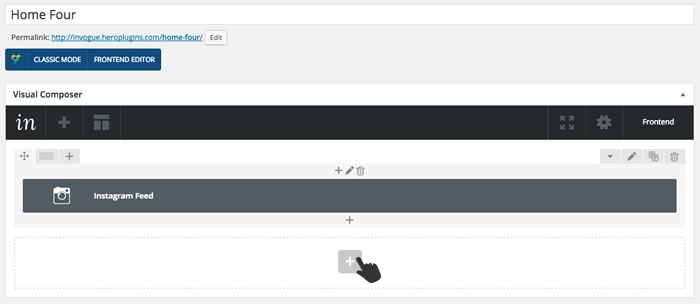
Home Page – Browse to Pages / All Pages and open your Home page.
Click on the blue BACKEND EDITOR button and then on the light blue “Add Element” button
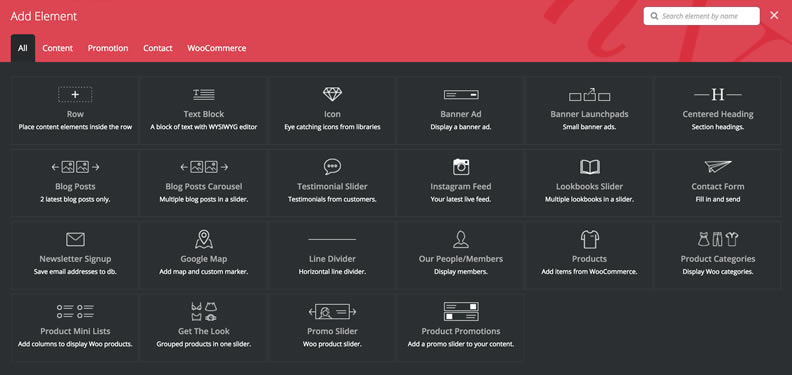
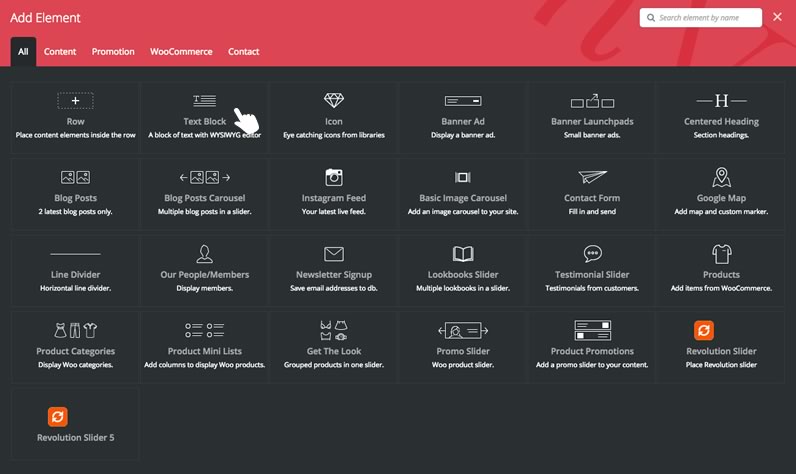
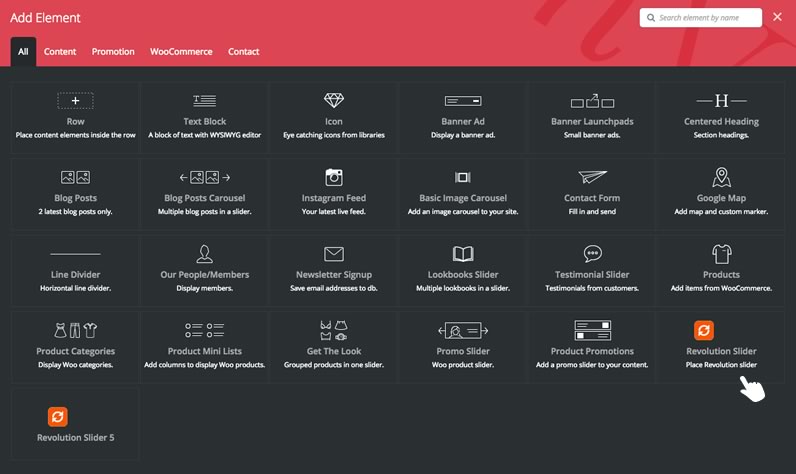
The below popup will now appear and you can start adding elements to your page. Everything you see here was used to create our demo pages.
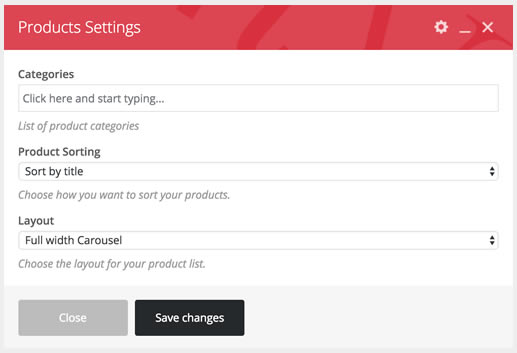
You will click on the element that you want to add and then the element popup will appear for you to edit. Example of a popup below.
Edit this popup and click Save Changes and you will have the first element on your page.
You can now repeat this process and add more elements on the page by clicking on the Plus button.

Remember to hit the “Publish” or “Update” button in your right hand side bar every time you add elements to the page.
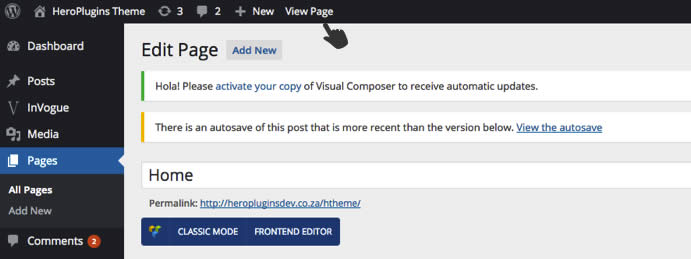
To preview this page in a browser window, click on the “View Page” button in the top gray bar. (Preferably – Right click and Open in new tab)
Keep this preview open in another browser tab so you can flip between the 2 tabs, editing in the one and previewing in the other.
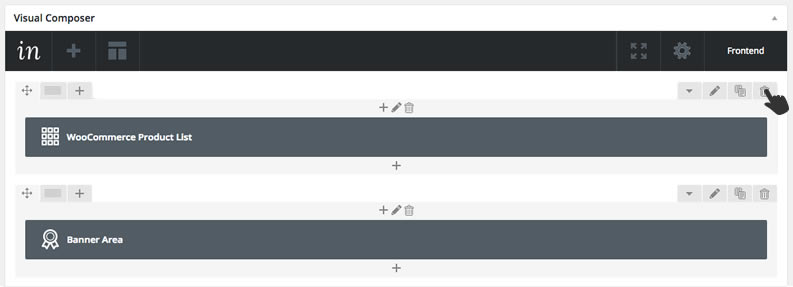
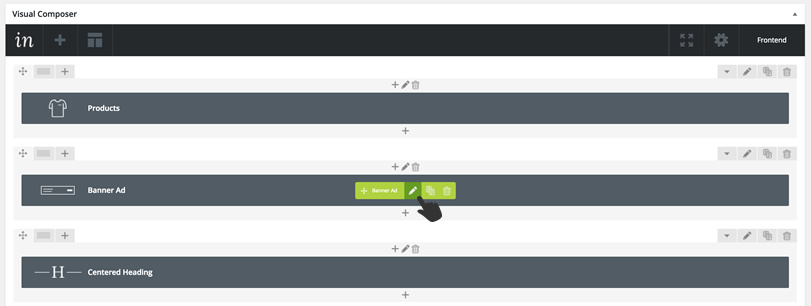
Drag and drop elements on your page by grabbing the arrow and dragging the element up or down to the position you want.
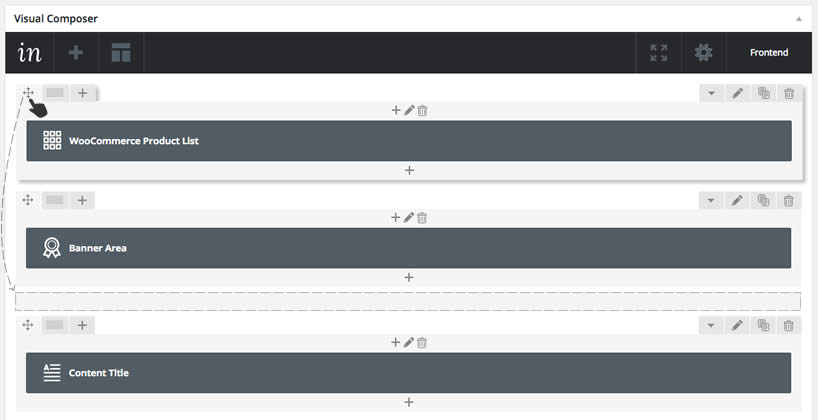
Click on the bin button to delete an element off the page
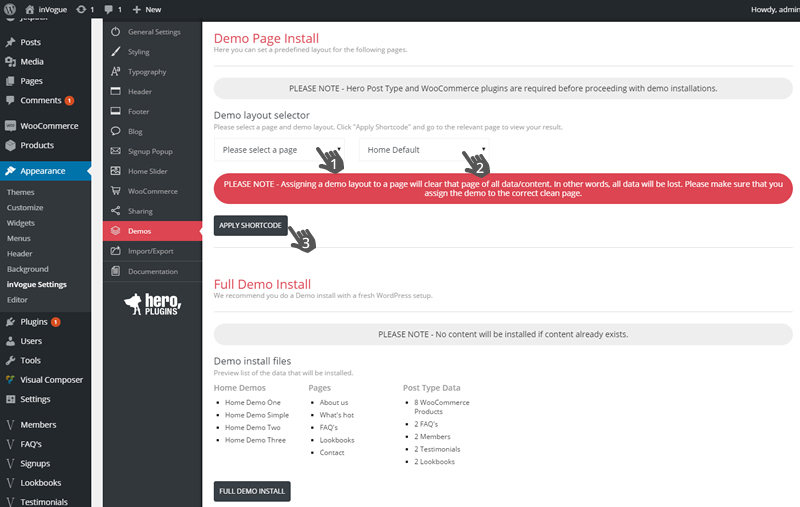
These are pre built layouts that can be switched on with ease. These demos can be found here. Browse to the InVogue settings page via the WordPress side bar Appearance / inVogue Settings and browse to the Demos section.
Please note that you will loose all previous data on the page that you are now building. It might be a better idea to create a blank page first and then do the demo installation on that page and once you are happy, then rename that page as the page that you wanted it to be.
Once you have selected your demo and assigned it to the right page, you can then browse to your page via the WP side bar / Pages.
Open the relevant page and you will see a layout that was now imported from the demo.
This will reflect the layout that was just selected. Click on View Page in the top gray bar to see your new layout.
Please note that this is purely the demo layout and no images or products from our main InVogue demo site are included. You need to now edit each element and make it your own.
Editing each of these elements are easy and can be found further down the page.
Please also note that some demo pages will need some extra work to make it look exactly like the inVogue demo. E.g. if you want the Home page to have a slider at the top, then you have to assign a template to that home page. Example above.
Note: With all new demo releases, please make sure you update your theme to the latest version to get these demos.
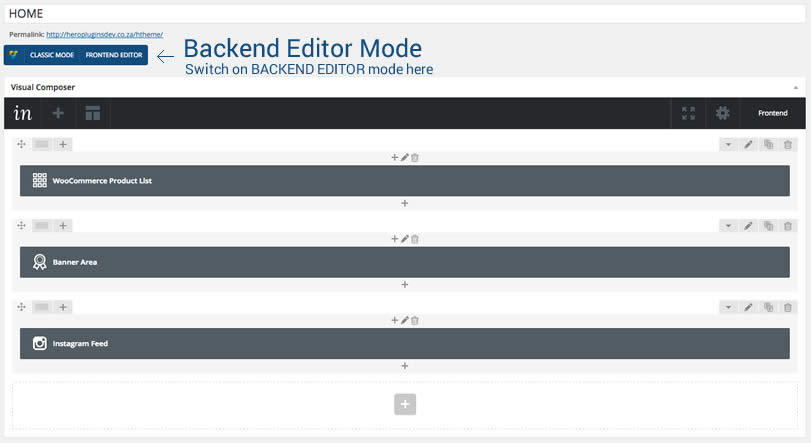
Always make sure you are viewing your pages in “Backend Editor Mode”
These are sections that can be added in various areas of the website, but mostly the home page. All our demo pages are built using these elements.
They can be added after each other on the home page to create the look you are after and they can also be dragged up or down the page to put them in the order you are looking for.
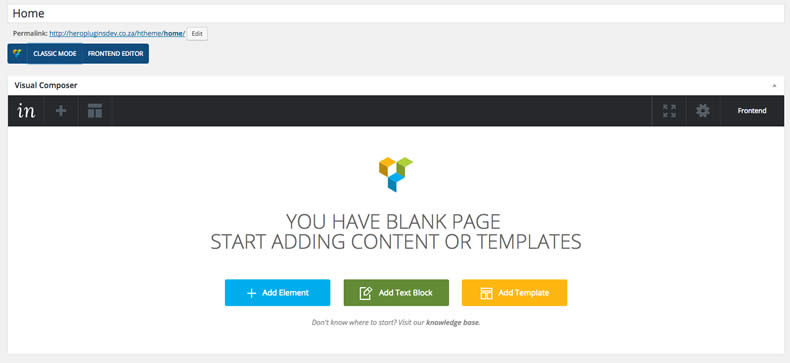
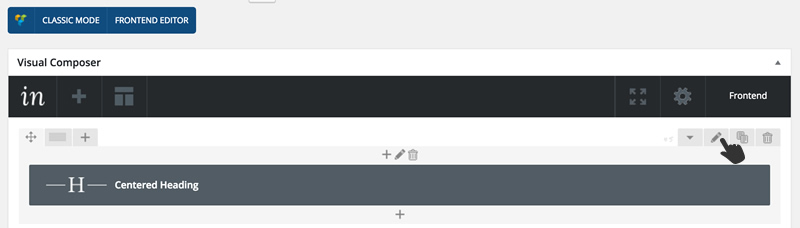
Start off by making sure you switch to “Backend Editor” as shown below.
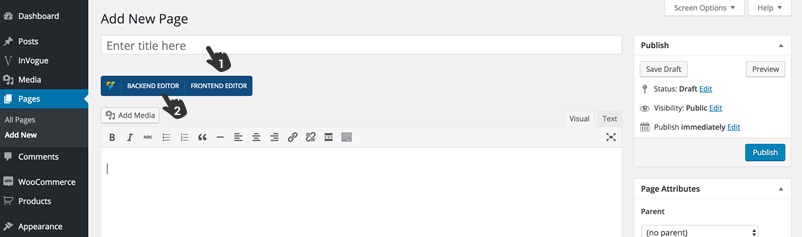
When you start on a blank page you might see the following and you can click on the blue “Add Element” button.
You will then see this popup with all elements to choose from.
Click on a element to add to the page and you will see another popup where you will now do all the settings for that specific element before adding it to the page.
You can now add more elements to the page by clicking on the plus sign in the middle
You can go back and edit an element by clciking on the green edit button and editing the popup.
Below we’ll explain how to add all elements and how to style them.
Drag and drop elements on your page by grabbing the arrow and dragging the element up or down to the position you want.
Click on the bin button to delete an element off the page
Rows should only be used when you want to add columns for text or text areas. All other elements will create it’s own row and will add the element in that row.
Front end preview:

In the popup window you can now add some text. Adding “H” tags can be added as well if you click on the “Text” tab in the top right corner.
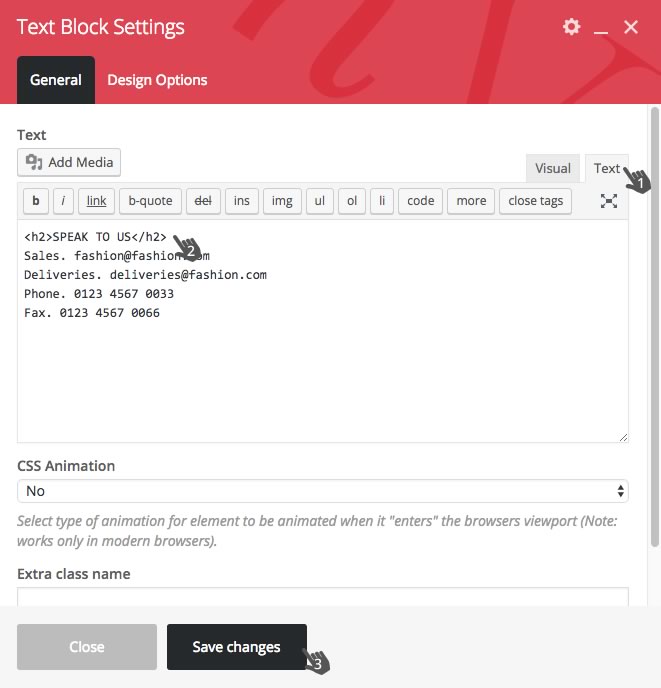
Hit Save and your text block will be added to the page.
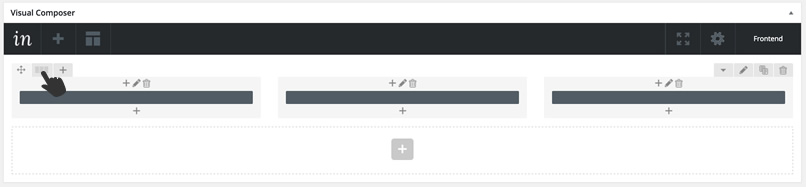
Adding more columns to your text area can be done by clicking on the appropriate layout and then adding more text.
Please note that this is the only element that you can add columns to. The rest of the element creates their own rows and columns should not be changed.
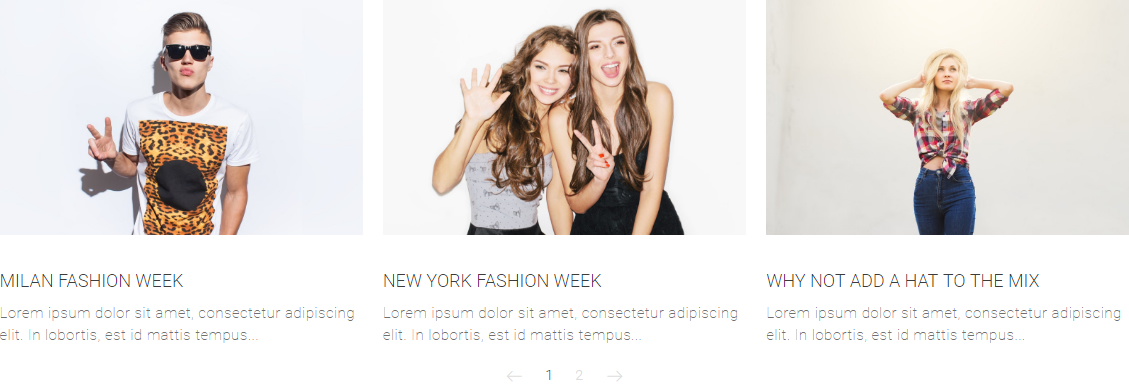
Front end preview:
![]()
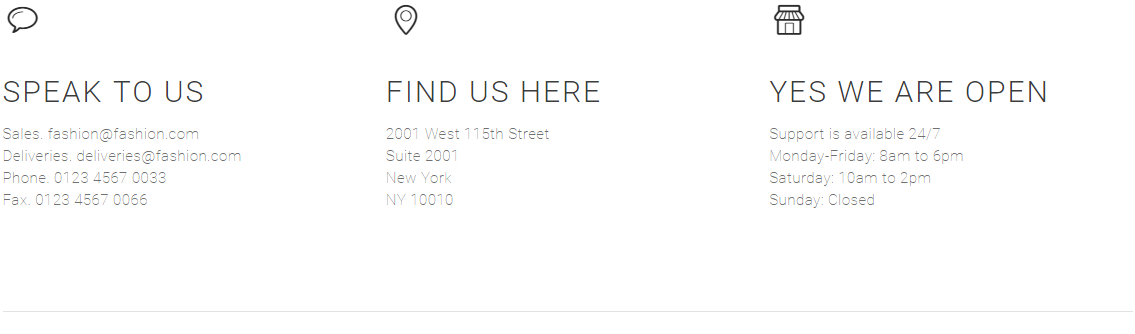
Want to add an icon next to or above some text, then you can do it the following way.
Lets work on the following example from the contact page.
Start off my adding a “Row” Element.
First start off by adding a row element
Now split that row into 3 columns (Hand 1)
Click on the plus sign in the middle of the column and add Icon (Hand 2)
Adding text underneath the icon – Click on the plus below the icon and add Text Block (Hand 3)


Front end preview:

Add a Title and Content and set your banner height. Enable the button and add a background image if you want. Add a URL and hit Save.
Front end preview:

Click on the Plus sign to add more launchpads next to each other and click on the arrow to edit them.
Front end preview:

Use this to add H2 titles in-between elements on your page.
Add a title and subtitle if needed and select the layout for your title.
The font can be changed by going to the inVogue Settings panel and browsing to the”Typography” section.
Front end preview:

This will display the latest 2 posts next to each other from a specific category.
Front end preview:
This will add a blog post carousel to the page. You can set the layout as contained on the page or run it full-page width.
Contained – select this and your content will run the width of the website in the middle of the page.
Full width – Set the layout to Full Row and it will run from edge to edge of the screen.
Hit save and change one more setting to allow it to run full-page width.
Click on the edit button of the row container

A Row Settings popup will appear and change it from “Default” to “Stretch row and content”
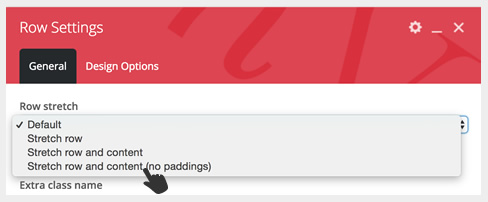
Front end preview:
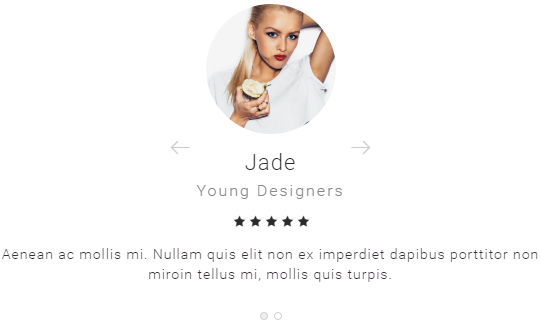
Start off by adding a few testimonials first.
Browse to “Testimonials” in your WordPress left hand side bar.
Add a few and save.
Go back to your page where you want to add the testimonials.
Add the testimonial element and edit the necessary settings.
Front end preview:

Your latest Instagram photos will be pulled in once you have entered your Title, User ID and Access Token
You can get your id here https://codeofaninja.com/tools/find-instagram-user-id
You can get your access token here https://heroplugins.com/2020/03/set-instagram-feed-new-facebook-api/
Now you need to set the width to run fullscreen(Full width option is only available for the Default layout as seen on demo home page). Click on the edit button of the row container

A Row Settings popup will appear and change it from “Default” to “Stretch row and content”
If you want to run this element tight on the footer of your page, then change the margin to “Margin Top” in the same Row Settings popup. This will make sure there’s no gap between the Instagram element and the footer. This setting is in the same Row Settings popup.
Front end preview:
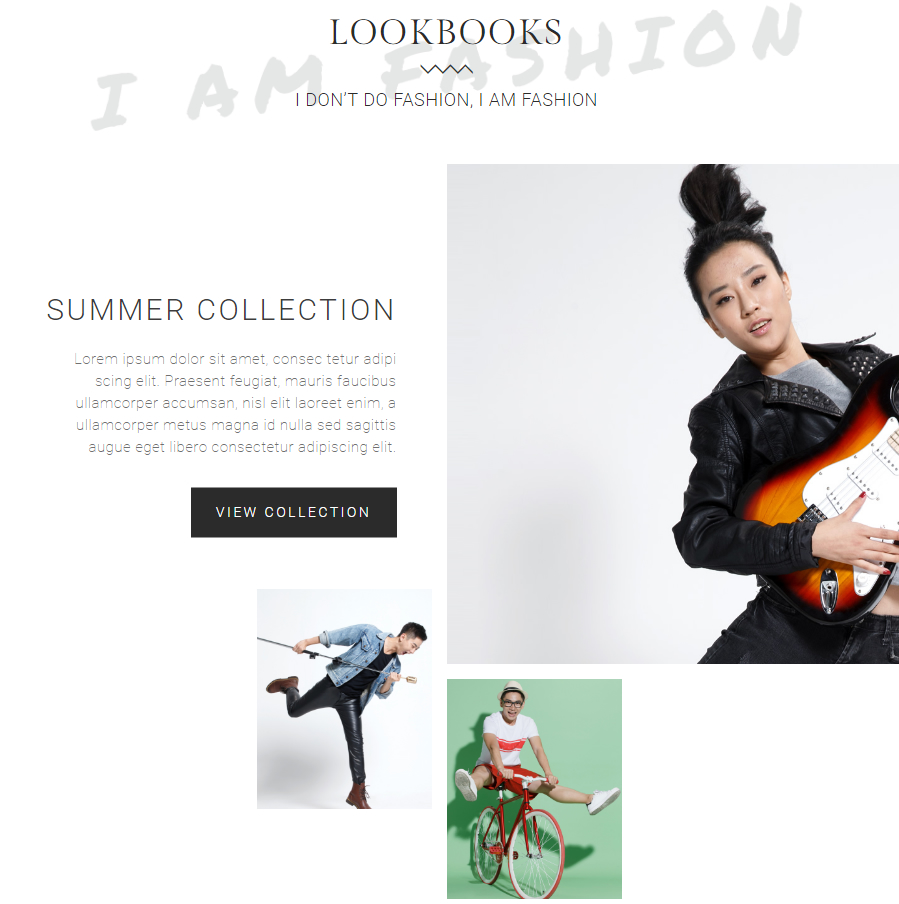
Start off by setting up a few look books under “Lookbooks” in your WP sidebar.
Add New page – Add a lookbooks gallery by uploading a few pics.
Add a featured image in the right sidebar – this will be used in the element slider.
Add a main image for this LookBooks page – Add the background image and add a page heading and some extra text if needed.
Adding text to the page – Use WPBakery Page Builder to add a row and split the row the way you want it and add some text to them.
Now go back to your page where you want to add the lookbooks slider.
In the Lookbooks slider popup, type in the look book names you want to display
Front end preview:

This will add a contact from to your site with the following fields.
First Name, Last Name, Email Address, Message Type, Message.
The email subject could be something like “message from my site” just so you know where the mail is from. The email will be sent to the site admin email address.
Front end preview:
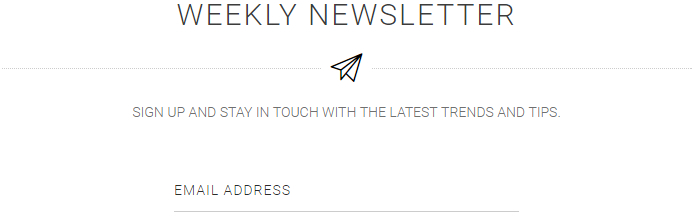
This element can be added if you want people to sign up for your newsletter, or just to capture email addresses.
Add a title and subtitle and hit save.
All these email addresses will be saved in your database and can be viewed via “Signups” in your WP sidebar.
You can export this list via your InVogue settings panel. Browse to Import/Export and go down the page. You’ll find this at the bottom of the page.
Front end preview:
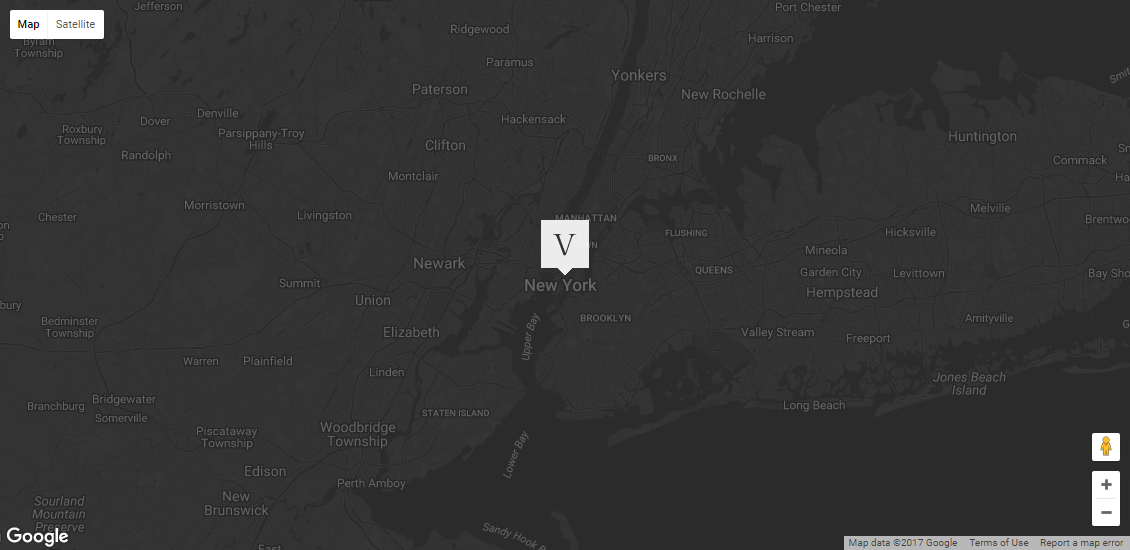
Add your map latitude and longitude (This will be the center point of the map)
Select the map style (we have included 6 and will add more later)
Then add markers at the bottom by adding its latitude and longitude.
Add as many as you want.
Also add your own custom marker.
Front end preview:
Here you can add a thin one-pixel line to separate content.
You can change the color of the line and if it should be full width or contained.
If you want it to run the full width of your screen, then also change the following setting.
Click on the edit button of the row container
A Row Settings popup will appear and change it from “Default” to “Stretch row and content”
Front end preview:
Add products to your page
Start by typing the categories you want to show. Leave blank and all products will pull in.
Layout can be set between a full width or contained carousel or a multiple row layout.
If you want to run a full width carousel, then also change the following settings.
Click on the edit button of the row container
A Row Settings popup will appear and change it from “Default” to “Stretch row and content”
Front end preview:
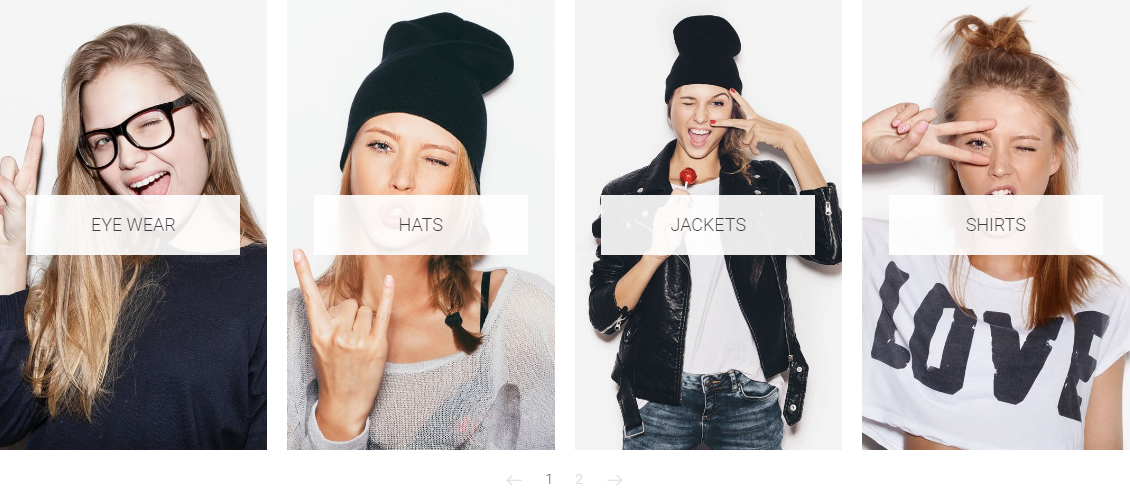
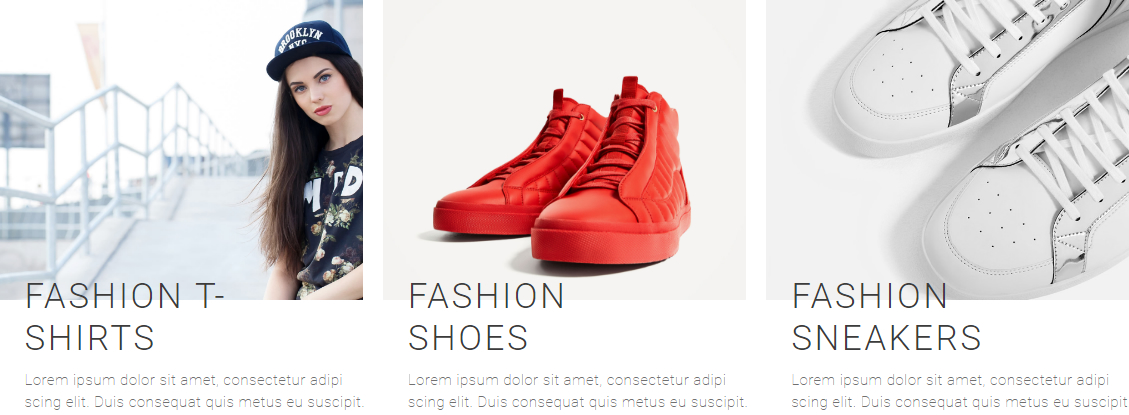
If you want to display all your product categories with click through to that category.
Set the layout and then add the categories by typing the name and then adding them.
Must add full width settings screenshots here
If you want to run a full width carousel, then also change the following settings.
Click on the edit button of the row container
A Row Settings popup will appear and change it from “Default” to “Stretch row and content”
Front end preview:
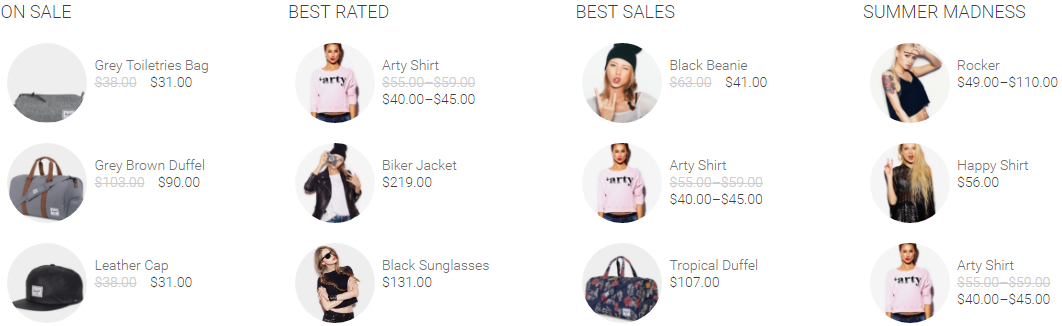
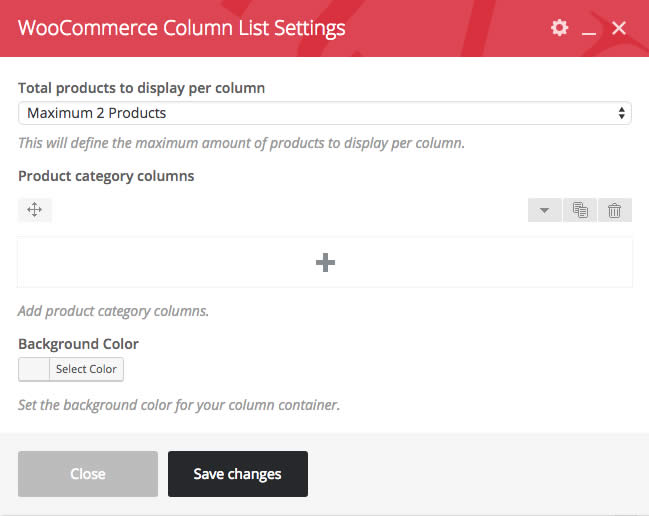
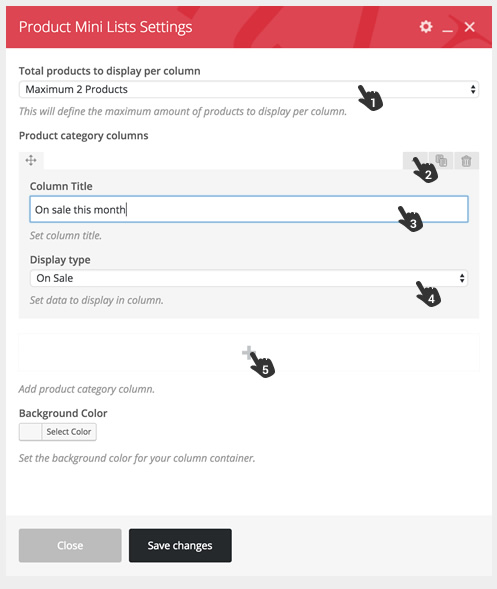
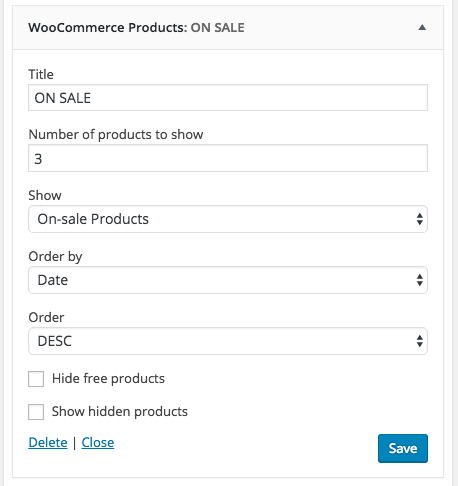
Set the amount of items you want to display underneath each other
Open the section to add content (Hand 1)
Add column title (Hand 3)and then select your display type (Hand 4).
Display type – On Sale, Best Rated and Best sales will be data from all products on site.
Display type – Category can be selected if you want to show a specific category.
Add the amount of columns that you want to show in the frontend (Hand 5)
Front end preview:

Here you can show 1 or 2 lifestyle images and list products that’s featured in these images.
Give each look a title and add a list of products(This would be products that you have added to WooCommerce already.
Add 2 background images.
Now click on the plus to add more sliders. (Hand 2)
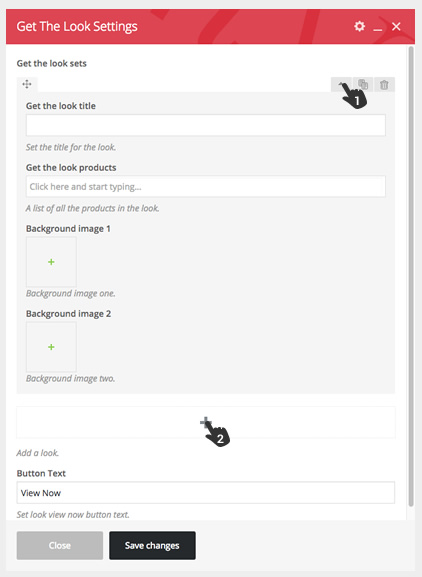
Front end preview:
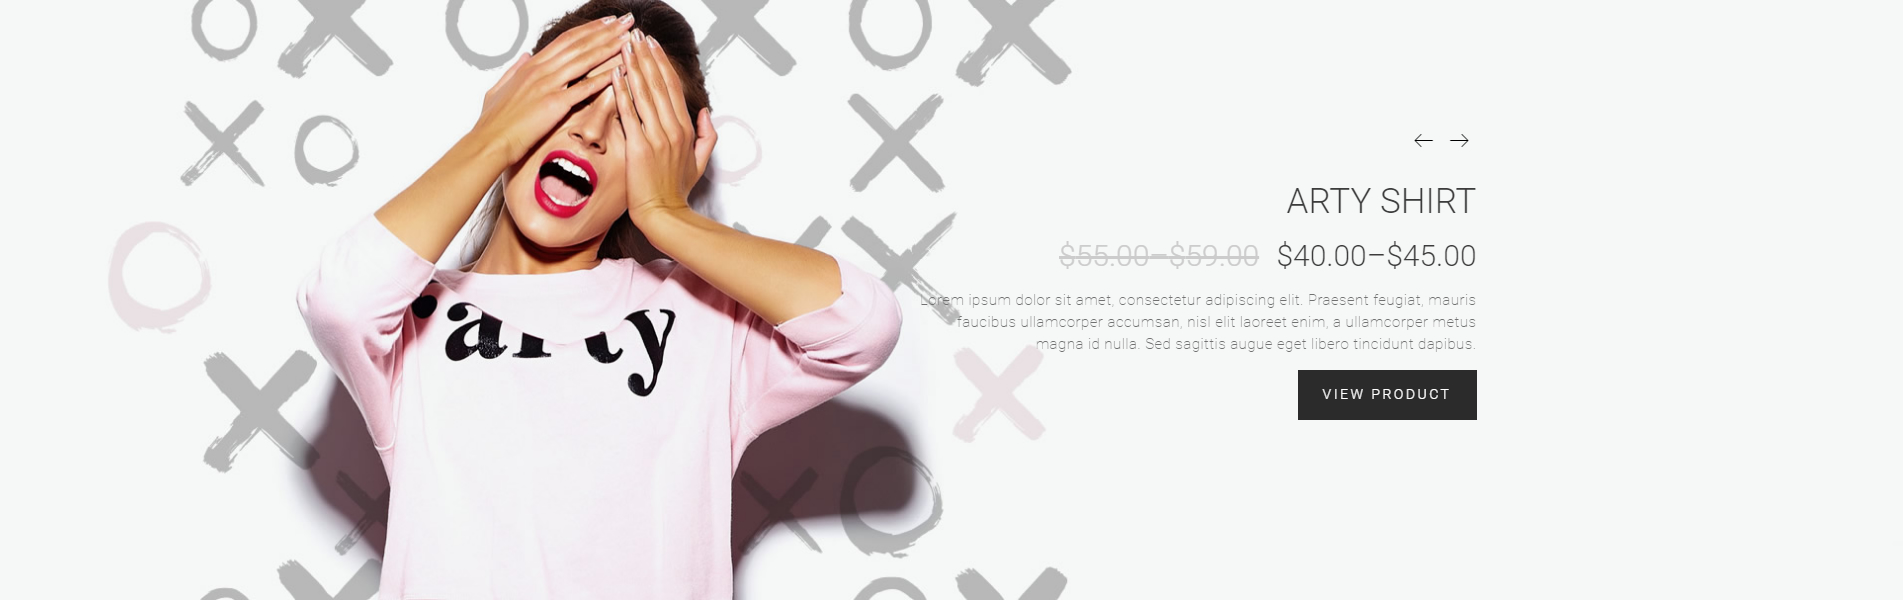
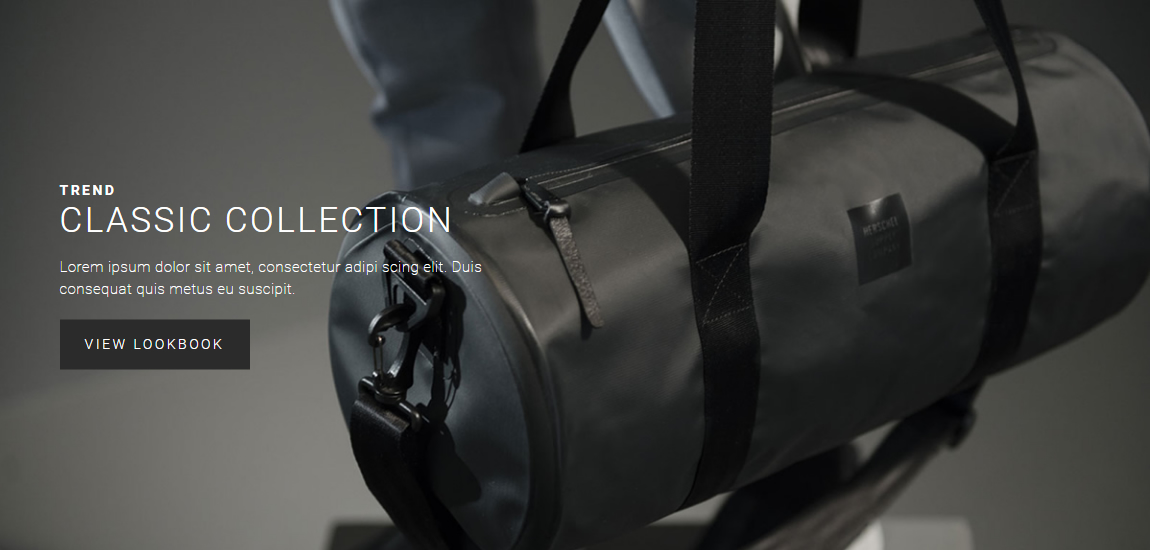
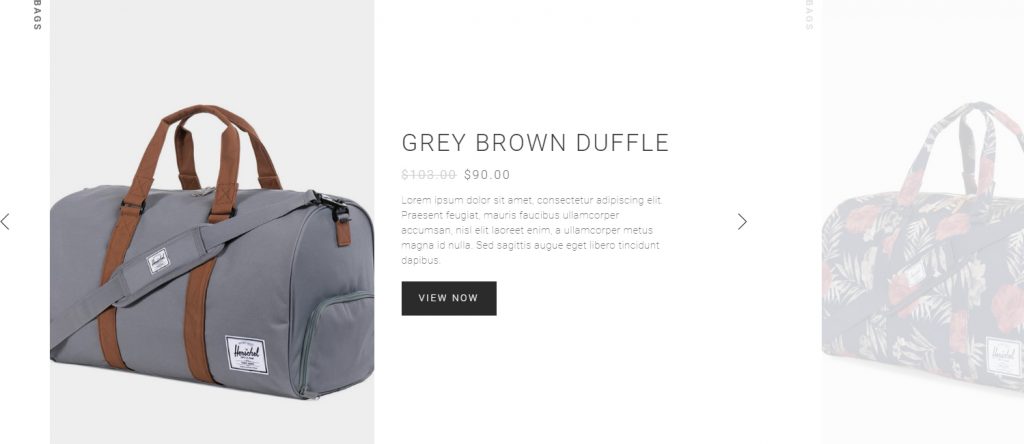
Add this if you want to showcase a product on you home page.
Firstly, go to that product. (Products in your WP sidebar)

Now add a promo slide image. Make sure this image is about 2000px wide and that the right half of the image is nice and clean for text to display.
Save/Update this product
Now go to the page where you want to add this slider
Add the promo slider element and add the products by start typing the names of the products you want displayed in the slider.
Hit save
You can make this a full screen width element by doing the following
Click on the edit button of the row container
A Row Settings popup will appear and change it from “Default” to “Stretch row and content”
Just type the product names you want to display and save.
Front end preview:
Add a modern launch pad to your website.
Settings available in popup:
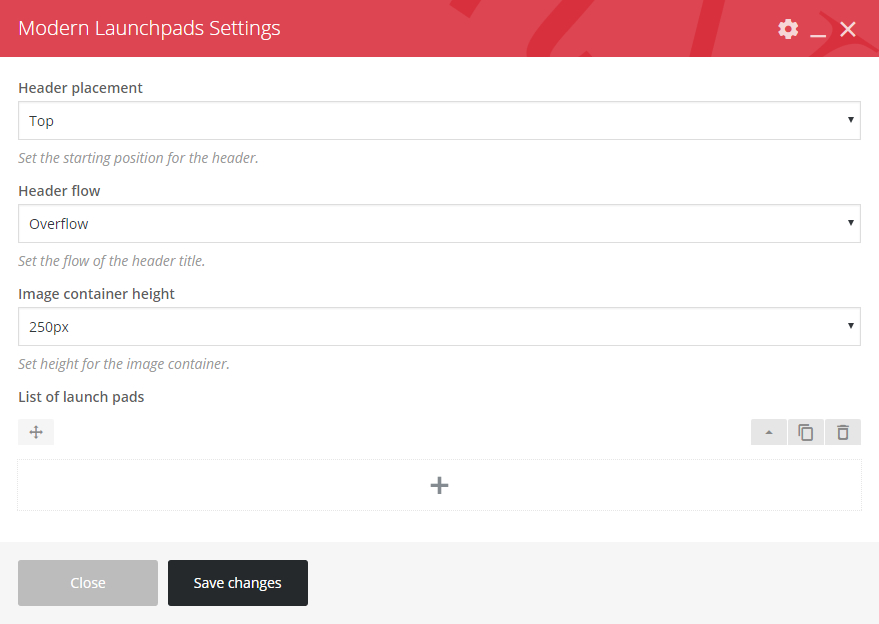
You can add as many launch pads as you want, however if you add more than 4 it defaults to a 3 per row layout.
Front end preview:


The featured content element allows you to promote content with a stylish layout, you can add the following data in the element popup:
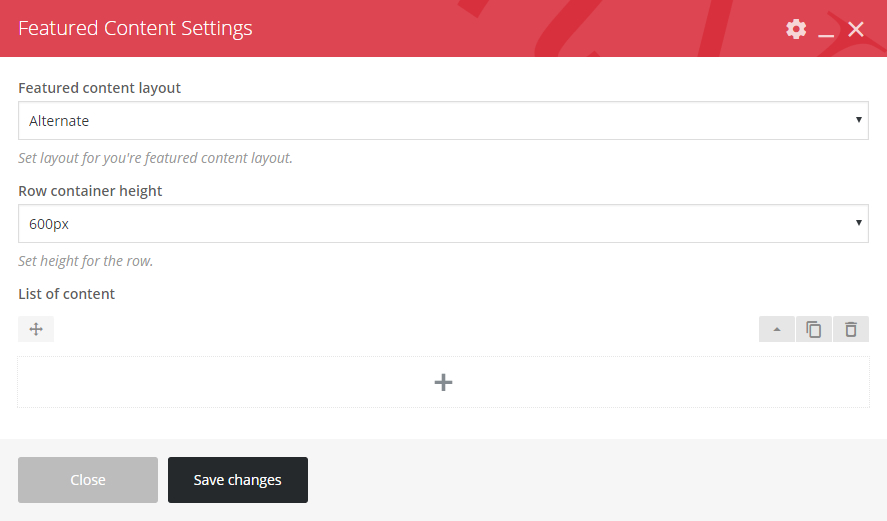
Front end preview:
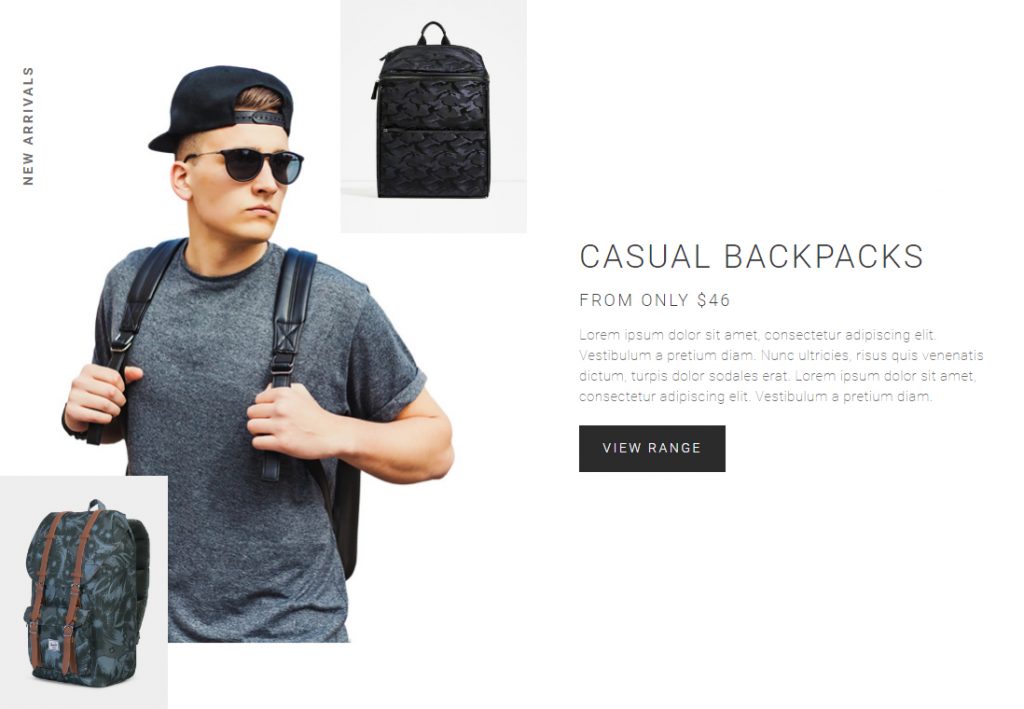
Mosaic promo allow’s you to add rows of custom content with a stylish design and alternate layout.
Settings available in popup:

Front end preview:
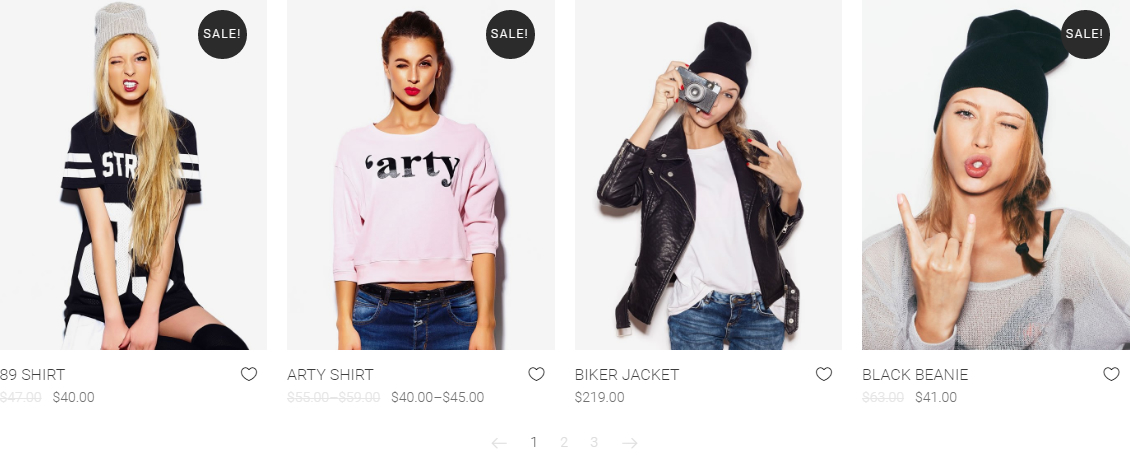
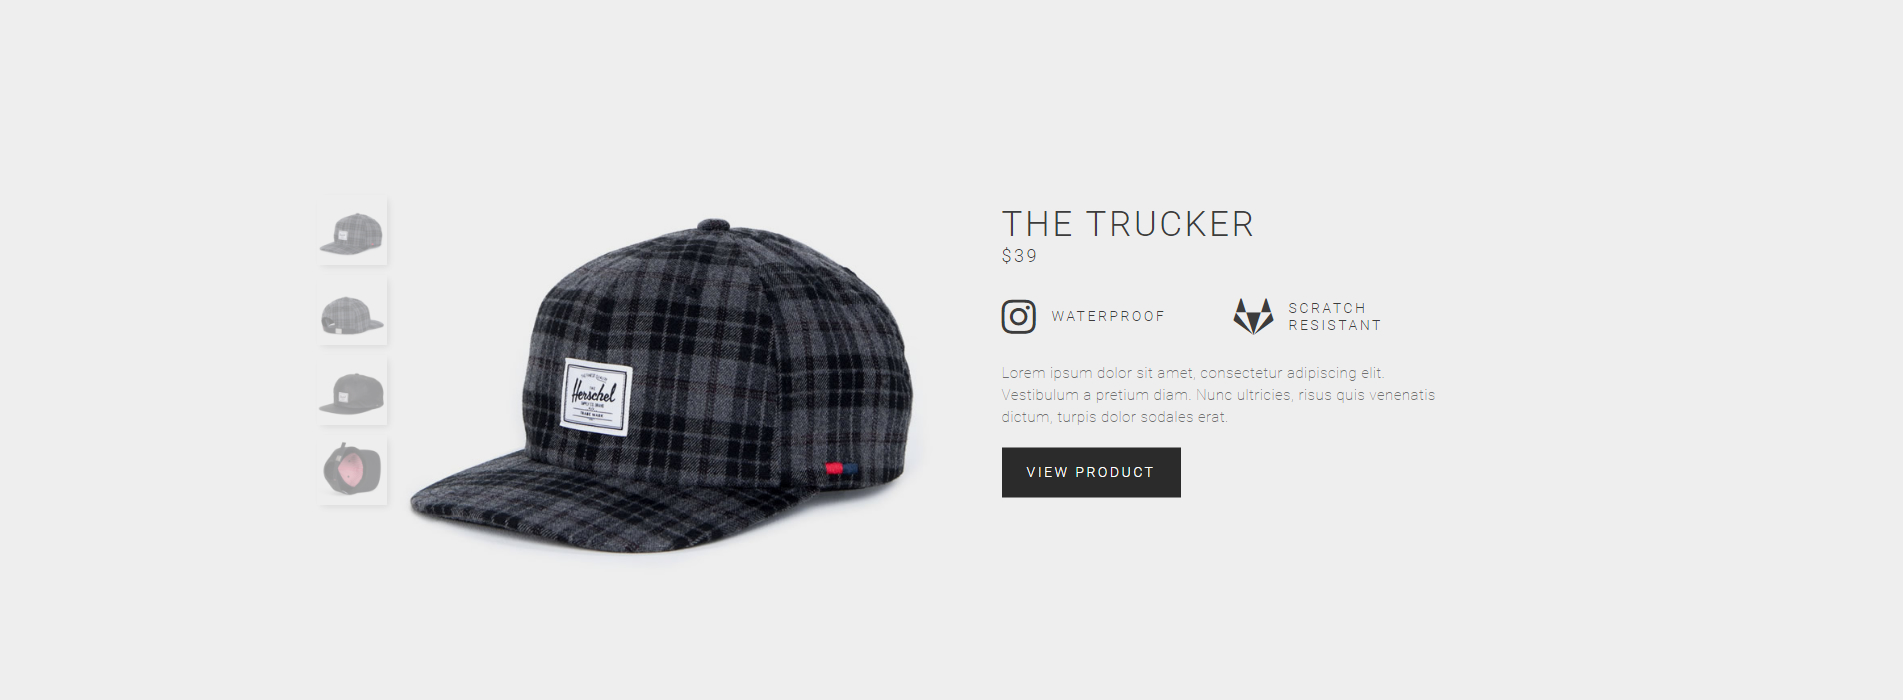
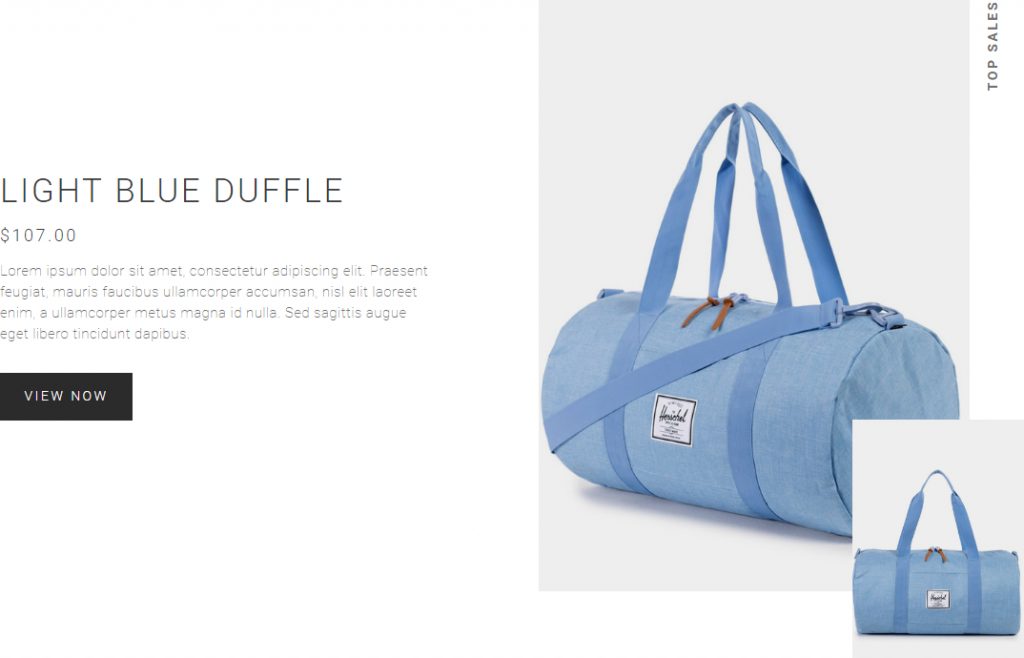
Our modern product slider element allows you to connect to WooCommerce and create a beautifully designed slider from and array of options in the popup.
Settings available in popup:
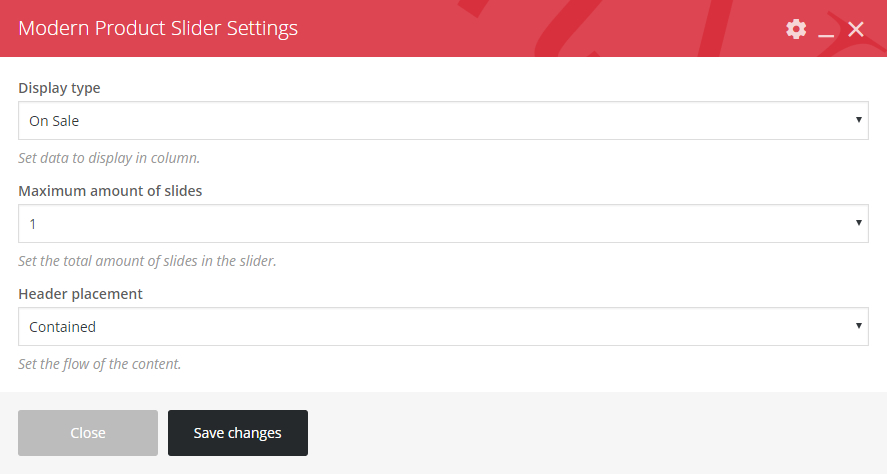
Front end preview:
![]()
Content icon element allows you multiple columns of custom content and icon.
Settings available in popup:
![]()
Front end preview:
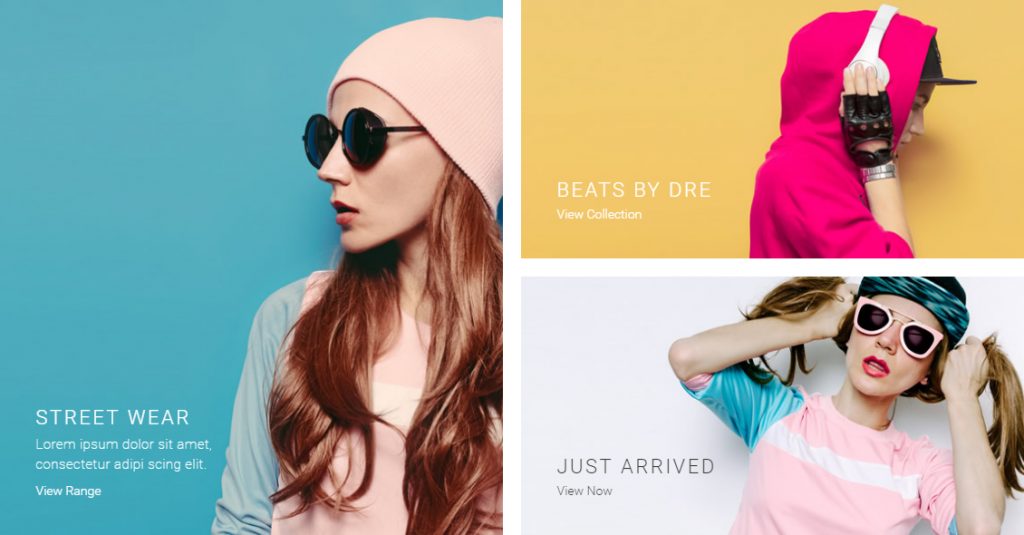
Mosaic product list element allows you to connect to WooCommerce and create a beautifully designed mosaic layout of selected filters.
Settings available in popup:
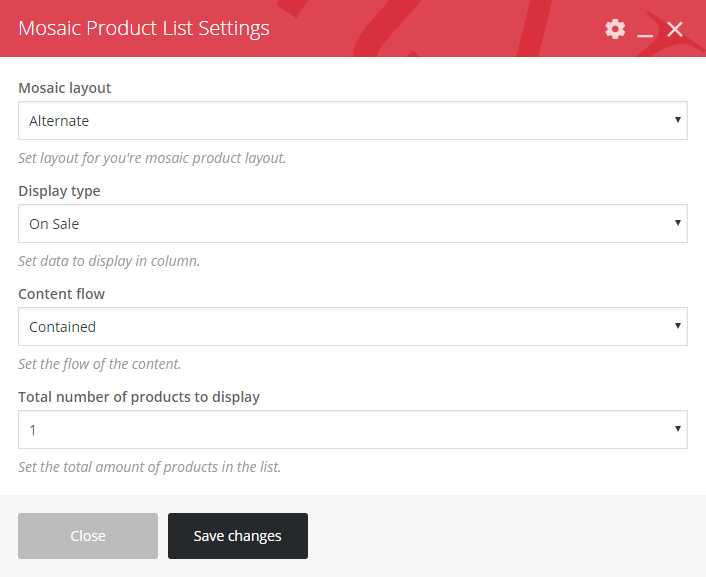
Front end preview:
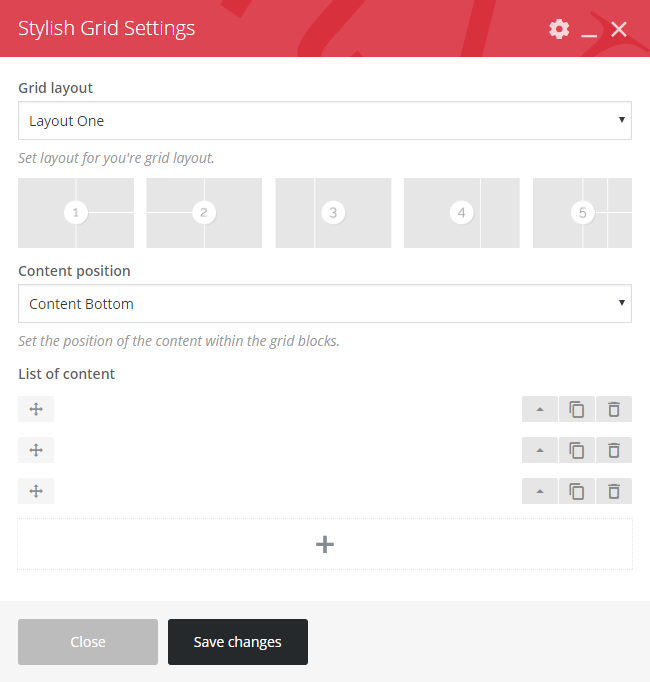
Stylish grid allows you to create beautifully designed layout, you will have a selection of several different layouts.
Settings available in popup:
Here we’ll help you set up pages similar to the InVogue demo site.
Go to the your Home page in the WP backend
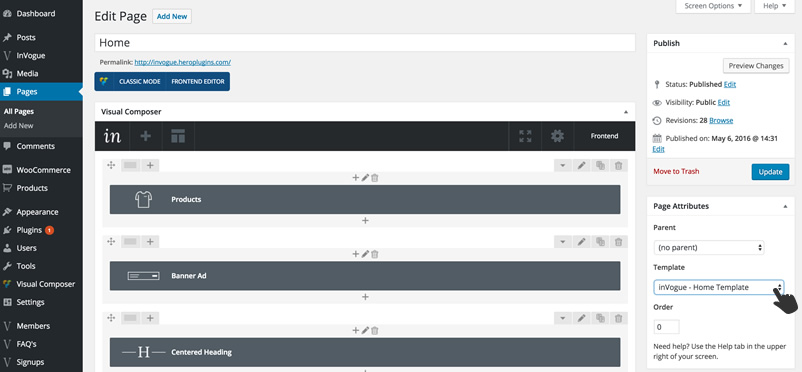
The right hand column of the page will have a Page Attributes panel where you have to set the “Template” to “InVogue Home”
Activate the demo content
Go to your InVogue settings panel and open “Demos”
Choose the home page and then choose the home demo you want to activate
Please note that this will overwrite all other content on this page
Hit save
Go back to your Home page in the backend and you will now see all the content have been added.
Please also note that you still have to now go and add your own content like products, posts, images etc. This is purely adding the structure from our home page demo.
Click on the Backend Mode button
Your page will look something like this
Hover over each row and edit each of them by clicking on the pencil button to open the relevant popup.
Keep another browser tab open with the frontend view of this page and flick between them to see your changes.
Slider setup
Go to your InVogue settings panel
Browse to Home Slider
Now add your slides and add some text and images
Save your settings and this will now be reflected on your home page
Go to your home page and in the right hand side you will have to set the template to the Home Template
Start off by adding your members. See People Profile below
Create an about page under “Pages” in your WP side bar.
On this page, go to Page Attributes in the right hand column and choose the InVogue About Template.
This will now pull in all the profiles from the Members section
Use the WPBakery Page Builder to add more content to this page if needed
Browse to “Members” in your WP sidebar.
Add new member
Add a name at the top of this page
Add an Excerpt further down the page. This will be used as the introduction content.
Member Details
Add Position/Title
Add a background image
Add a signature if you want to be fancy☺
Set the colors for your heading text and social icons
Add a URL next to the social icons that you want displayed
Hit save
Now you have a basic profile page
You can add extra content by adding elements if needed.
Adding extra content on this page
Use the backend editor to add more content on your page
Add a content title element and then a text block element and maybe a blog element below
Please see the element documentation if you are unsure how to do this
Add simple products and assign to category
Watch Video
Grouped products
Watch Video
How to add variable products (E.g. size and color)
Watch Video
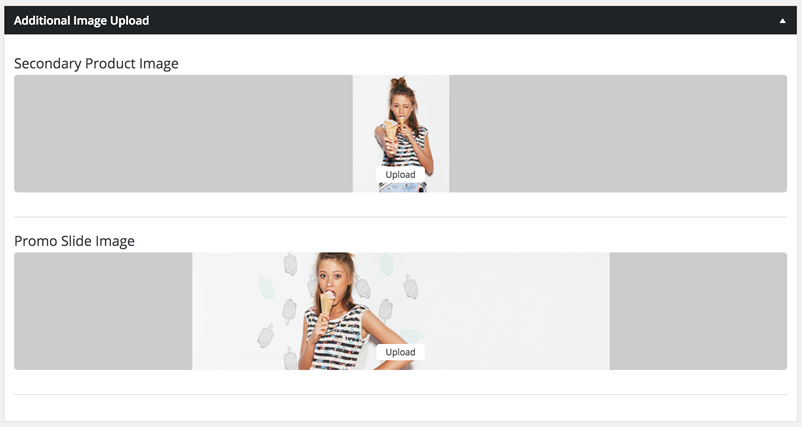
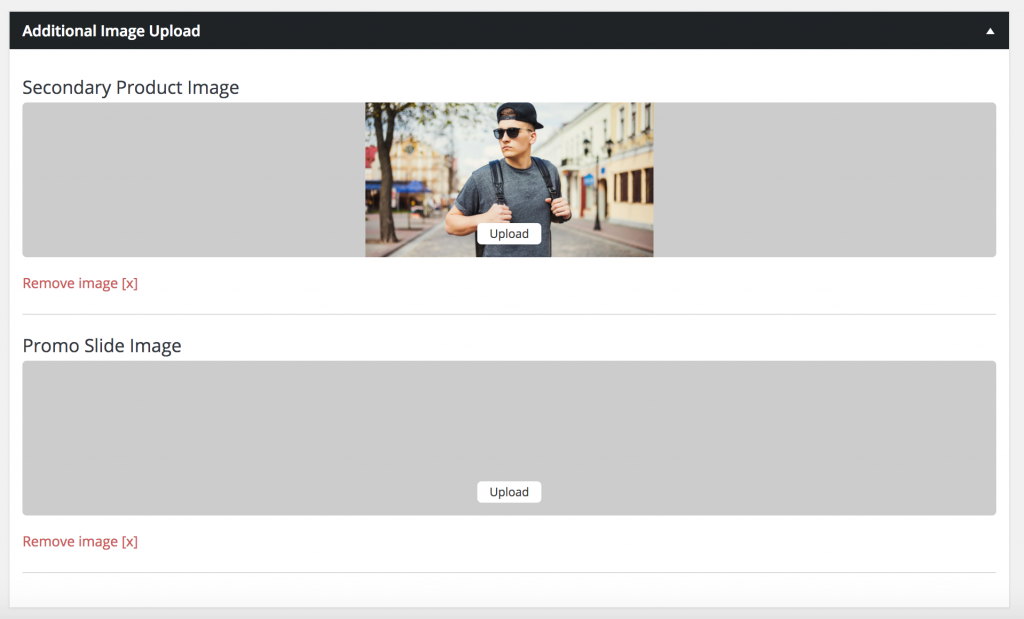
How to add a hover image for products (Secondary product image)
Browse to Products in your WP sidebar
Open one of your products
Assign a “product image” in the right hand side of the page and then
Scroll down the page and add a “Secondary Product Image” under “Additional Image Upload”
How to assign filters and widgets to your shop sidebar
Watch Video
How to set my currency and country
Watch Video
PayPal
Watch Video
Coupons
Watch Video
Shipping
Part 9 – Shipping Settings Watch Video
Part 10 – Shipping Settings – Flat Rate
Part 11 – Shipping Settings – Free Shipping
Part 12 – Shipping Settings – International Flate Rate
Part 13 – Shipping Settings – Local Delivery
Part 14 – Shipping Settings – Local Pickup
Checkout Settings
Watch Video
Please view an extended list of WooCommerce video tutorials from WooThemes
Watch Video
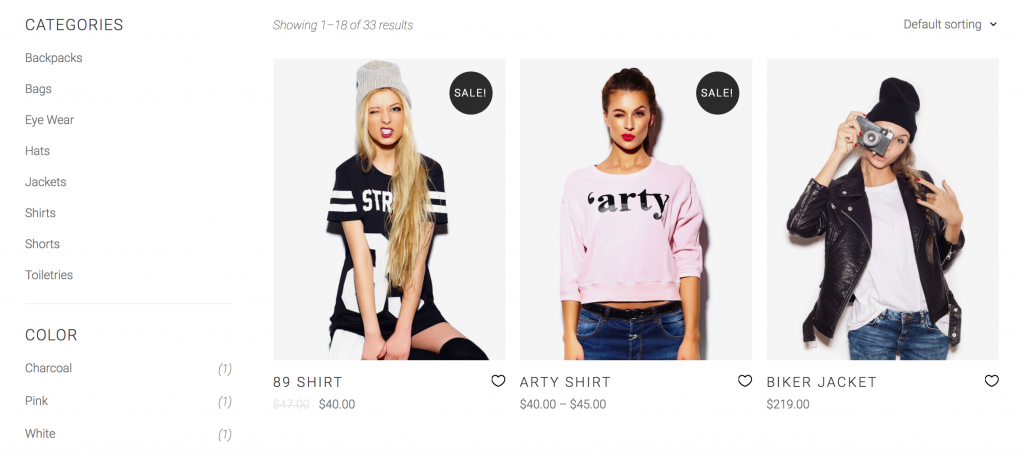
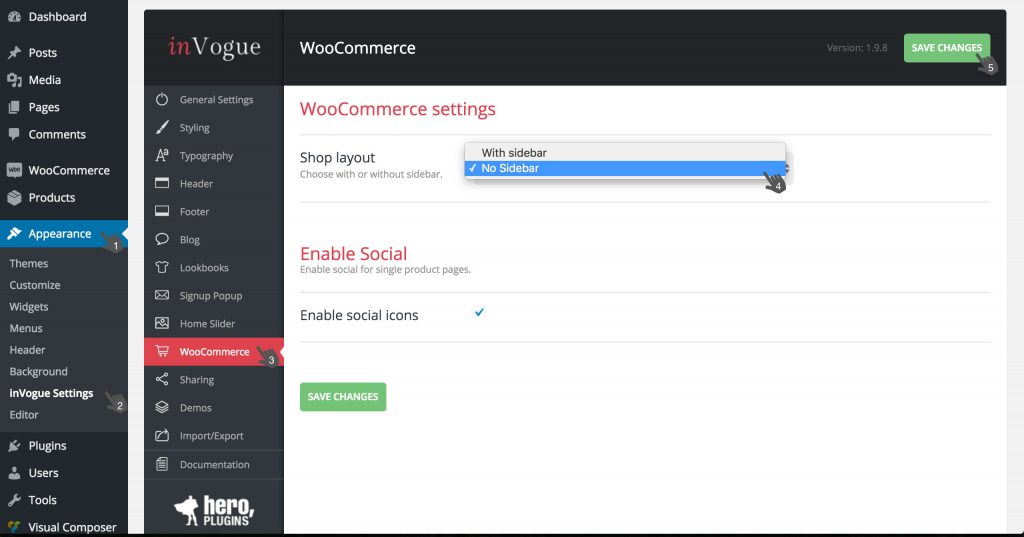
To switch on a sidebar on your shop page, browse to your WP backend, browse to Appearance / inVogue Settings / WooCommerce and set your Shop Layout With Sidebar.
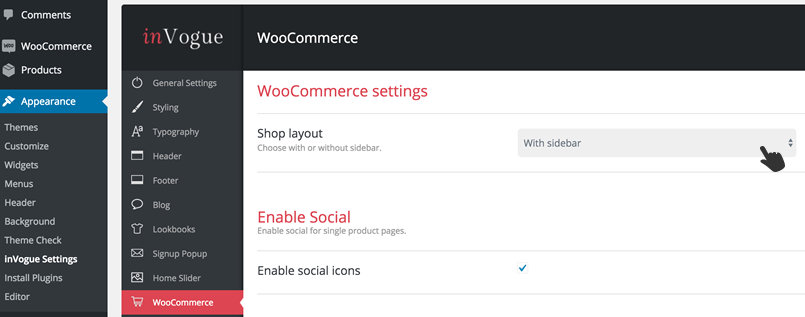
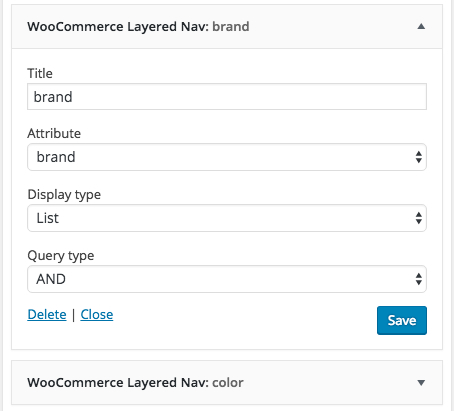
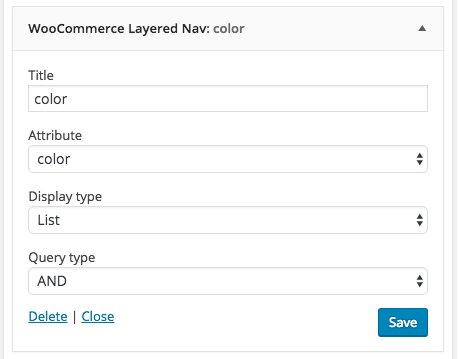
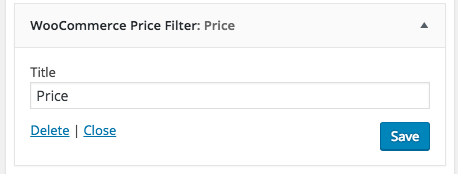
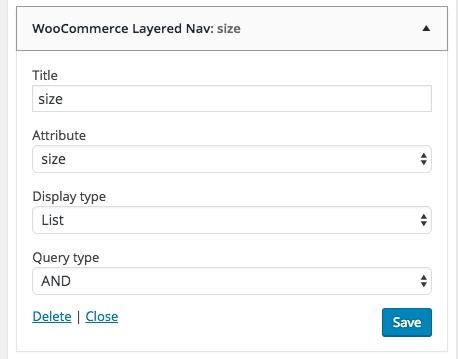
Once this is done, you can assign widgets to that sidebar. Browse to Appearance / Widgets. On the right hand side you will see a Shop Sidebar Widget. You can now drag WooCommerce items from the left into that widget area as shown below.
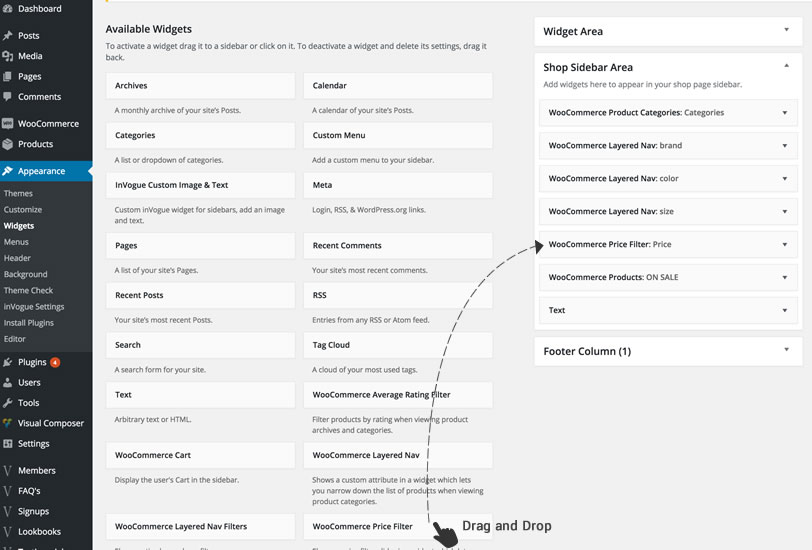
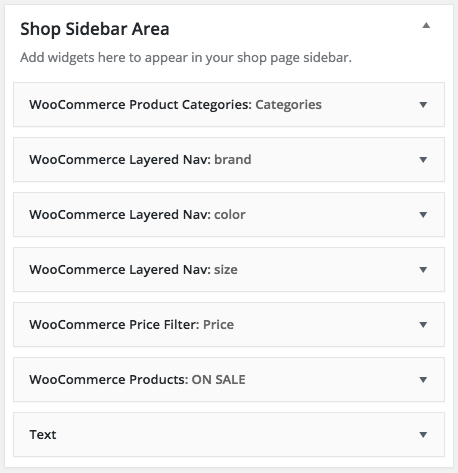
Have a look at the images below to see the exact widget structure that is shown on the inVogue demo website.
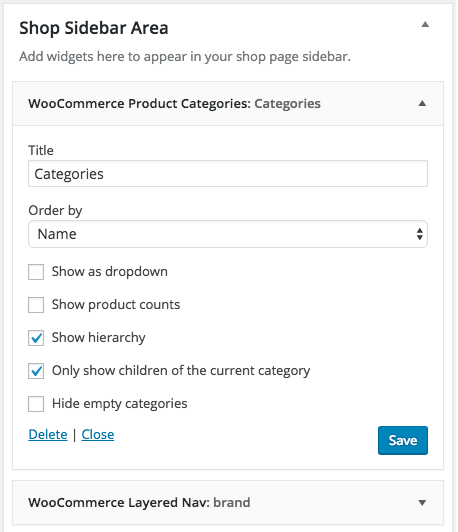
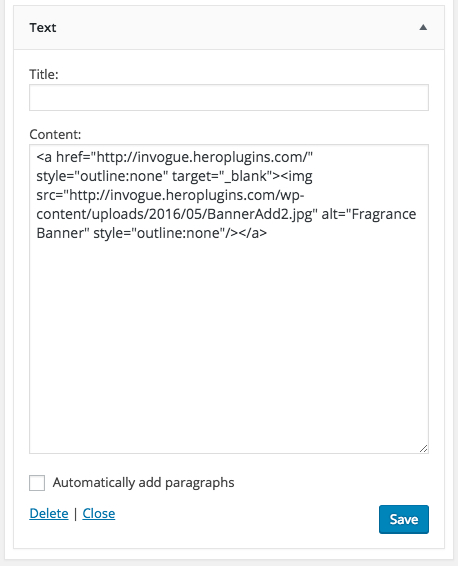
To add a banner image, use the Text Widget do do so. Upload n image to your Media Library first and reference it in the same way that we have done here.
WooCommerce 3.0 includes the following updates.
More details on the new gallery update.
With the new gallery, inVogue has removed the use of the mega zoom function. This is now built into the WooCommerce gallery and will be the standard moving forward.
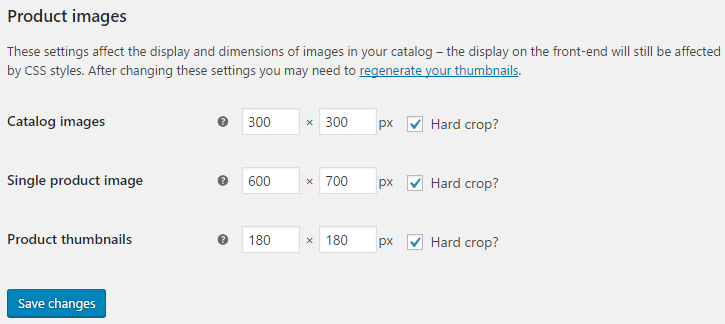
For best results, set the single product image size to: 600px X 700px
Once you set the new product image sizes and update, you will have to regenerate your thumbnails.
General Settings, Styling, Typography, Header, Footer, Contact, Blog, Newsletter, Home Slider, Testimonials, Woo Commerce, Demo activation
Add your Favicon
Change 404 page details
Add custom code
Accent Colors – These will be available throughout the site to use as your accent colors.
Button Styling – Here you can set the color for all buttons on the site. Set your own font, font color and button background color.
Tags, Block quote styling can be done as well. Change color and fonts for all of these.
The default fonts and font colors should be perfect for any brand and site that you want to build, but we also give you the opportunity to change all fonts of the theme.
We’ve included all Google fonts and you can assign one of 4 accent colors to any bit of content on the site. Accent colors can be done under “Styling”.
A lot of these fonts get used in more than one place; so make sure you check all pages after you have made your change.
Set your navigation layout to include an eyebrow above your navigation or not.
Logo – Add your logo to the navigation. Make sure you upload it at about double the size you want it to display, to make sure it looks nice and crisp on all retina devices.
Sticky logo – You can upload a different logo for you sticky navigation if you want. Uploading the original logo is also fine.
Mobile Logo – Upload a smaller or less detailed logo here for your mobile navigation.
Layout Options – The following can be switched on or off – Login, Cart Icon, Wish list Icon, and Search Icon
Color and font settings for the full navigation can also be set here.
Social icons can be switched on. Set the primary color and hover color and choose which icons you want to show.
Choose your layout – You can choose to include columns with dynamic data or just a thin footer with some copy write info and maybe a list of your pages.
All text and text colors can be changed here. You can also change the footer background color.
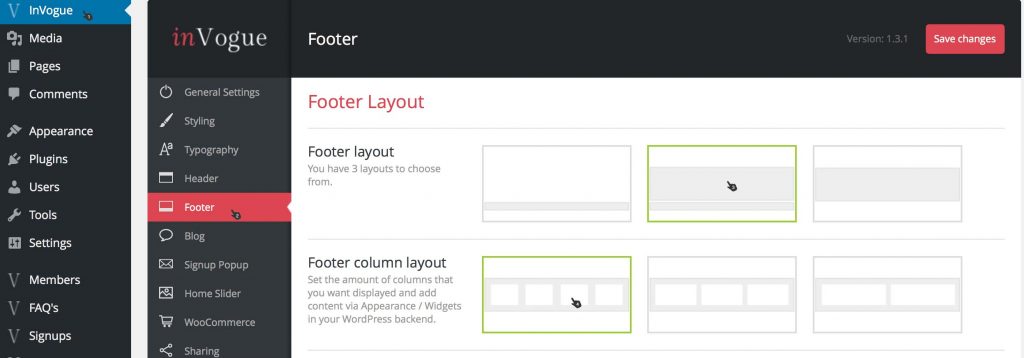
Setting up your footer layout
Choose footer layout 2 or 3
Choose a footer column layout. Our demo site includes 4 columns, so we chose layout 1.
Save
Adding content to your footer
Now browse to Appearance / Widgets in your WP sidebar.
You will see the four widget areas on the right hand side of this page(Called Footer Column 1 – 4)
You can now drag items from the left into the widget areas on the right.
Set the following
Sidebar, no sidebar
Enable tags
Enable author’s bio
Enable social icons
Activate a signup popup.
Assign it to any page of your website.
Get people to sign up for your newsletter
All data will be stored in your WP database
This can be found under “Signups” in the WP sidebar
Exporting of this data can be done via InVogue/ImportExport
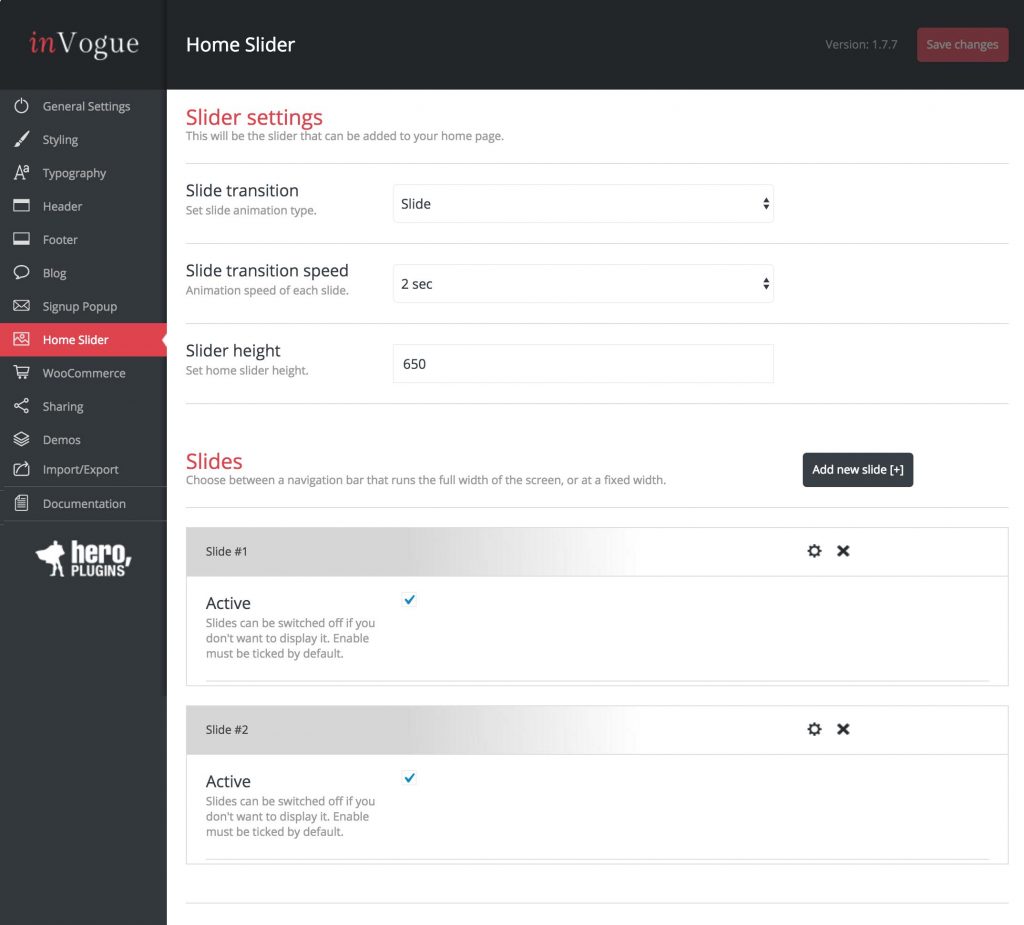
Here you can set up a slider to be used on the home page of your site
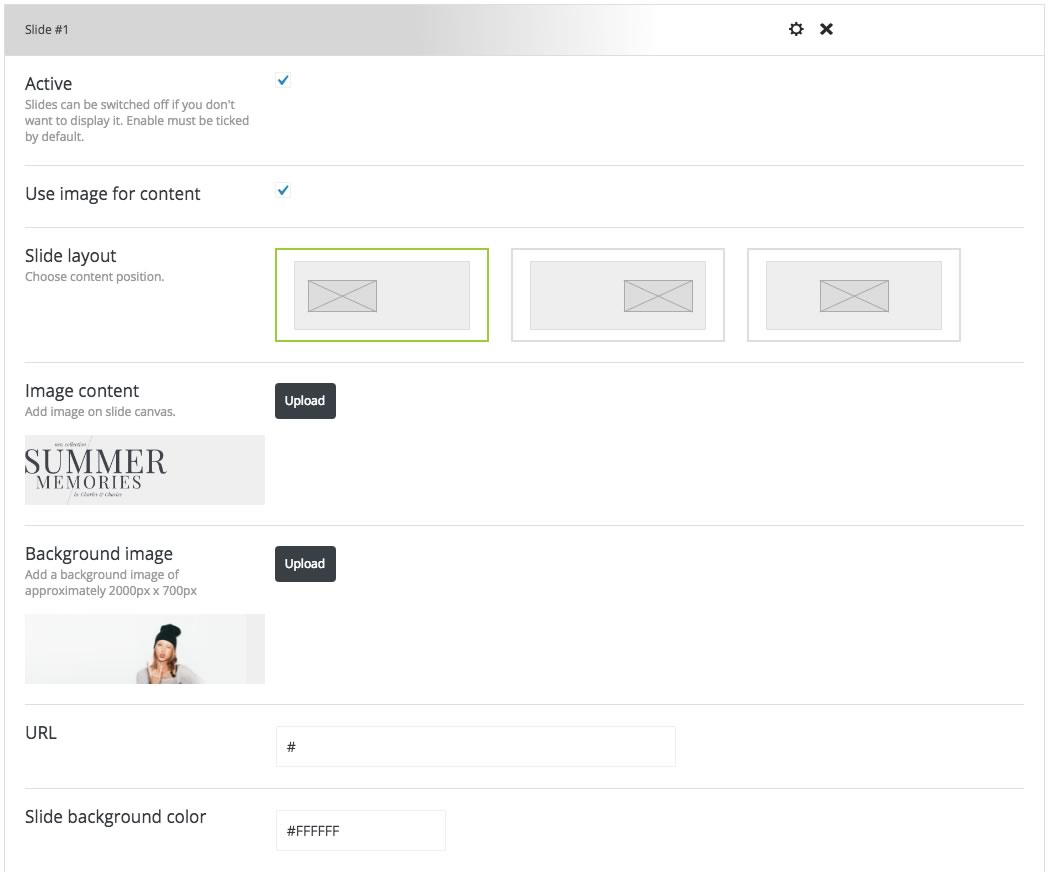
Add a few slides and edit them individually at the bottom of this page.
Choose if you want to use images only or add your own text
The fonts can be set under the “Typography” page
You can enable a sidebar for your products list page if needed
You can also enable social icons to be displayed
These icons can be set under the “sharing” tab
Here you can select which icons you want displayed on the relevant sections
Please note that you still have to enable it on the relevant setting page to display.
Products – Go to the WooCommerce tab to enable
Blog – Go to the Blog tab to enable
This can be used to import style settings from one install to another. Say for instance you work on a dev server and there’s some changes and want to now include them on your live site, then you can do the following.
Click on “Generate Export Options”, copy everything from the box.
Go to your new/live site and paste this into the import box and click on “Import Options”
At default all pages will have a clean white top section with the page name in the middle.
You can change this by adding a header image with custom content.
You can achieve the by doing the following:
Go to the page in your WP backend
Scroll down the page to the bottom where it says “Header Settings”
Here you can choose to have a background image or just a blank area
You can set the height of this area and add you own custom title and excerpt
The header will use the global H1 style. Can be set under “Typography”.
You have the ability to override the color of your global H1 color by adding a Header Font Color at the bottom of this page.
On the lookbooks page we have a fancy heading with skew text in the background.

Start off by going to the page in your WP backend.
Scroll down to Header Settings
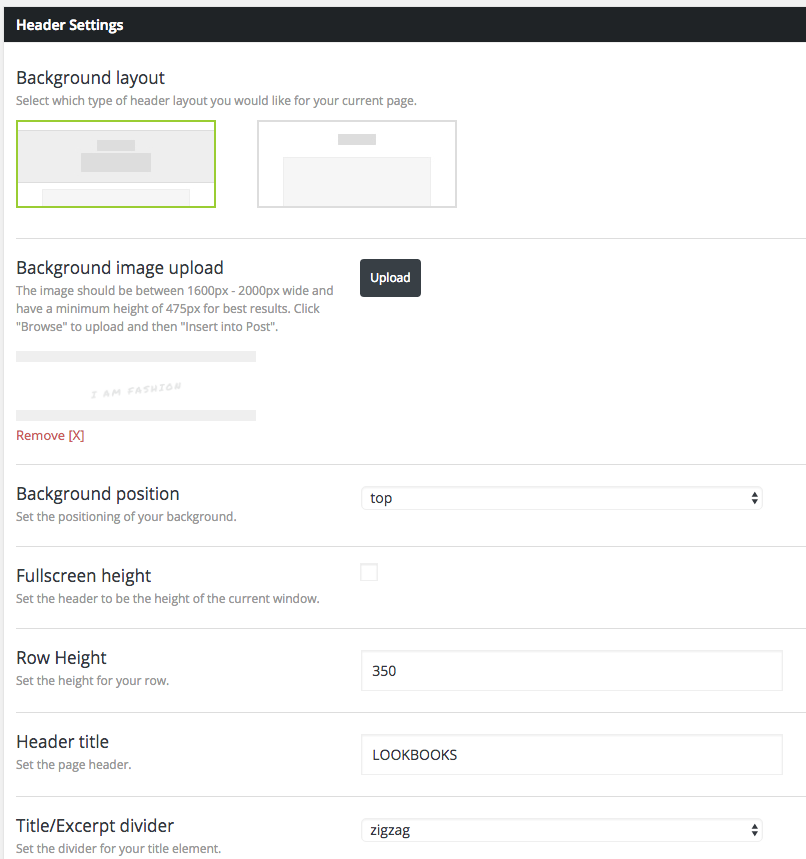
Select header layout one on the left
Upload a white background image with your words typed on the background.
Add a row height of 350
Add a Header Title and a Divider and Sub Title
Hit Update and you should be done
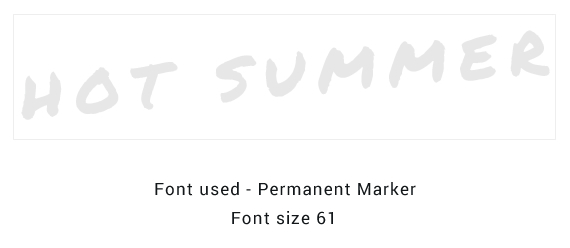
Here’s an example of what I have done to get the right effect.

Download Google font “Permanent Marker” and type out your words on the blank canvas and export your canvas at 72dpi, 2000px wide, 400px high.
Start off by setting up a few slides
This can be done via your inVogue settings panel
This can be found here – Appearance / inVogue Settings / Home Slider
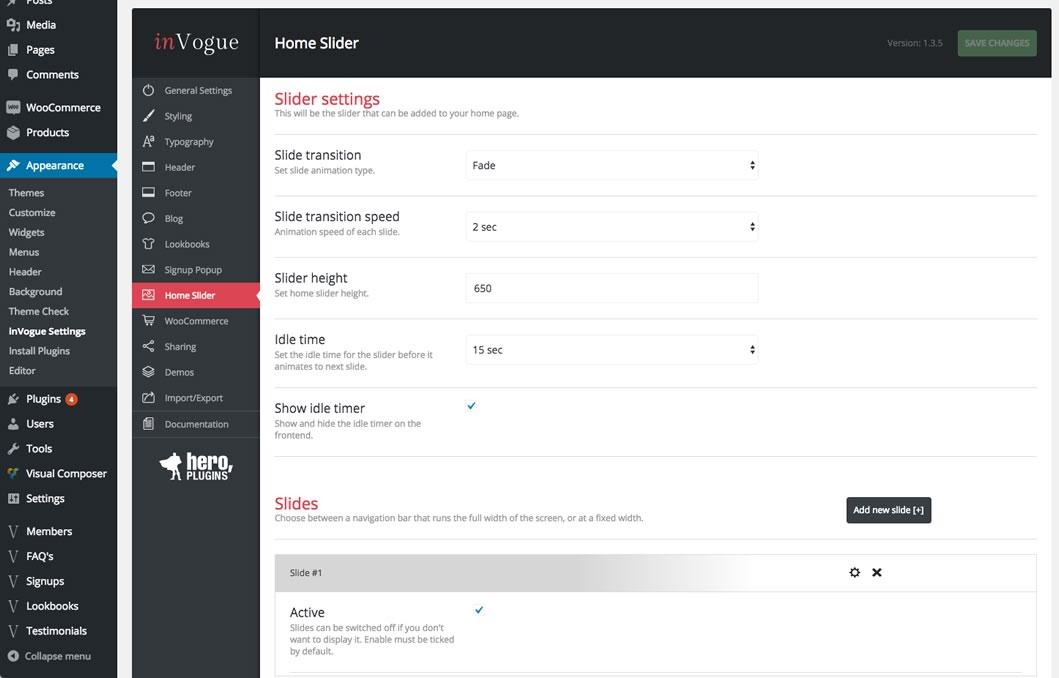
Add a few slides and edit each by adding your own images and/or text
Once happy with your slides, browse to your home page in your WP backend
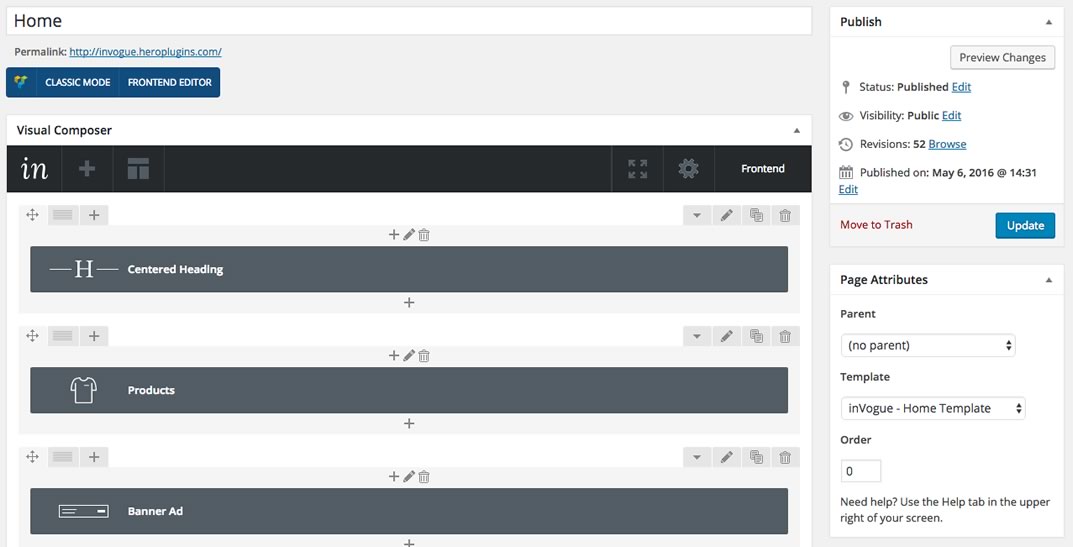
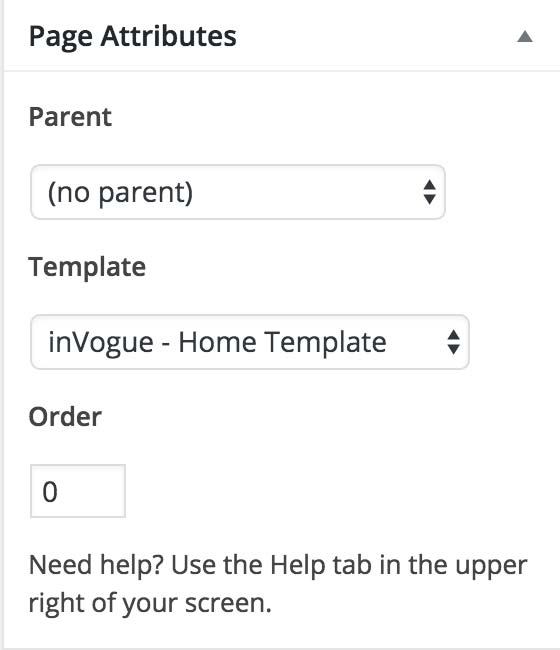
In the right hand column you will find a Page Attributes Panel
Here you will click on the Template dropdown and select “inVogue Home Template”
Update your page and the slider should now be active in the frontend
We are using an Extended License for WPBakery Page Builder that is bundled within inVogue, so there’s no need to update it form your side. We will make sure that we update WPBakery Page Builder to the latest version with every big theme update that gets pushed out. You can then simply update your theme and WPBakery Page Builder will also be updated.
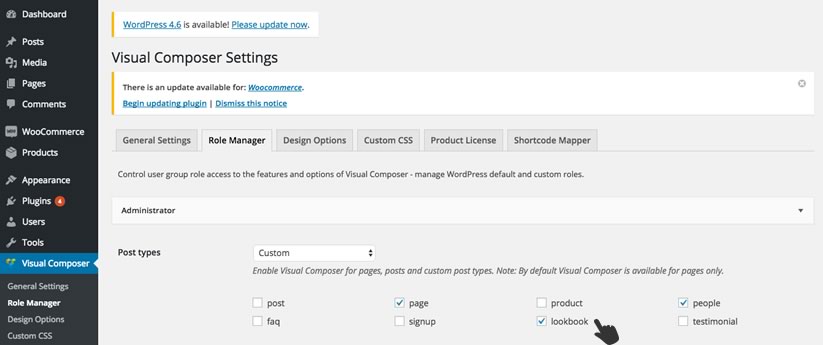
If you don’t see the WPBakery Page Builder Backend Editor button on a page in the theme backend, then you will have to switch on WPBakery Page Builder for that page.
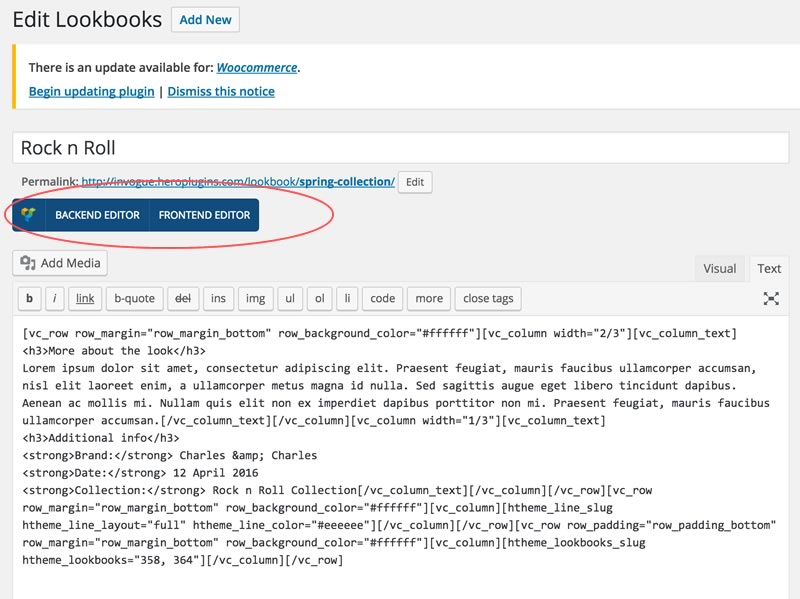
Browse to WPBakery Page Builder / Role Manager / Settings.
Select Custom from the dropdown list and you will now see a list of custom post types that gets used in the theme.
Here you can now switch VC on for that page as shown below.
Start off by creating a slider.
Once done with your slider, then copy the slider shortcode.
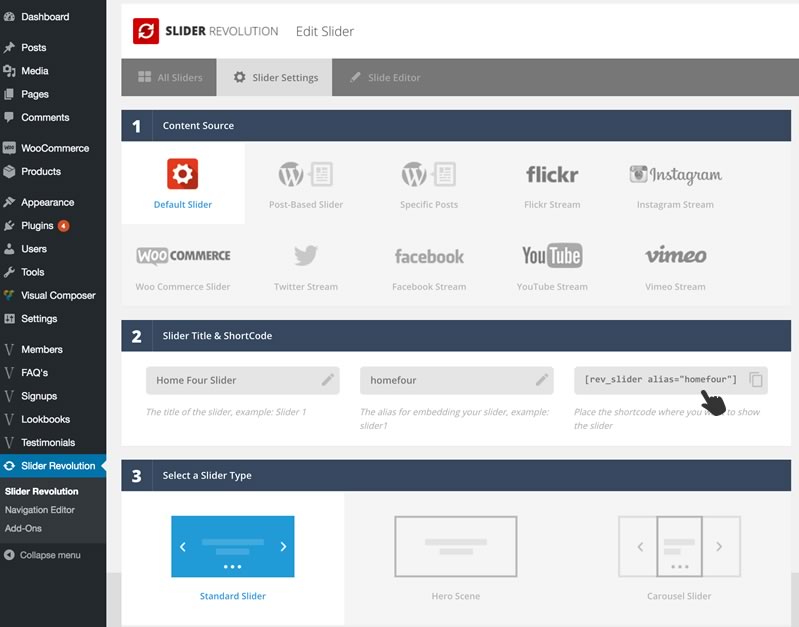
This shortcode can now be used as a page header slider, or just in the content area on a page.
Go to your page in the WP backend
Scroll right to the bottom of the page
Add the shortcode into the field called “Slider shortcode”
Go to your page in the WP backend
Add the slider by adding a Text Block
Now add the slider shortcode to the text block and Save.
You can also add the slider that you have done, by just clicking on the Revolution Slider button and you will see a popup with a dropdown where you can now select the slider from the dropdown and Save.

Start off by adding your content heading
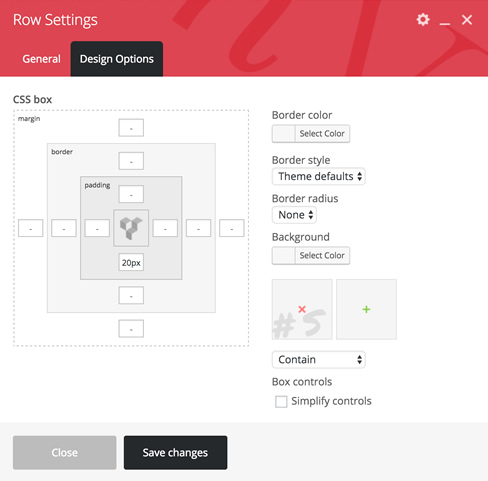
Then edit the Row Settings / Design Options
Add the background image that you have designed and set the padding as shown in the picture below.
The font used is Permanent Marker and is a Google Font.
Make sure the font is nice and light, color wise, so it doesnt clash with the other heading.
Export the text as a jpeg.
The inVogue demo uses the two row footer layout along with the four column layout for the main footer section. For each footer column in the main row a different widget has been used. For the bottom bar some text has been entered on the footer settings tab, the social icons for the footer have been enabled and a menu has been assigned to the footer:
Select the inVogue settings page from the WordPress admin panel and choose then Footer settings tab. From here you should select the second or middle ‘Footer layout’ and the first ‘Footer column layout’ option.
STEP 2: BOTTOM FOOTER BAR SETTINGS
While still on the Footer settings tab scroll down to the ‘Extra Footer Settings’ section. Here you can enable the ‘Footer copyright’ option and enter some custom text for the ‘Copyright text’ field and enable the ‘Enable social icons’ option.
Please note that the social icons used here are setup and enabled from the Header options tab.
You can now say save these changes.
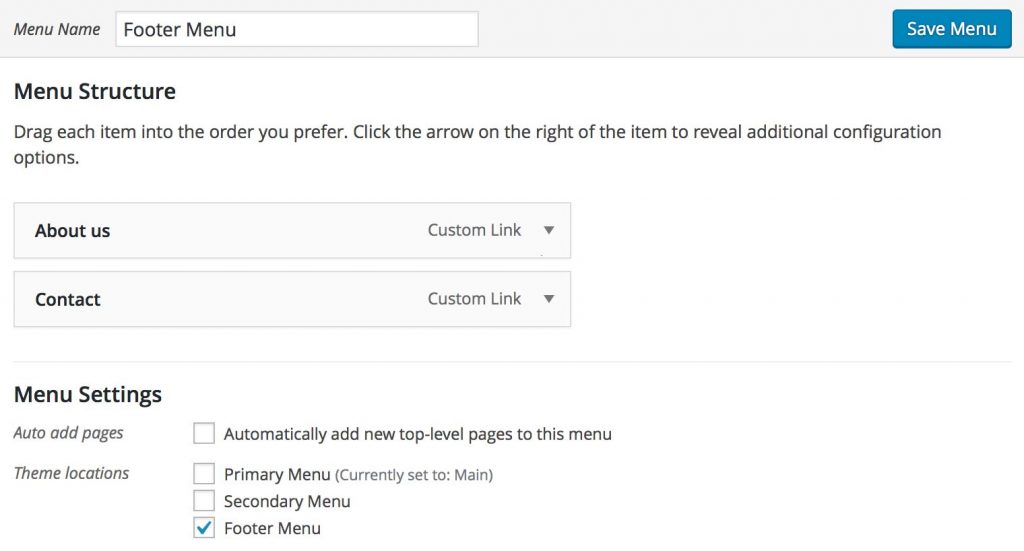
STEP 3: CREATE A FOOTER MENU
For a detailed outline on creating a new menu and assigning pages to it see our documentation here.
If you have already created a footer menu you can assign the required pages to this menu and assign the menu to the ‘Footer Menu’ location and then save this menu.
STEP 4: ADD IN THE FOOTER WIDGETS
First you’ll need to navigate to the ‘Widgets’ page located under the ‘Appearance’ dropdown within the left hand WordPress dashboard menu.
For the first column in the footer a ‘Text’ widget has been used. Widgets from the left hand ‘Available Widgets’ are can be dragged and added into the available widget areas.
Settings for the fist column are shown below:
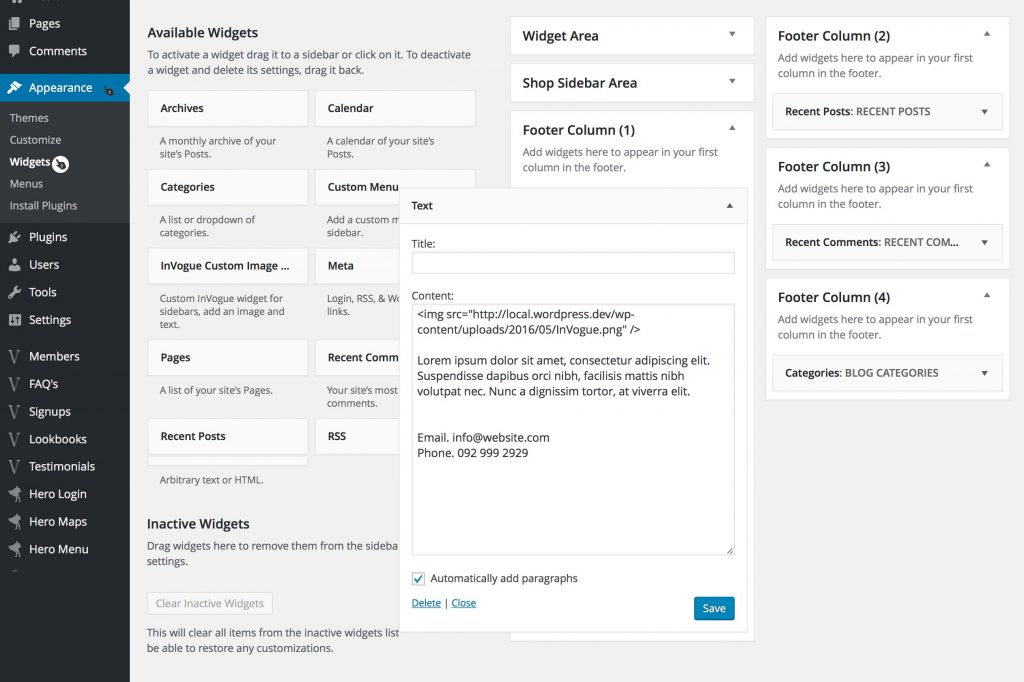
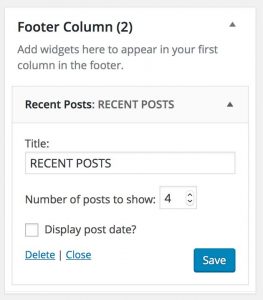
For the 2nd column a ‘Recents Posts’ widget has been used.
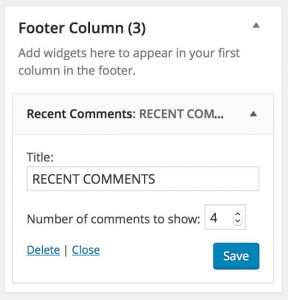
For the 3rd column a ‘Recent Comments’ widget has been used.
For the 4th column a ‘Categories’ widget has been used.
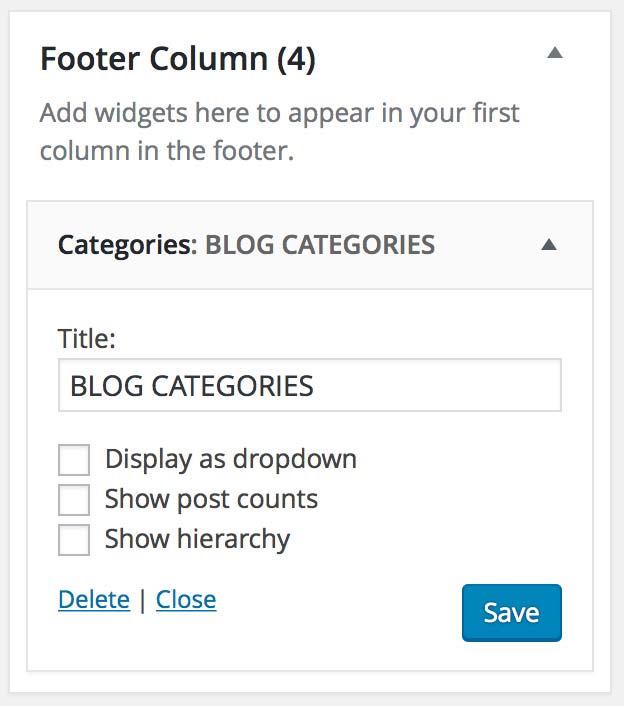
Please note that you’ll need to click ‘Save’ for each individual widget.
Once completed you’ll have a footer resembling out demo page.
The home page used within our demo can be easily re-created through the inVogue demo import option.
Please note that doing this will overwrite any existing content on that page so its advised to first create a new blank page; when creating a new page remember to assign the inVogue – Home Template to this page.
From the WordPress admin menu navigate to the inVogue settings page and then to the Demo tab. From here you will have the option to assign the structure of the home page to any already existing page. From the drop downs below the ‘Demo layout selector’ heading first select the page you would like the structure added to, in this example the page is named ‘Home’. From the second drop down select the ‘Home Default’ option to use the same structure as our demo page. You can then click the ‘Apply Shortcode’ button.

Note that this will create the structure of the page for you but will not use the same content as on the demo page. Section headings will be added in but all content such as products and posts will be from your sites content.
Once the shortcode has been applied, on the inVogue settings page, you can navigate to the Home Slider tab to create the slider which will be used on the home page within the header.
You can now navigate to this page and edit it in order to customize the content and change any titles and text.
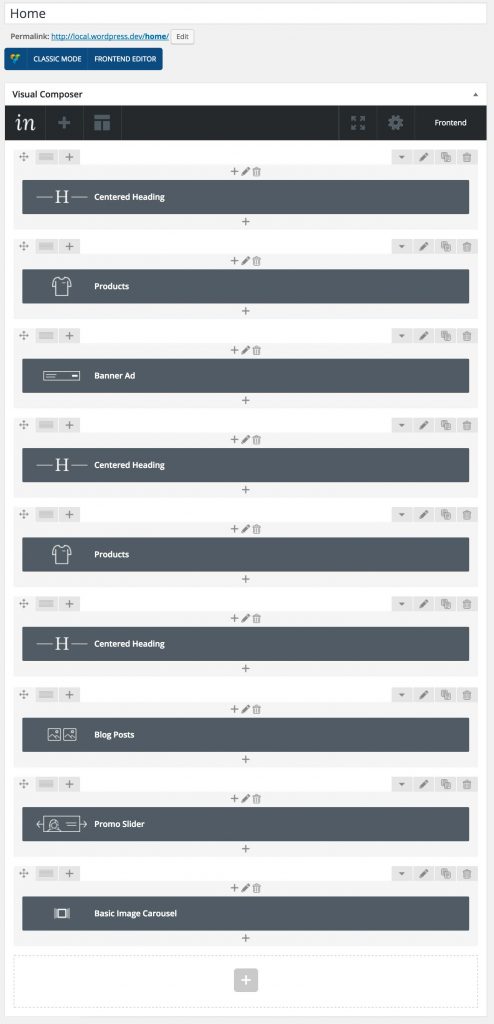
The sections used within the home page demo are, from top to bottom;
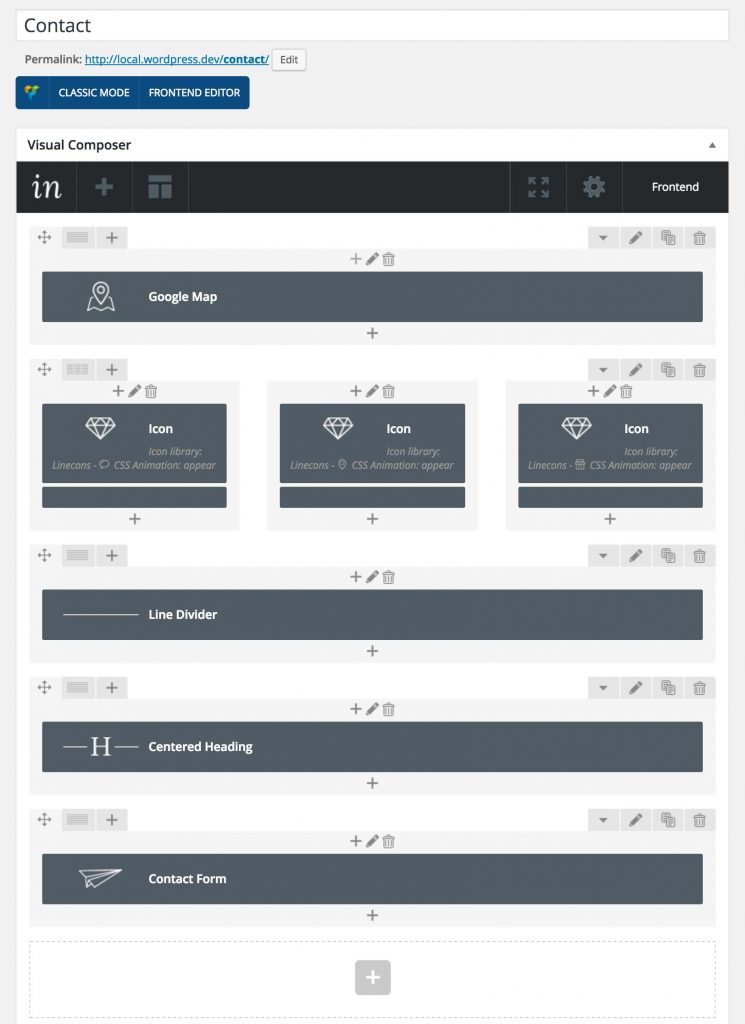
The contact page used within our demo can be easily re-created through the inVogue demo import option.
Please note that doing this will overwrite any existing content on that page so its advised to first create a new blank page
From the WordPress admin menu navigate to the inVogue settings page and then to the Demo tab. From here you will have the option to assign the structure of the contact page to any already existing page. From the drop downs below the ‘Demo layout selector’ heading first select the page you would like the structure added to, in this example the page is named ‘Contact. From the second drop down select the ‘Contact Demo 1’ option to use the same structure as our demo page. You can then click the ‘Apply Shortcode’ button.

Note that this will create the structure of the page for you but will not use the same content as on the demo page. Sections will be added in but it would still be necessary to add in the correct content.
Once the shortcode has been applied, on the inVogue settings page, you can navigate to the page to which the structure has been assigned to. From here you will be able to update the content on the page as required, i.e. setting the map pin location and contact information.
The page composer elements used for this page are, in order from top to bottom;
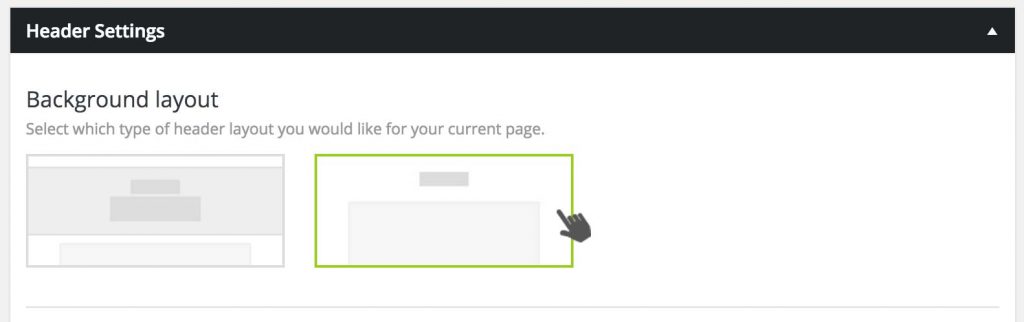
From below the page content section, within the ‘Header Settings’ section you will need to choose the second ‘Background Layout’ option.
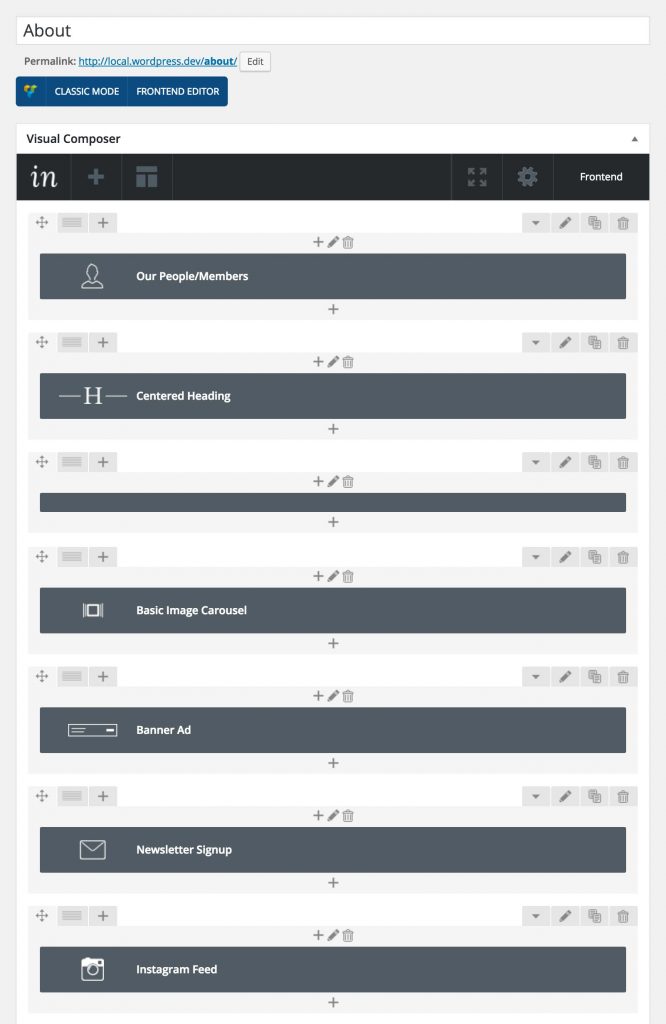
The about page used within our demo can be easily re-created through the inVogue demo import option.
Please note that doing this will overwrite any existing content on that page so its advised to first create a new blank page
From the WordPress admin menu navigate to the inVogue settings page and then to the Demo tab. From here you will have the option to assign the structure of the about page to any already existing page. From the drop downs below the ‘Demo layout selector’ heading first select the page you would like the structure added to, in this example the page is named ‘About’. From the second drop down select the ‘About Demo 1’ option to use the same structure as our demo page. You can then click the ‘Apply Shortcode’ button.

Note that this will create the structure of the page for you but will not use the same content as on the demo page. Sections will be added in but it would still be necessary to add in the correct content.
Once the shortcode has been applied, on the inVogue settings page, you can navigate to the page to which the structure has been assigned to. From here you will be able to update the content on the page as required.
The page composer elements used for this page are, in order from top to bottom;
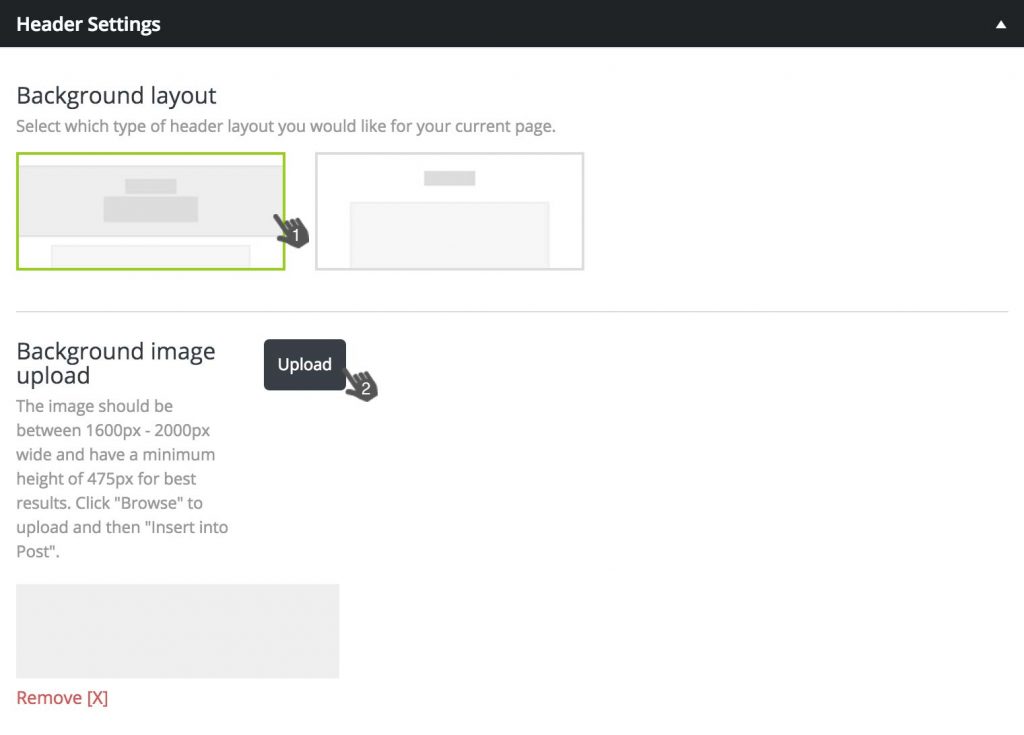
From below the page content are within the ‘Header Settings’ section you will be able to upload the image used for the header of this page. Here you can also add in a title and sub title to be added onto the image.
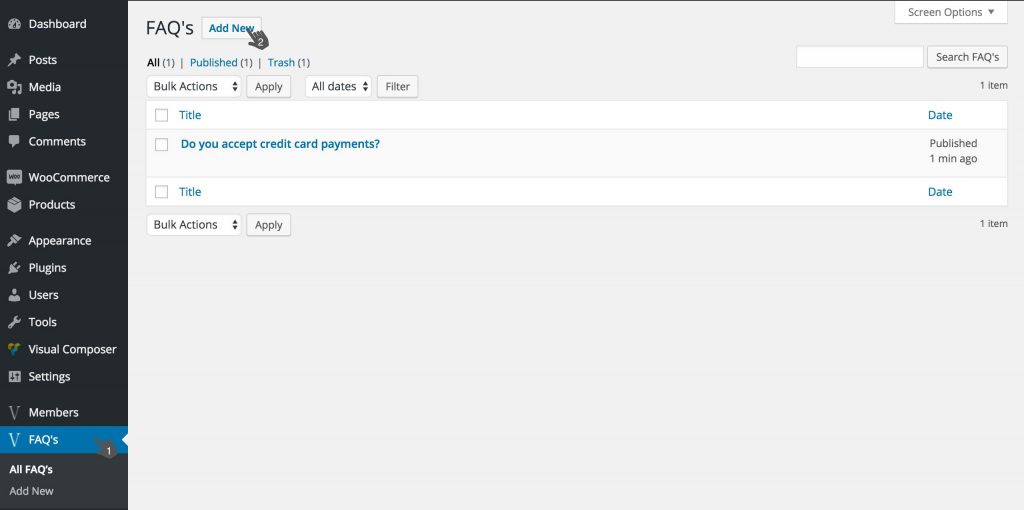
FAQ’s are created through the option available within the left hand WordPress admin menu and are then assigned to a particular page with a template.
You will first need to create an FAQ by navigating to the FAQ tab. From here you’ll be able to create new FAQ items or edit previously created ones. Start off by clicking the FAQ tab link and then on the ‘Add New’ button.
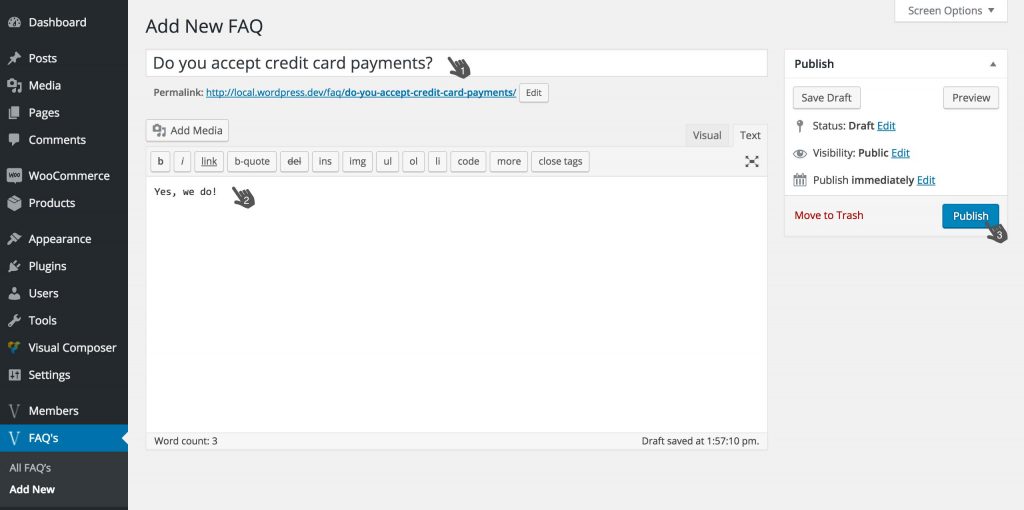
From this page you will be able to add in the content for a single question. The title section will serve as the question and the text that is visible first on the frontend before the accordion is opened. The content section below the title will be the answer for this question and is displayed on the frontend only once the question accordion is opened. Once the content has been added in you can now publish this FAQ. The same process can be repeated to add in more FAQs.
Once you’ve created the required FAQs you will need to assign them to a particular page. You can do this by creating a new blank page or using and existing blank page and selecting the ‘inVogue – FAQ Template’ from the ‘Template’ dropdown in the ‘Page Attributes’ section within the right hand column. Any content added to this page in the content section will be displayed below the FAQ accordion.

Once done your FAQs will appear on the designated page.
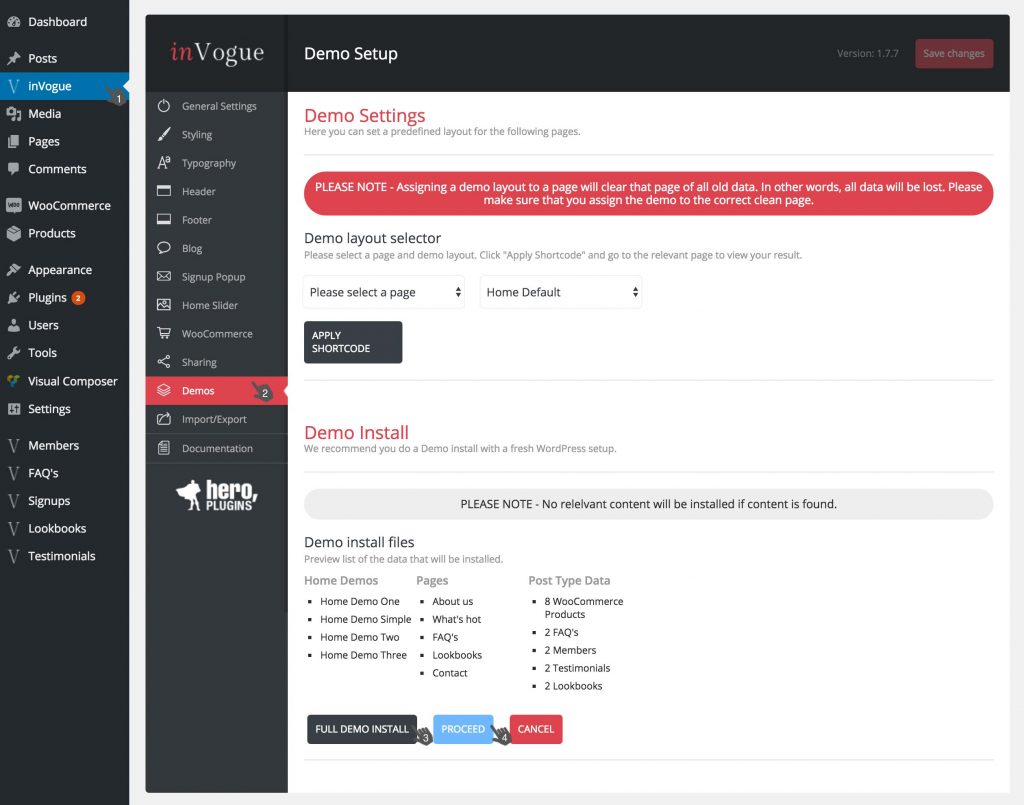
inVogue provides the option to import a demo site structure that can be used when creating a new site to quickly create sample pages, products, members and FAQ’s. Only sample text content is added and should be used as a guide only and should be changed.
We advise to only run the demo install on a fresh new WordPress setup and not on an already existing site with established content.
You can access the demo installation by navigating to the inVogue settings page through the WordPress admin menu and selecting the Demo tab. From here you can scroll down to the bottom of the tab and select the ‘Full Demo Install’ button and then confirm the demo import by clicking the newly shown ‘Proceed’ button.
We recommend to always run theme updates through the WordPress admin area rather than uploading the theme files manually. The latest theme version can always be downloaded from your ‘Downloads’ page on Theme Forest.
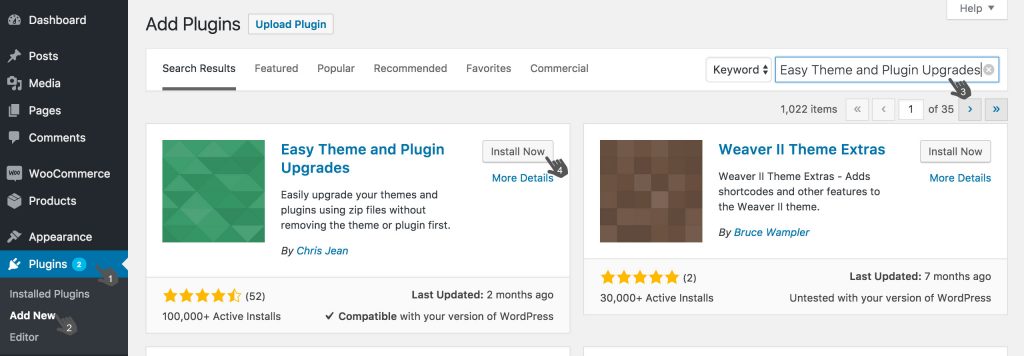
You will first need to install the ‘Easy Theme and Plugin Upgrades’ plugin, the plugin is available from the WordPress plugins repository and can be found here. This plugin can be installed directly from within WordPress on the ‘Plugins > Add New’ page.
You will then need the latest version of the theme files which will be available on Theme Forest. Once you’ve downloaded the theme files you can use the ‘invogue.zip’ for the update process.
With the above mentioned plugin installed and activated you can navigate to the ‘Appearance > Themes’ page within the WordPress admin area. From here you can select the ‘Add New’ option.
From the next page you will choose the ‘Upload Theme’ option.
From the following screen, you can select the ‘Choose File’ button to locate the ‘invogue.zip’ file previously downloaded from Theme Forest.

Once located and selected you can click the ‘Install Now’ button.
This will run the theme update process and the update is complete.
Menus can be created and managed through the WordPress ‘Menus’ page found within the ‘Appearance’ drop down menu.
From this page you will be able to create a new menu by clicking the ‘create a new menu’ link. You will then need to add a name for this menu and select the ‘Create Menu’ button.
You will then be able to add in the required pages to the menu from the available list of pages, posts and categories in the newly available left hand column. Select the required page by first ticking the checkbox next to it and then selecting the ‘Add to menu’ button. You can then choose the location that this menu should appear in within the theme from the ‘Menu Settings’ section. A menu can be assigned to multiple locations if necessary by ticking multiple checkboxes. Once done the menu can be saved.
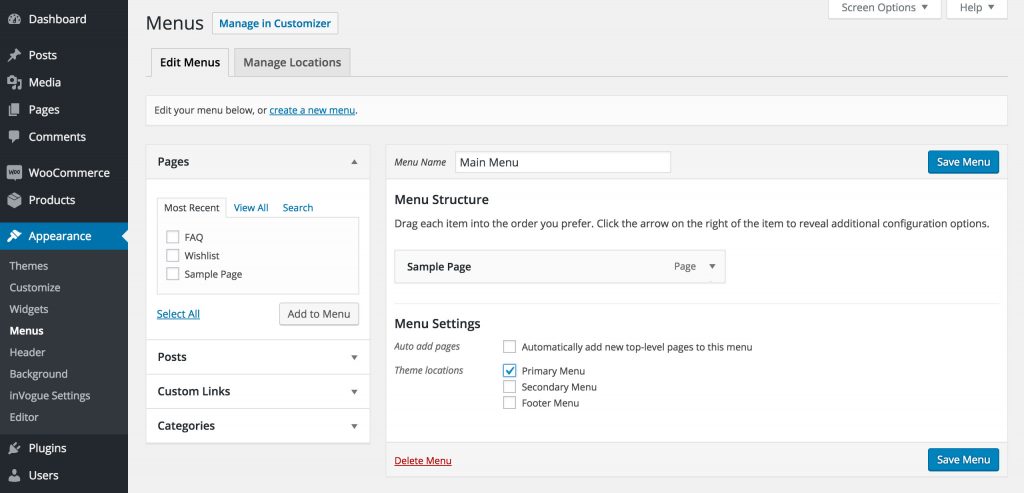
Once done the menu will be visible on the frontend of the site.
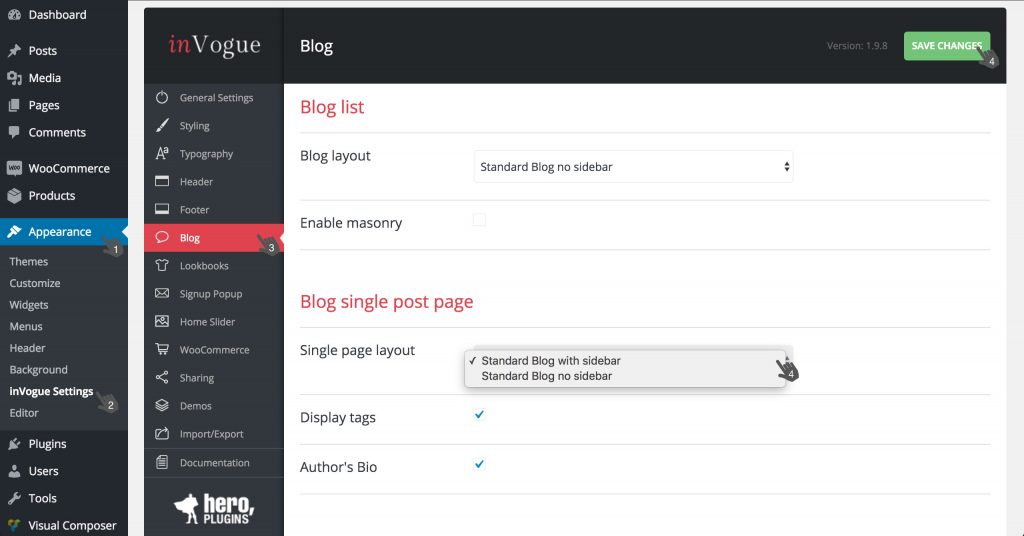
The main sidebar can either be shown or hidden on post pages. This option is found on the ‘inVogue Settings’ page on the ‘Blog’ tab.
From the ‘Single page layout’ dropdown you can choose to either display the sidebar or hide it. Remember to save this change once done.
The shop sidebar can either be shown or hidden on the shop page. This option is found on the ‘inVogue Settings’ page on the ‘WooCommerce’ tab.
From the ‘Shop layout’ dropdown you can choose to either display the sidebar or hide it. Remember to save this change once done.
Slider Revolution is a very powerful slider plugin with many features.
To learn more about the plugin and use it to its full potential, please have a look at the documentation given by the plugin author.
https://www.themepunch.com/revslider-doc/slider-revolution-documentation/
Adding a Slider to a page.
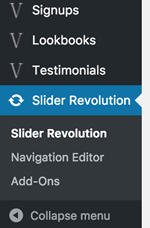
Open the Revolution Slider plugin that came bundled with inVogue. This can be found in the WordPress sidebar.
Create your slider and copy the short-code.
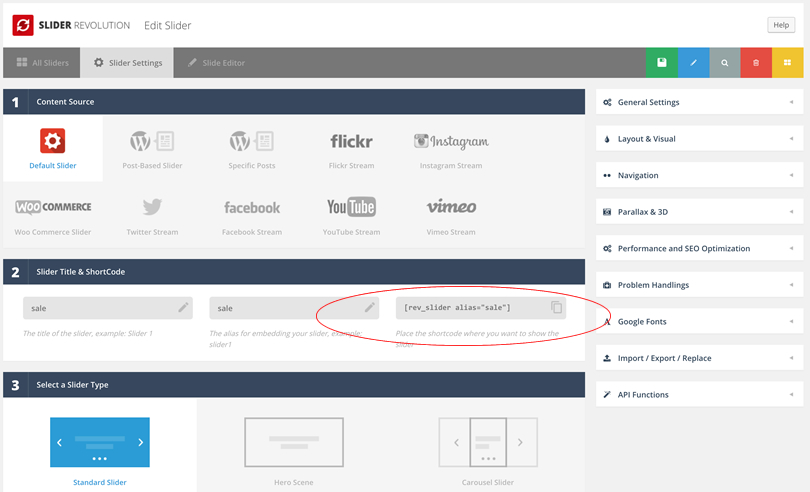
Now go to your page backend and add the short-code to the page.

Save/Update your page and go to the front-end and reload the page.
If the slider is not showing, go back to you page backend and change the Page Template in the Right Hand Column to “Default Template”.
If you have any queries about the plugin, please feel free to contact us.
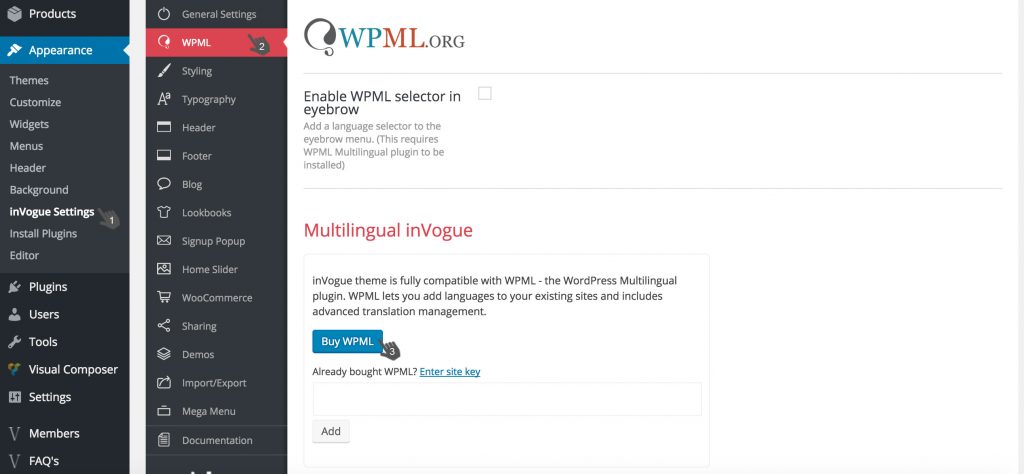
InVogue is now fully compatible with the WPML plugin! WPML can be used to create a multilingual site and translate your sites content into multiple different languages.
WPML is not bundled with the theme so will need to be purchased separately, you can purchase WPML directly from within inVoge by navigating to the ‘inVogue Settings > WPML’ tab:
Or by navigating to this link:
Once purcahsed your WPML license key can be added to on this tab.
You’ll need to then fully install the WPML plugin through your WordPress admin area. You can do this from the ‘Plugins’ page, please ensure you’ve installed and activated the WPML core plugins (WPML Multilingual CMS, WPML String Translation, WPML Translation Management) before activating any other plugins that might depend on them.
GETTING STARTED WITH WPML
Once the plugins are all installed you can begin configuring WPML for translation to the required languages. Please take a look at the WPML starter guide here: https://wpml.org/documentation/getting-started-guide/
To begin translating the content of your pages and posts you’ll need to edit each page and post and create duplicates which are then ready to be translated. WPML will help by maintaining your link structure across duplicates to makes sure the translated content is displayed when users switch between site languages.
Within inVogue if there are any specific pieces of text which don’t fall under the content of a page or post such as buttons or extra bits of text you’ll be able to use WPML String Translation to also update these sections.
With version 1.13.4 of inVogue the mega menu feature has been added!
You can enable this option by navigating to the ‘Appearance > inVogue Settings > Mega Menu’ tab and ticking the ‘Enable mega menu’ checkbox.
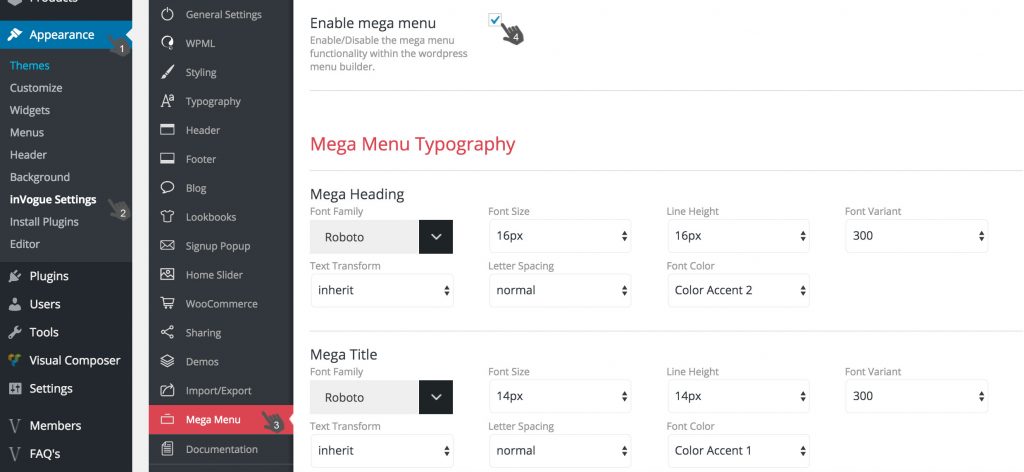
Once the option has been enabled and saved you can then move on to the ‘Appearance > Menus’ page to create and edit your mega menus. From here you can select the menu you’d like to edit and begin editing and adding content to a mega menu for each link.
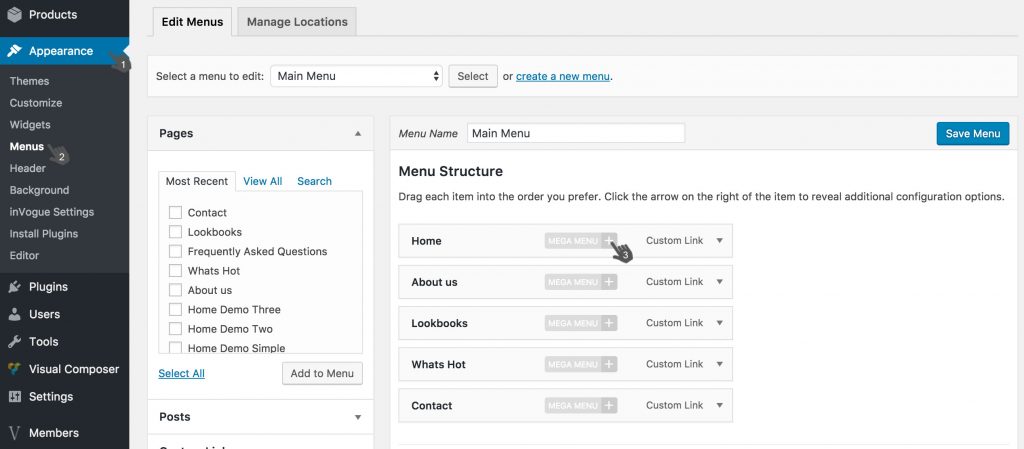
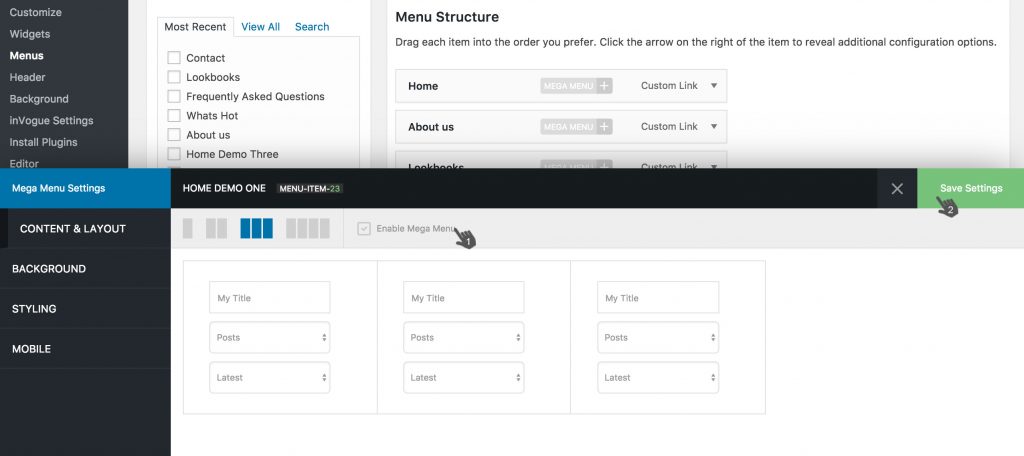
When clicking the ‘mega menu’ button on each link you’ll be provided with a new menu providing the options to add content to this mega menu. Here you’ll be able to define the number of columns for the dropdown and the content for each column as well as the styling options for the mega menu. You can then enable this menu, or later disable it if necessary to prevent it from displaying, and then save your settings.
Our inVogue theme is only compatible with WordPress and can only be run on this framework.
You should have an existing WordPress installation which is used to run your site that the theme can be added to.
WordPress version support is from version 4.5.x and will be updated with future updates to the theme.
PHP version 5.6 or greater – This is a requirement directly from WooCommerce. https://docs.woocommerce.com/document/server-requirements/
If you already have WooCommerce installed, please make sure that it is the latest version that you are running before you run the inVogue Theme installation.
Although the plugins bundled with our theme ( WooCommerce and WPBakery Page Builder ) are not required for the site to run, a large portion of the theme functionality is reliant on these plugins. It is recommended to install these plugins in order to have full access to the themes features.
NOTE: It's that festive time of year again and we will be taking a short break to recharge from the 16th of December 2020 until the 3rd of January 2021. During this time our support will be limited but we will try to respond to high priority tickets as best we can. Have a great holiday!
OUR HEROES WILL BE HANGING UP THEIR CAPES FOR A SHORT BREAK!
We'll be out of office from the 2nd of August until the 18th of August 2019. Please note that during this time we will not be available to assist with support queries but will be right back to assist from Monday the 19th of August 2019. We appreciate your patience and support!
While we will always do our best to get back to you within an hour or two, we ask that you please allow for a maximum of 24 hours for feedback.
Monday to Friday, 9am to 5pm in the UTC+2 Timezone.
Bug fixing
How to questions
Assistance with integration
Support for 3rd party plugins
Custom Coding
Theme customization
Stay informed about all new releases and product updates