To get started, please download HeroMenu from CodeCanyon
In your WordPress backend, navigate to Plugins » Add New » Upload Plugin. Browse to the zip file that you have just downloaded from CodeCanyon and follow the prompts to install & activate HeroMenu.
![]()
![]()
Take note
When HeroMenu is installed and activated, it will have no effect on your website frontend. You will only see a change on your website once you have finished setting up your navigation in HeroMenu. Activating your menu can be done here Settings » Menu Integration
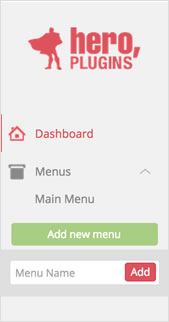
To create your first menu, navigate to Hero Menu » Menus » Add new menu.
Layout » Layout and Order

Choose your menu layout by simply switching on or off what you need and drag and drop the items in the order you want. Items will snap left, right or centre.
Layout » Navigation Structure
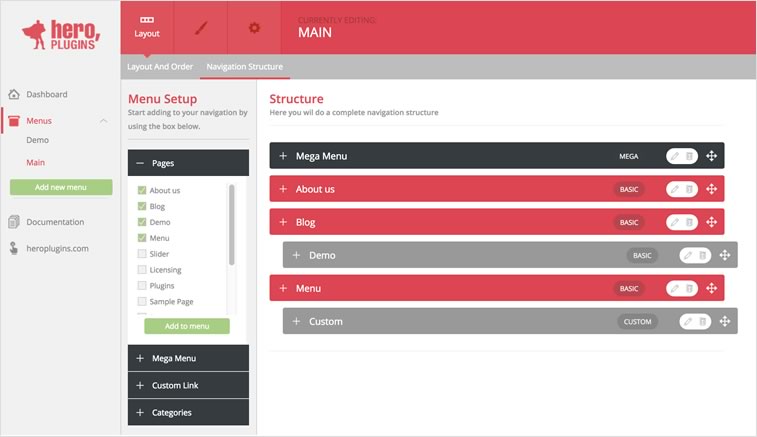
Select the pages that you want to add to your menu from the items on the left.
Click “Add to menu” once pages are selected.
This bit works very similar to the standard WordPress Menu builder, so you’ll feel very comfortable using this.
The following types of items can be added to your navigation.
Pages
Mega Menu’s
Custom Links
Categories
Quick tip
Drag items up and down to change order.Drag items slightly to the right and it will snap under another menu item to become a submenu of that item.
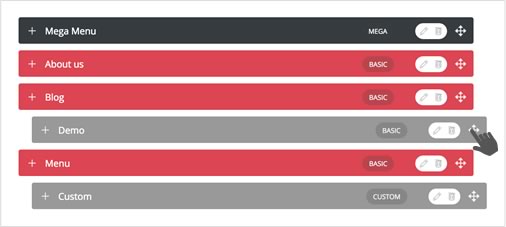
Click on the little pencil button of each menu item to start edit. Here you will see all the basic elements that you would want to change or edit.
Icons can be added to each menu item by clicking on the icon button.
Select the appropriate icon. We supply you with 360 free icons to use as you please.
The size and colour of the icon are also editable.
Deleting a nav item can be done by clicking on the “bin” button next to the “edit” button.

A very intuitive and visual way to style your navigation. This allows you to style every aspect of your navigation. This includes menu bar, drop downs, mega menus, fonts, colors, size, icons and many more. Our default settings are styled in a way that would look and function great with any website. So by leaving everything as is, should leave you with a great looking menu.
This is the exciting part of HeroMenu, seeing the live version on your website. You can integrate/activate your menu using one of the following steps:
8.1 Menu Location Selector

The recommended way of activating your menu, is by selecting the menu location. Navigate to Settings » Menu Integration » Select a Location. To replace the standard WP menu that comes with your theme, select “Primary” from the dropdown list. This should replace the main menu of your WP theme.
Theme locations
Theme location labels could change relative to current theme, most themes should have Primary, Main and Secondary.
8.2 Manual Integration: Plain Shortcode
Add the following shortcode to one of you pages/posts, remember to click update.
[hmenu id=1]
8.3 Manual Integration: do_shortcode For example, replace the following code in your header.php file:
<header id="masthead" class="site-header">
<div id="navbar" class="navbar"><nav id="site-navigation" class="navigation main-navigation"><button class="menu-toggle"><!--?php _e( 'Menu', 'twentythirteen' ); ?--></button>
<!--?php _e( 'Skip to content', 'twentythirteen' ); ?-->
<!--?php wp_nav_menu( array( 'theme_location' => 'primary', 'menu_class' => 'nav-menu' ) ); ?-->
<!--?php get_search_form(); ?--></nav><!-- #site-navigation -->
</div>
</header>
With the following –
<?php echo do_shortcode( '[hmenu id=1]' ) ?>
Take note
Remember that the “ID” in shortcode is subject to change. Please make sure that you are referencing the correct menu “ID”. Make a backup of your code before you replace it.
Choose your menu layout by simply switching on or off what you need and drag and drop the items in the order you want. Items will snap left, right or centre.

Select the pages that you want to add in your menu from the items on the left. Click “Add to menu” once pages are selected. This bit works very similar to the standard WordPress Menu builder, so you’ll feel very comfortable using this.

The following types of items can be added to your navigation.


This is the fun part of HeroMenu, where we give you the option to build a great looking mega menu without any coding knowledge.
A mega menu can be added to your navigation by clicking on the Mega Menu button on the left and then give it a name and add to menu.
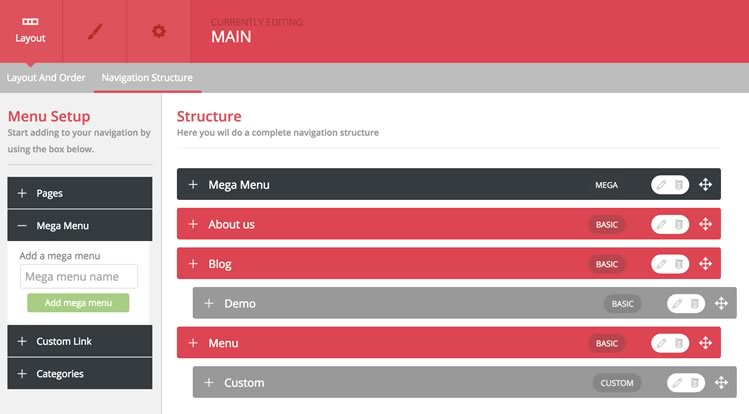
Edit your mega menu by clicking on the pencil/edit button.
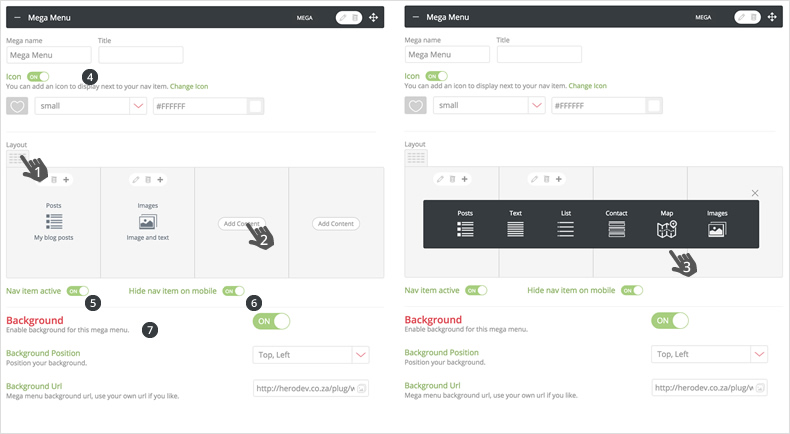
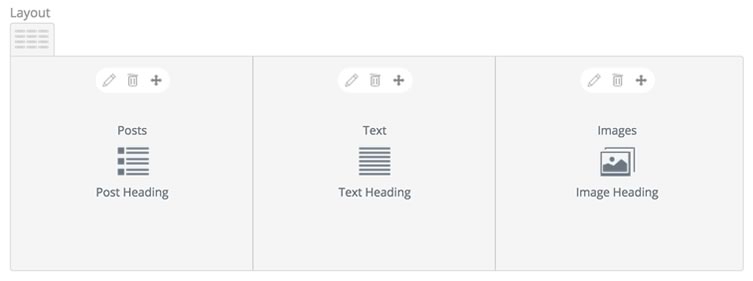
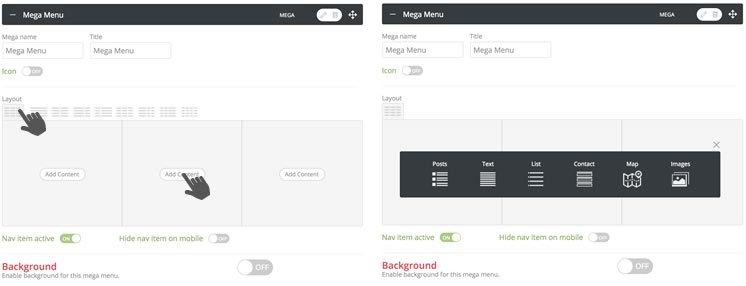
Under the “Layout and Order” tab. Once you have added a mega menu item in your navigation, start editing it by choosing a layout and adding content. Choose the type of content in the dark grey popup and you will then be presented with a settings popup.
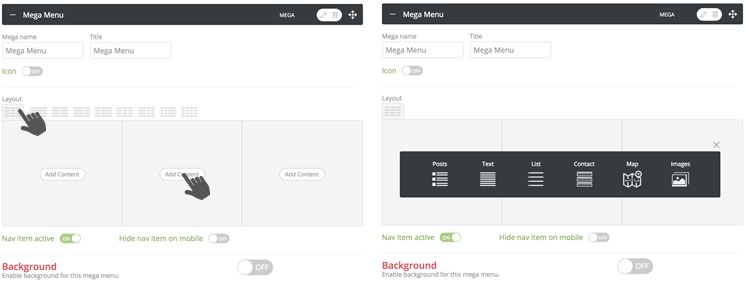
You can give your column a heading, if needed. And choose underline, depending on your design preference. You will see in the example below, we have switched on the “Heading Underline” function and gave the column a name.
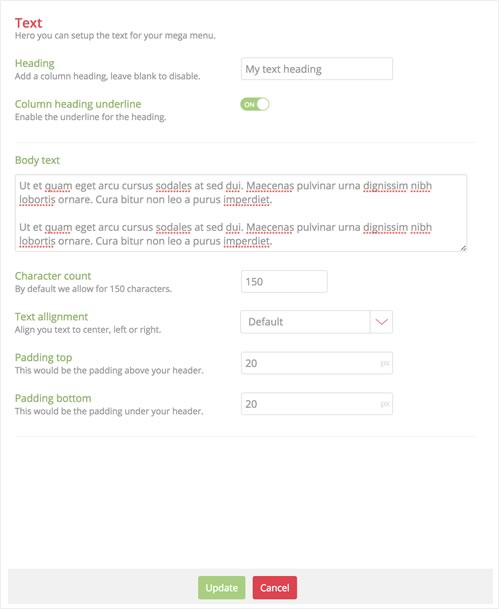
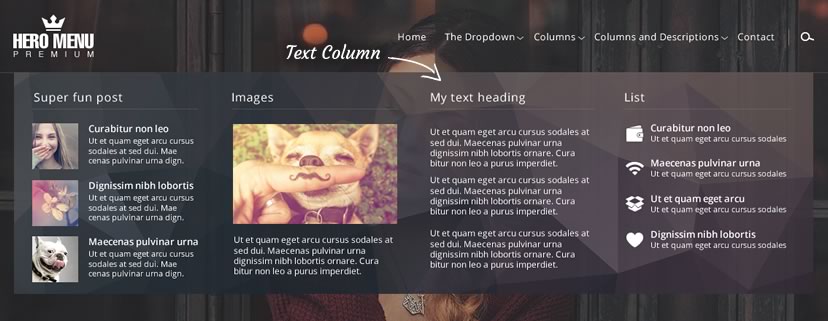
Below is an example of what your text column in your mega menu can look like, just by playing with a few of the settings above.
Under the “Layout and Order” tab. Once you have added a mega menu item in your navigation, start editing it by choosing a layout and adding content. Choose the type of content in the dark grey popup and you will then be presented with a settings popup.
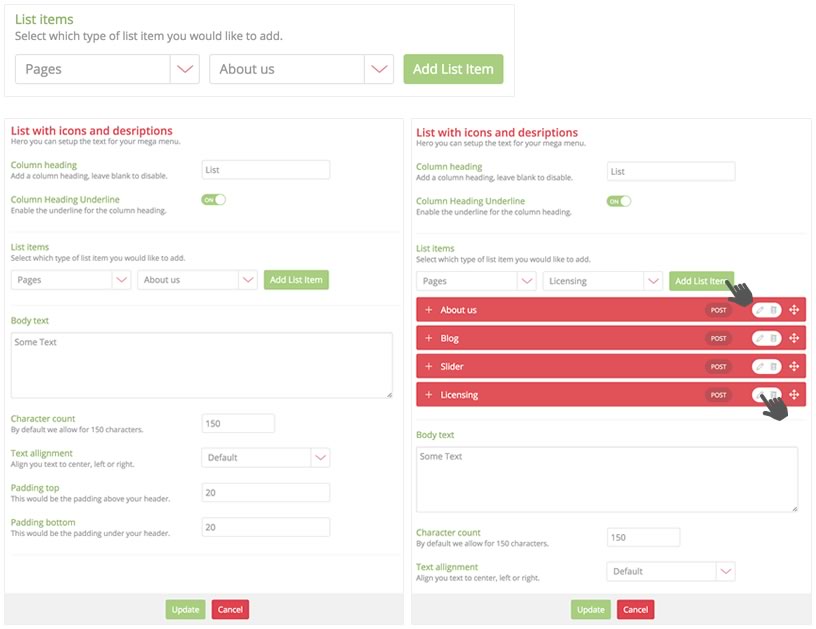
You can give your column a heading, if needed. And choose underline, depending on your design preference. You will see in the example below, we have switched on the “Heading Underline” function and gave the column a name.
Click on the type of list item on the left and then select the items from the list on the right and click “Add List Item”
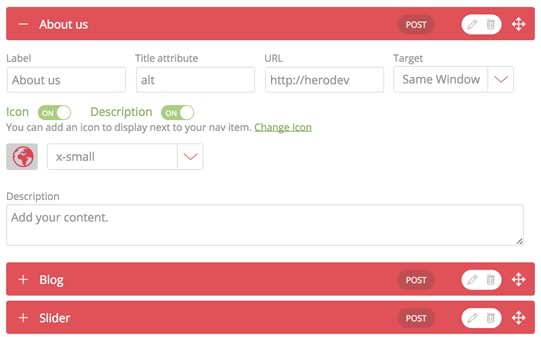
Below is an example of what your list column in your mega menu can look like, just by playing with a few of the settings above. You will see that we have added icons and description text with each list item.
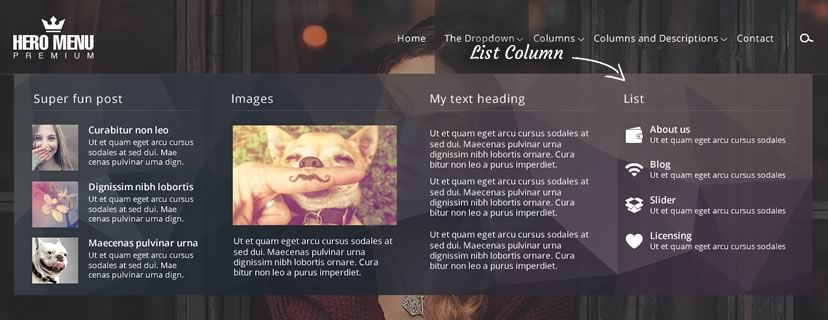
Under the “Layout and Order” tab. Once you have added a mega menu item in your navigation, start editing it by choosing a layout and adding content. Choose the type of content in the dark grey popup and you will then be presented with a settings popup.

You can give your column a heading, if needed. And choose underline, depending on your design preference. You will see in the example below, we have switched on the “Heading Underline” function and gave the column a name.
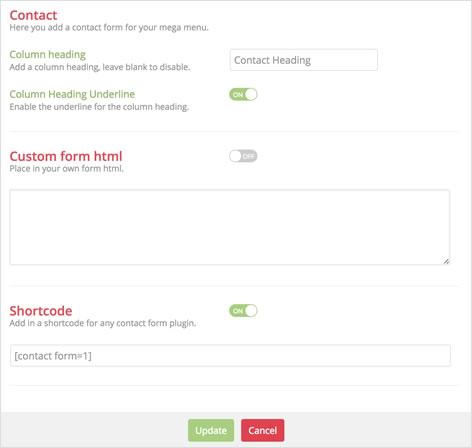
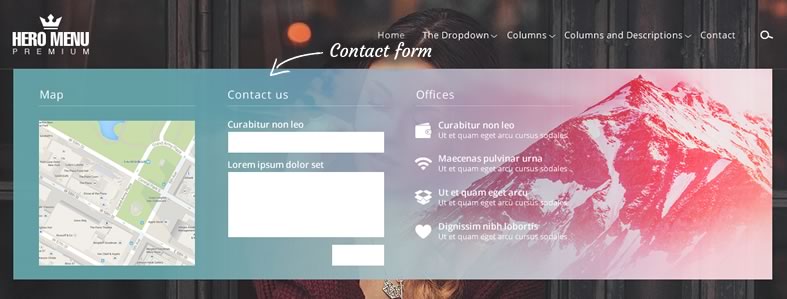
Adding a form to a column can be done in 2 ways.
Sortcode – Create a form using any form plugin and adding the shortcode. (E.g. Gravity Forms, Contact Form 7)
Custom form HTML – This section can used to add in custom form HTML.
Under the “Layout and Order” tab. Once you have added a mega menu item in your navigation, start editing it by choosing a layout and adding content. Choose the type of content in the dark grey popup and you will then be presented with a settings popup.

You can give your column a heading, if needed. And choose underline, depending on your design preference. You will see in the example below, we have switched on the “Heading Underline” function and gave the column a name.
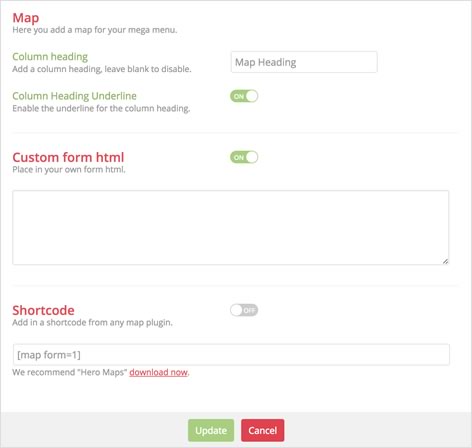
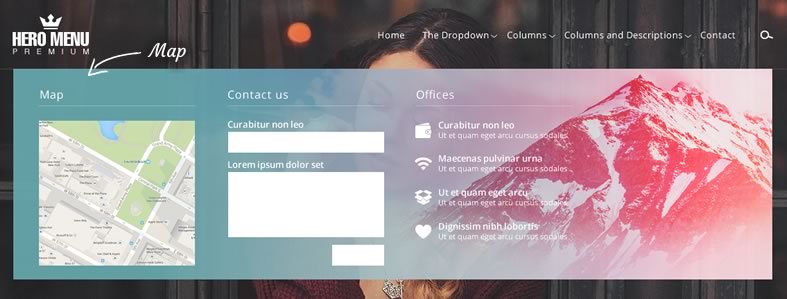
Adding a map to a column can be done in 2 ways.
Sortcode – Create a map using the HeroMaps plugin and adding the shortcode.
Custom map HTML – This section can be used to add in custom map HTML.
Under the “Layout and Order” tab. Once you have added a mega menu item in your navigation, start editing it by choosing a layout and adding content. Choose the type of content in the dark grey popup and you will then be presented with a settings popup.

You can give your column a heading, if needed. And choose underline, depending on your design preference. You will see in the example below, we have switched on the “Heading Underline” function and gave the column a name.
You also have the option of 3 different layouts of where your text should display.
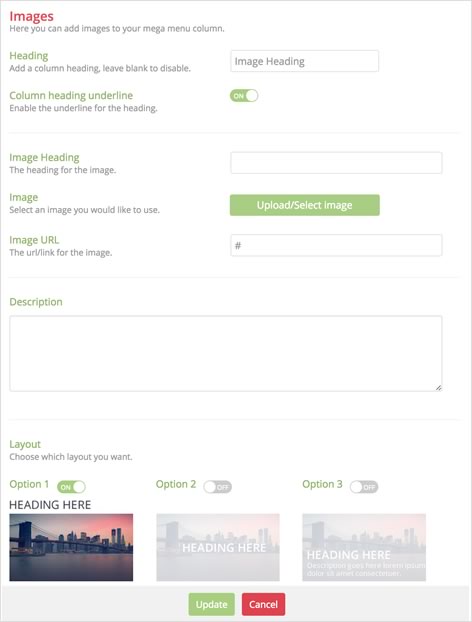
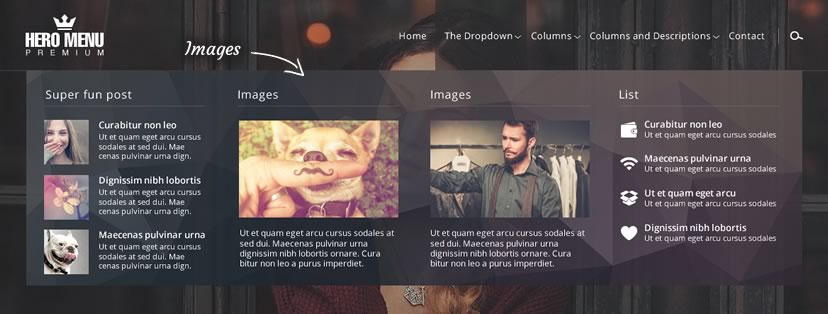
Under the “Layout and Order” tab. Once you have added a mega menu item in your navigation, start editing it by choosing a layout and adding content. Choose the type of content in the dark grey popup and you will then be presented with a settings popup.

You can give your column a heading, if needed. And choose underline, depending on your design preference. You will see in the example below, we have switched on the “Heading Underline” function and gave the column a name.
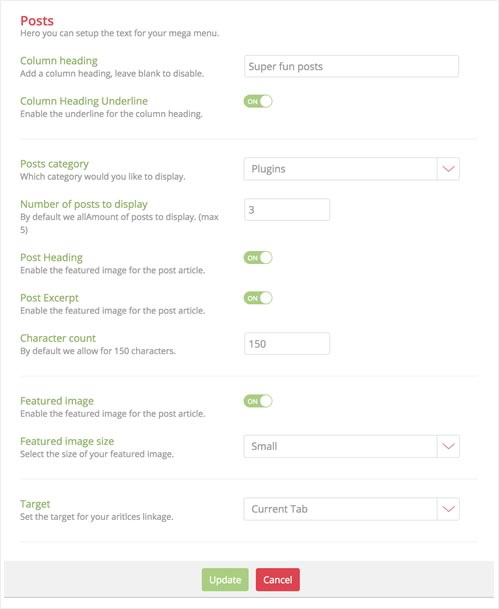
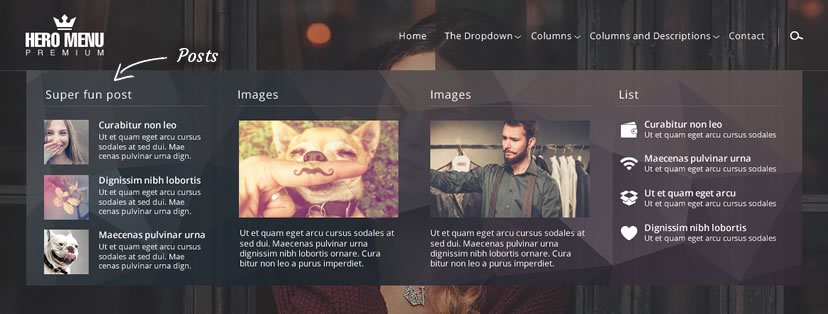
Below is an example of what your posts in your mega menu can look like, just by playing with a few of the settings above.
A very intuitive and visual way to style your navigation. This allows you to style every aspect of your navigation, but by leaving most of the items on this page as default, will be good enough.

Setting up your menu bar dimensions is an easy 2 step process by clicking the bar width and then choosing the content width.
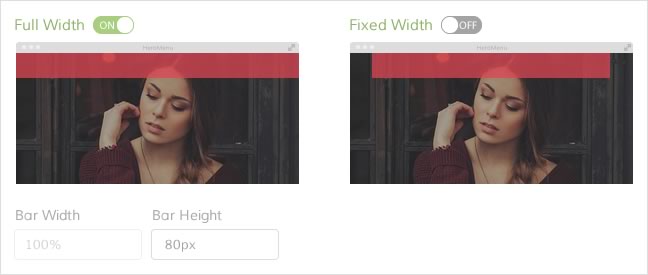
Choose between a navigation bar that runs the full width of the screen or at a fixed width. (Bound by the parent div container that wraps the HeroMenu navigation)
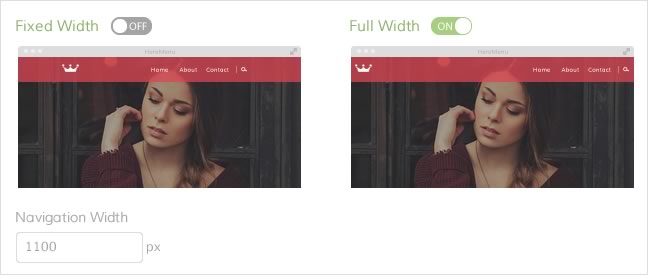
Choose between navigation items that runs the full width of the navigation bar, or a fixed width in the centre of the navigation bar.
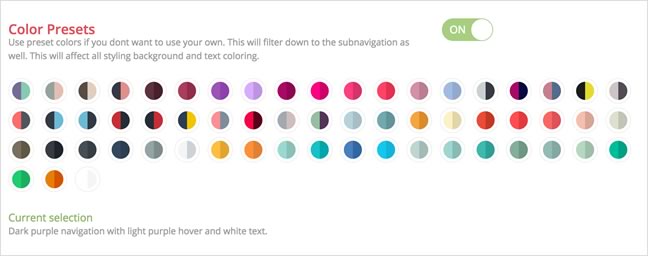
Using our preset colors enable you to select a color example, this will then filter through the whole menu, from the main menu, down to the sub navigation and mega menu.
Use your own custom colour by adding in a hex value, or use our color picker. You can also add css gradients in your navigation, by clicking on the “Gradients” button and then selecting or adding your second colour. Gradient orientation can also be changed from vertical to horizontal.
Also change the menu bar transparency as needed.

Choose from 3 different types of hover effects. Background hover, Underline and Border. Each one of these hover effects can be styled with your own color.
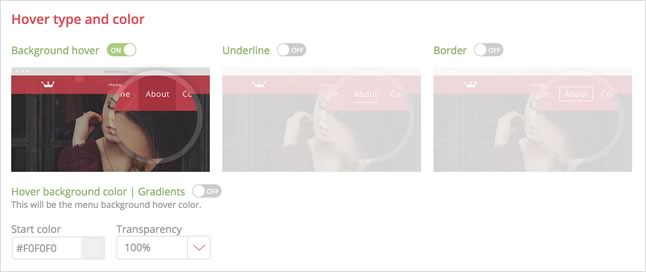
Switch on the the border button and you can add a thin, 1 pixel border around your navigation bar. You also have the option to only add the border to one of the sides. The colour and transparency can also be changed.
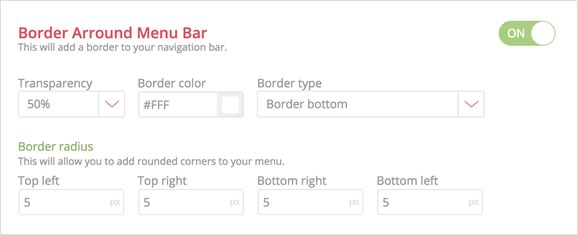

Add rounded corners to your menu bar by changing the border radius.
Choose between more than 650 Google fonts from the dropdown. Edit size, weight , color and hover color.

If you feel you need to change the distance between your nav items, feel free to change the padding here. The default setting should be fine.

This will add a shadow to your menu bar. Please note that this function is not supported in older browsers.
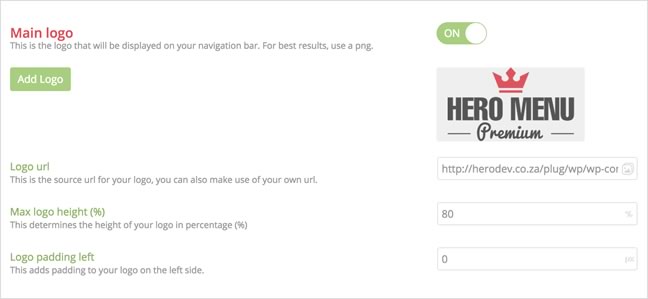
Add a logo to your navigation and add a link if you want the logo clickable. The logo size can be changed by giving it a percentage of the menu bar height. Use a transparent PNG, preferably 600px by 600px.
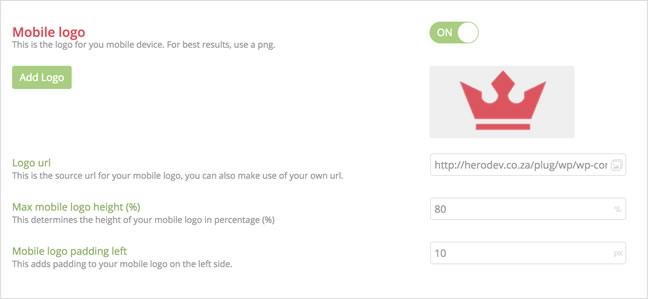
We give you the option to have a replacement company logo when the navigation collapses into a mobile nav.
Sticky navigation (also called a fixed navigation) is basically a website menu that is locked into place at the top of the screen so that it does not disappear when the user scrolls down the page; in other words, it is accessible from anywhere on the website without having to scroll.
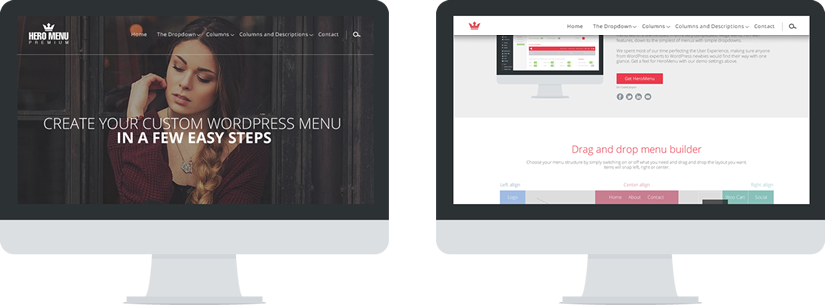
Activating this will give you a few extra options, like when you want the menu to activate, size, transparency, menu bar color, text color, text size and a different logo if needed.
Here is an example of a menu that becomes a sticky menu when you scroll down.
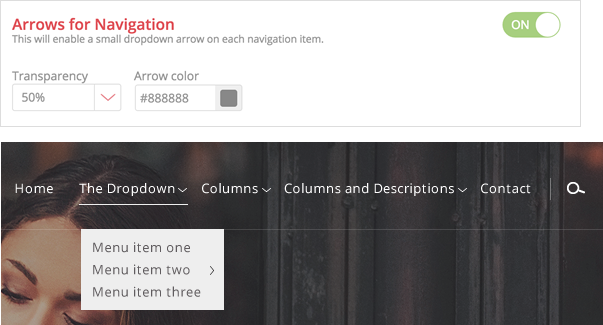
This will enable a small dropdown arrow next to all dropdown navigational items.
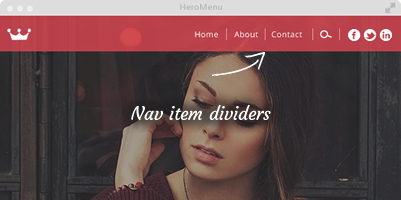
This will enable a line divider between navigational items.
Set the transparency, color and size.
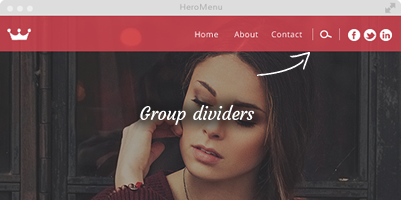
This will add a group divider item between your navigational sections.
E.g. WooCart, Search, Social
Set the transparency, color and size.
Here you would style what your dropdown menus will look like.

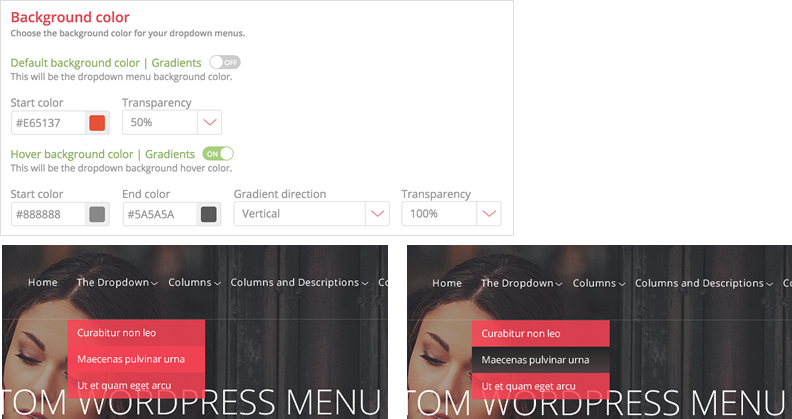
Choosing a color preset on the previous window (Styling – Main Navigation) will also filter through to the drop downs and mega menu. This can easily be changed with the tools supplied here. Add gradients to your drop downs by switching on the gradients setting and choose the start and finish color. Transparency of your dropdown and hover state can also be changed here.
Choose from over 650 Google fonts and set the size, weight and color. Font hover can also be changed here.
Fix the width of all drop downs menus.
You can set the padding around all submenu items by editing these fields. The default 5px should be sufficient.

Add a css shadow around your dropdown. Set the shadow distance, shadow blur, transparency and color. Please note that this feature does not work in older browsers.
Add a line around your dropdown menu. Add the color you need and set the transparency to fit your design.
Switching this on, will show a small arrow at all fly out menus(sub sub menu). Set the color and transparency as needed.
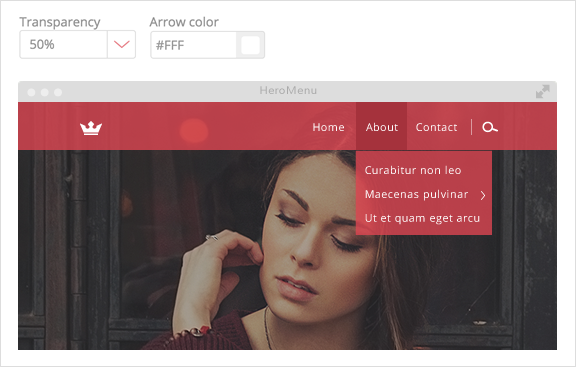
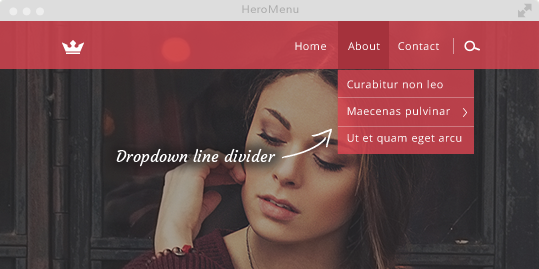
Switching this on, will add a thin line between dropdown menu items. Set the color and transparency you need.
This is the fun part of HeroMenu, where we give you the option to build a great looking mega menu without any coding knowledge.

Choosing a color preset in the “Styling – Main Navigation” section will also filter through to the drop downs and mega menu. This can easily be changed with the tools supplied here. Add gradients to your MegaMenu by switching on the gradients setting and choose the start and finish color.
Background images can also be added to your MegaMenu. (This can be added under “Layout / Navigation Structure”. Each Mega Menu can have its own background image.)
Transparency of your dropdown and hover state can also be changed here.
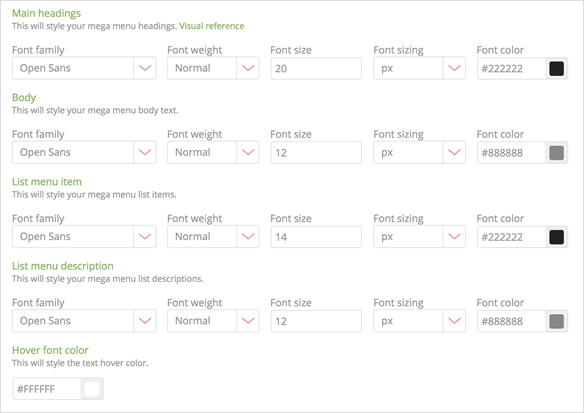
All mega menu font styling in one place. You have all the normal options like Google Fonts, weight, size and color. Hover font color is one setting for all.
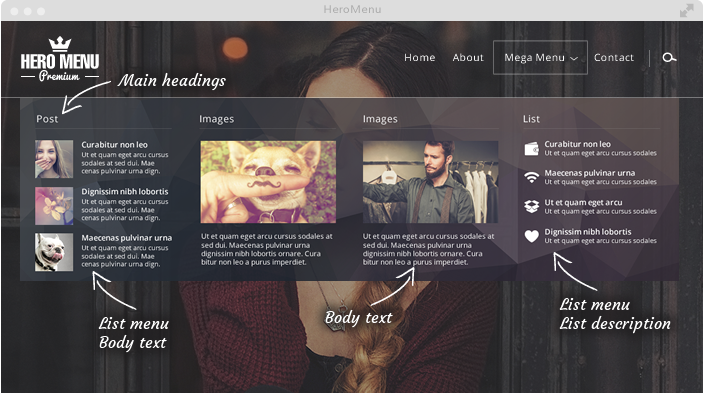
The width of MegaMenu is determined by the width of your menu bar dimensions. This can be found in “Styling / Main Navigation / Navigation Width”.
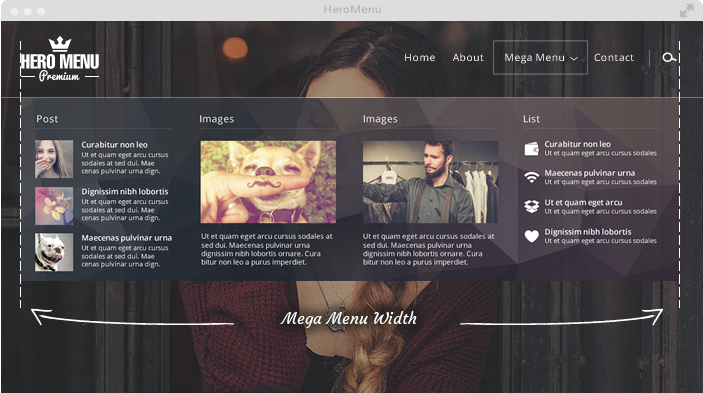
Here you can add padding around your Mega Menu. The default values should be sufficient.
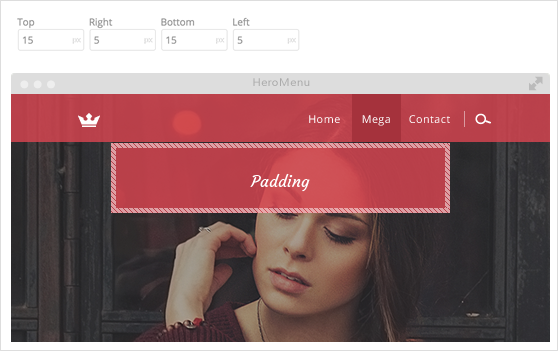
This will add a shadow around your Mega Menu drop down. Please note that this feature is not supported by older browsers. Set the shadow distance, blur, transparency and color.
This will add a one pixel border around your Mega Menu dropdown. You can also set the transparency and color.
Change your square corners to round corners by editing this part.
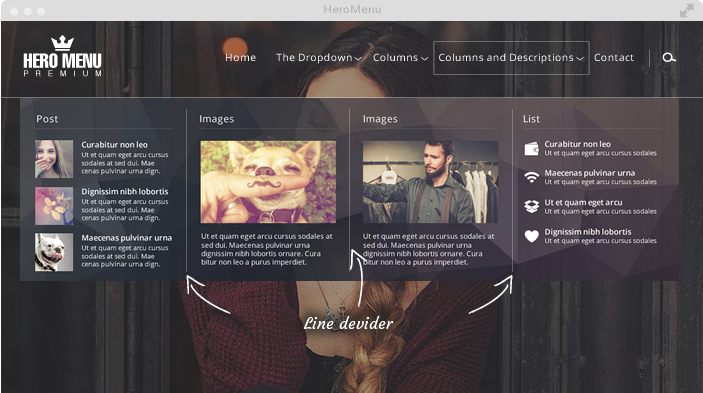
This will add a one pixel vertical divider between all columns in Mega Menu. Transparency and color of these lines can be changed.

We have 3 different search fields that you can choose from, by simply clicking on the one you prefer.

Here you can set the size of the search box
Set the background color of the input field, if you use the light box search field, this will automatically set the background color of the lightbox.
Set the font to display in the search field. Style, color, size etc can be changed. Search Icon size can also be changed here.
This will add padding to the search field
This will add a border to your search field. If you select lightbox, this will style the color of the line under the text field.
This will allow you to add rounded corners to the classic search field.

You can activate this icon only if WooCommerce is installed on your website

Set the icon size, color and hover color.
The basket icon will have a little circle with the amount of products that was added on your live site.

Here you can activate the social icons you want to add on your nav bar. Just double click the icons you want and this will then be added in sequence beneath the list of icons.
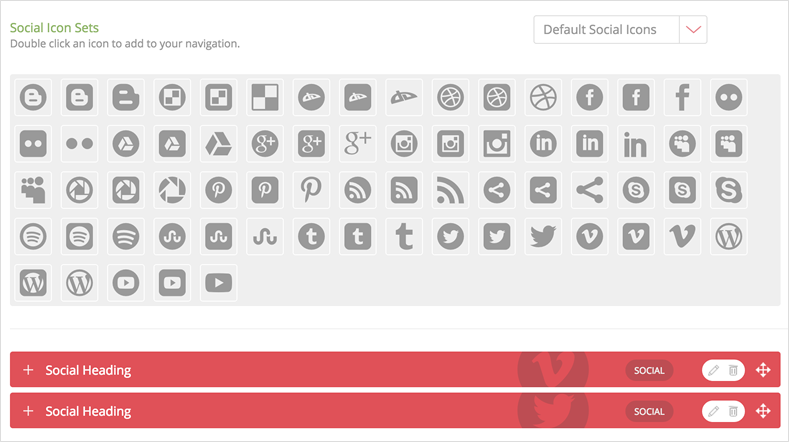
You can drag the red bars in a different order if needed.
Click on the pencil button to edit the item.
A panel will open where you can now change icon color and hover color and set things like URL etc.

![]()
This area is purely for viewing the icons that is available in the plugin.

Select the breaking point at which your navigation collapses into a mobile navigation. The defaults should be fine and no need to change.
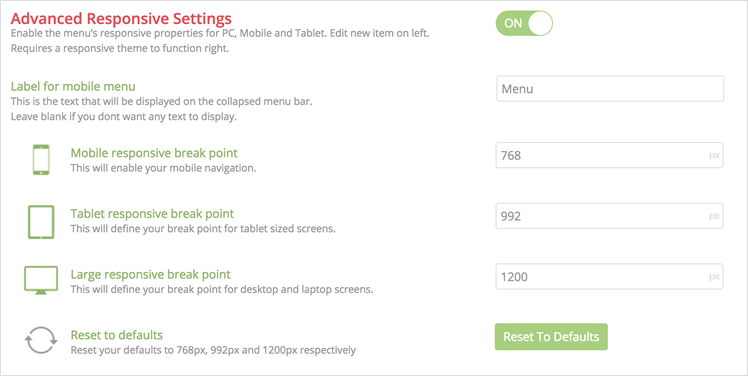
You can integrate your menu using one of the following steps:
The recommended way of setting your menu, is by selecting the menu location, navigate to Settings » Menu Integration» Select a Location
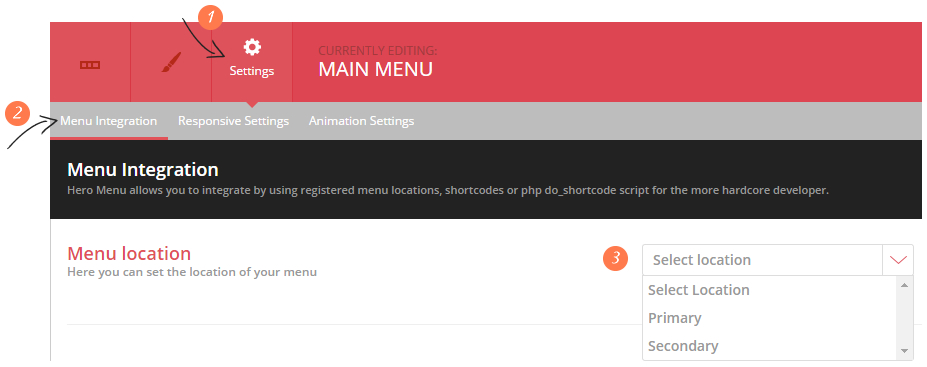
Theme locations
Theme location labels could change relative to current theme, most themes should have Primary, Main and Secondary.
Add the following shortcode to one of you pages/posts, remember to click update.
[hmenu id=1]
For example, replace the following code in your header.php file:
<header id="masthead" class="site-header" role="banner">
   <a class="home-link" href="<?php echo esc_url( home_url( '/' ) ); ?>" title="<?php echo esc_attr( get_bloginfo( 'name', 'display' ) ); ?>" rel="home">
      <h1 class="site-title"><?php bloginfo( 'name' ); ?></h1>
      <h2 class="site-description"><?php bloginfo( 'description' ); ?></h2>
   </a>
   <div id="navbar" class="navbar">
      <nav id="site-navigation" class="navigation main-navigation" role="navigation">
         <button class="menu-toggle"><?php _e( 'Menu', 'twentythirteen' ); ?></button>
         <a class="screen-reader-text skip-link" href="#content" title="<?php esc_attr_e( 'Skip to content', 'twentythirteen' ); ?>"><?php _e( 'Skip to content', 'twentythirteen' ); ?></a>
         <?php wp_nav_menu( array( 'theme_location' => 'primary', 'menu_class' => 'nav-menu' ) ); ?>
         <?php get_search_form(); ?>
      </nav>
      <!-- #site-navigation -->
   </div>
   <!-- #navbar -->
</header>
<!-- #masthead -->
With the following –
<?php echo do_shortcode( '[hmenu id=1]' ) ?>
Take note
Remember that menu ID in shortcode is subject to change. Please make sure that you are referencing the correct menu ID.
We have seen instances where – during restoration – database entries for HeroMenu were prevented from being properly restored when using BackupBuddy. In order to resolve the issue, please follow the steps below when setting up BackupBuddy:
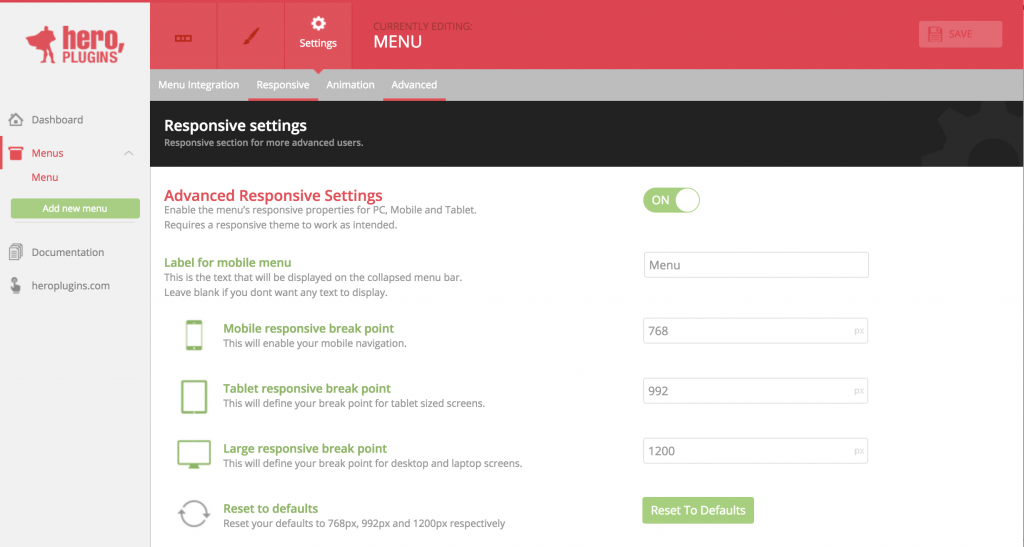
This can be removed from the ‘Settings > Responsive’ tab by editing the ‘Label for mobile menu’ input field. The text can either be completely removed or renamed as required.
This is most likely due to a file permission issue and it will be necessary to connect to the site via FTP or an alternate file manager and change the file permissions for the plugin folder and all of its contents to 755.
Hero Menu does not natively support translation and this would have to be done by using tools such as ‘WPML’ or ‘Polylang’ and implementing multiple menus.
The integration of the menu would need to be updated in order to include the multiple shortcodes within your header and would also need to be within an ‘if’ statement in order to check which language is currently selected and so display the required menu.
An example snippet of code can be found below on how the integration could be done. Please note that this snippet assumes that the selected language is shown by a query string within the URL. The ‘THE_LANGUAGE_NAME’ would be replaced with the language code in the URL i.e. en for English
<?php
//get the current URL
$hmenu_actual_link = "$_SERVER[REQUEST_URI]";
//create the lang var and get the value
$hmenu_slected_lang = explode('lang=', $hmenu_actual_link);
if( $hmenu_slected_lang[1] == 'THE_LANGUAGE_NAME' ){
echo do_shortcode('[hmenu id=2]');
} else {
echo do_shortcode('[hmenu id=1]');
}
?>
By default, this feature is disable for mobile devices. We have done this because ‘fixed’ elements cannot be scrolled through and this presents a problem for long menus on mobile devices because if the menu is larger than what can be displayed at once on the mobile device it won’t be possible to scroll to the remaining elements which are outside of the viewport. We would not recommend force enabling this feature however if your situation does call for it this can be enabled with some CSS that can be added on the ‘Advanced’ tab of the menu settings.
@media(max-width: 767px){
#hmenu_load_1 { position: fixed;}
}
Note that the pixel value ‘767px’ is the default break point at which the mobile menu is shown. If you have altered this it would be necessary to change this value to match. The numeric value within ‘hmenu_load_1’ reflects the ID of your menu which you can find on the ‘Dashboard’ tab of the plugin backend i.e. the first created menu would be 1 and this increments in values of 1 so that the second menu would have the ID 2 and you’d use ‘#‘hmenu_load_1’ etc.
In most cases this is due to having the menu within your theme’s default content containers which have a width assigned to them and so are containing the menu and preventing it from exceeding this width. It would be necessary to either adjust the widths of these containers or their padding and margining or alternatively place the Hero Menu shortcode outside of these containers by editing the menu integration in your header template file.
This issue is usually due to caching, especially if you are running any sort of caching plugin. It would be necessary to clear this cache each time a change if made in order to see it reflect or temporarily disable caching. Alternatively, this might also be a server side cache in which case there should be an option within your hosting control panel to clear or disable this cache or it might also be a local browser cache which needs to be cleared.
However, if changes within the backend of the plugin are not being saved at all and keep reverting back to their defaults upon saving or refreshing the backend this could be a filer permissions issue where the plugin files aren’t being created or altered. In which case it would be necessary to change the file permissions of the plugin folder and all of its contents to 755 via FTP or an alternate file manager.
Hero Menu provides the option of using Google Fonts for your menu, however if you need to use a custom font or a font from another source it would need to be manually changed as you will not be able to import a font so that it is available within the menu settings.
You’ll first need to ensure that the font has been added to the site and is available for use. Once this is done the changes to Hero Menu will need to be manually done for each element within the menu with some custom CSS. This CSS can be added to the ‘Advanced’ tab of the menu settings or through any other custom CSS section.
As an example for changing the font for the main navigation the following can be used:
.hmenu_navigation_root > li a div span { font-family: Georgia; }
It would then be necessary to apply further CSS to the other text elements within the menu as required.
Please scroll down to see our integration guide for older versions of Avada. To integrate HeroMenu within Avada, follow the steps below very carefully.
Take Note:
All changes are done within the header.php file. Start by making a backup of this file. Please also note in future that theme updates by the author will overwrite the header.php. So make sure that when you do a theme update, also do this bit in the header.php file again.
In the Avada theme files, navigate to the header.php file. Find the code which looks like this (this line is truncated for simplicity).
<?php avada_header_template( 'below', ... ... ... ); ?>
Replace this line with the following:
<?php
	//HERO MENU
	$hmenu_main_menu = array(
		'theme_location'  => 'main_navigation'
	);

	wp_nav_menu( $hmenu_main_menu );
?>
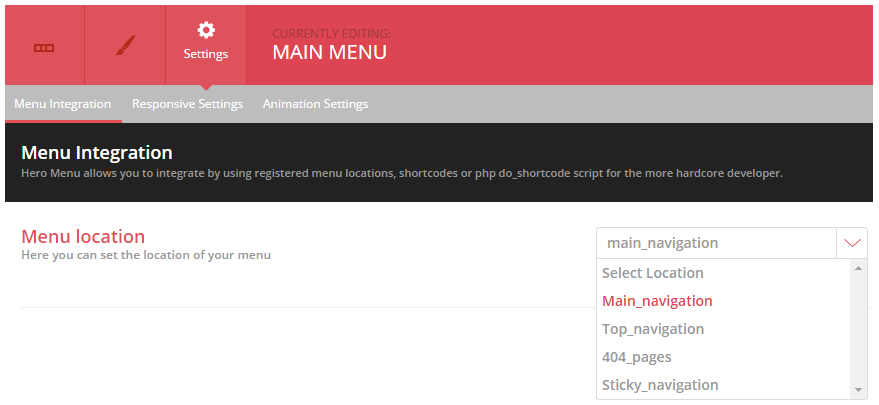
Navigate to Hero Menu » Settings » Menu Integration and set menu location to Main_navigation.
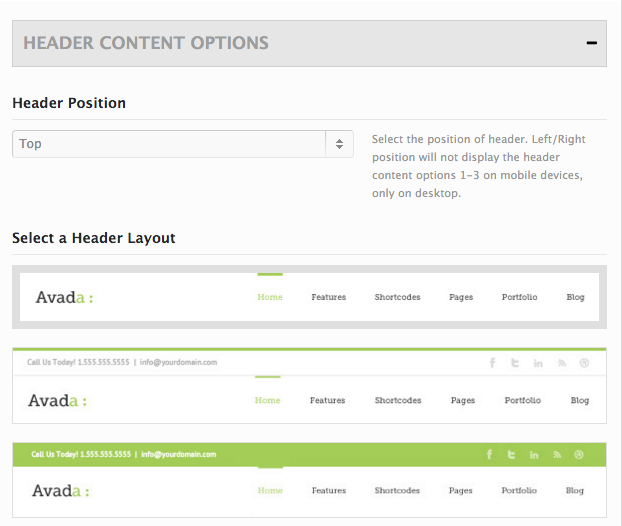
Navigate to Appearance » Theme Options » Header and set header position to Top and choose the first header layout option.
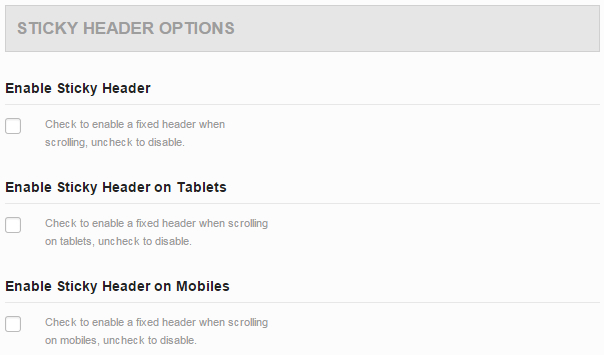
Navigate to Appearance » Theme Options » Sticky Header and disable all the settings shown below.
Navigate to Appearance » Theme Options » Menu and disable the search icon within the Main Nav as shown below.

Navigate to Appearance » Theme Options » WooCommerce and disable the WooCommerce cart icon within the Main Menu as shown below.

Please scroll down to see our integration guide for older versions of Avada. To integrate HeroMenu within Avada 3.8, follow the steps below very carefully.
Take Note:
All changes are done within the header.php file. Start by making a backup of this file. Please also note in future that theme updates by the author will overwrite the header.php. So make sure that when you do a theme update, also do this bit in the header.php file again.
In the Avada theme files, navigate to Templates » header.php Find the code beginning on line 64 and ending on line 76 which looks like this.
<div <?php echo $header_wrapper_class; ?>>
	<div class="<?php echo sprintf( 'fusion-header-%s fusion-logo-%s fusion-sticky-menu-%s fusion-sticky-logo-%s fusion-mobile-logo-%s fusion-mobile-menu-design-%s%s', fusion_get_theme_option( 'header_layout' ), strtolower( fusion_get_theme_option( 'logo_alignment' ) ), has_nav_menu( 'sticky_navigation' ), $sticky_header_logo, $mobile_logo, strtolower( fusion_get_theme_option( 'mobile_menu_design' ) ), $sticky_header_type2_layout ); ?>">
		<?php
		/**
		 * avada_header hook
		 * @hooked avada_secondary_header - 10
		 * @hooked avada_header_1 - 20 (adds header content for header v1-v3)
		 * @hooked avada_header_2 - 20 (adds header content for header v4-v5)
		 */
		do_action( 'avada_header' );
		?>
	</div>
</div>
Replace all code from line 64 until 76 with the following:
<?php
	//HERO MENU
	$hmenu_main_menu = array(
		'theme_location'  => 'main_navigation'
	);

	wp_nav_menu( $hmenu_main_menu );
?>
Navigate to Hero Menu » Settings » Menu Integration and set menu location to Main_navigation.

Navigate to Appearance » Theme Options » Header and set header position to Top.

To integrate HeroMenu within Avada version 3.7 and older, follow the steps below very carefully.
Take Note:
All changes are done within the header.php file. Start by making a backup of this file. Please also note in future that theme updates by the author will overwrite the header.php. So make sure that when you do a theme update, also do this bit in the header.php file again.
In the Avada theme files, navigate to Framework » Templates » header.php Wrap all the code within the function below: Please note that the example code has been reduced to reduce page scroll.
<?php
	function avada_header_template( $slider_position = 'Below' ) {
		[ AVADA FUNCTION CODE ]
	}
To look like this:
<?php
	function avada_header_template( $slider_position = 'Below' ) {
		if( !class_exists( 'hmenu_backend' )) {
			[ AVADA FUNCTION CODE ]
		}
	}
<?php
   function avada_header_template( $slider_position = 'Below' ) {

   	//IF STATEMENT TO WRAP ALL CODE WITHIN FUNCTION
   	if( !class_exists( 'hmenu_backend' )) {

   		global $smof_data;

   		$c_pageID = get_queried_object_id();

   		if( $slider_position == 'Below' ) {
   			$reverse_position = 'Above';
   		} else {
   			$reverse_position = 'Below';
   		}

   		if( ( ! $smof_data['slider_position'] ||
   			( $smof_data['slider_position'] == $slider_position && get_post_meta( $c_pageID, 'pyre_slider_position', true ) != strtolower( $reverse_position ) ) ||
   			( $smof_data['slider_position'] != $slider_position && get_post_meta( $c_pageID, 'pyre_slider_position', true ) == strtolower( $slider_position ) ) ) &&
   			! is_page_template( 'blank.php' ) &&
   			get_post_meta($c_pageID, 'pyre_display_header', true) != 'no' &&
   			$smof_data['header_position'] == 'Top'
   		) {
   ?>
<div class="header-wrapper<?php if($smof_data['header_shadow']): ?> header-shadow<?php endif; ?>">
	<?php
      if($smof_data['header_layout']) {
        if(is_page('header-2')) {
            get_template_part('framework/headers/header-v2');
        } elseif(is_page('header-3')) {
            get_template_part('framework/headers/header-v3');
        } elseif(is_page('header-4')) {
            get_template_part('framework/headers/header-v4');
        } elseif(is_page('header-5')) {
            get_template_part('framework/headers/header-v5');
        } else {
            get_template_part('framework/headers/header-' . $smof_data['header_layout']);
        }
      } else {
        if(is_page('header-2')) {
            get_template_part('framework/headers/header-v2');
        } elseif(is_page('header-3')) {
            get_template_part('framework/headers/header-v3');
        } elseif(is_page('header-4')) {
            get_template_part('framework/headers/header-v4');
        } elseif(is_page('header-5')) {
            get_template_part('framework/headers/header-v5');
        } else {
            get_template_part('framework/headers/header-' . $smof_data['header_layout']);
        }
      }
    ?>
   <div class="init-sticky-header"></div>
</div>
<?php get_template_part('framework/headers/sticky-header'); ?>
<?php 	}
} // CLOSE IF STATEMENT FUNCTION
}
Navigate to Hero Menu » Settings » Menu Integration and set menu location to Main_navigation.

Navigate to Appearance » Theme Options » Header and set header position to Top.

To integrate HeroMenu within Beaver Builder, follow the steps below very carefully.
To change the header layout, navigate to Appearance » Customize » Header » Header Layout and change the header layout to Navigation Right.
Click Save & Publish
If the above is complete, navigate to Appearance » Editor » nav-right.php, remove all code within this file and replace with the following:
Take Note
Please make sure that you keep a backup of nav-right.php before changing any code.
<?php wp_nav_menu(array('theme_location' => 'header')); ?>
Navigate to Hero Menu » Settings » Menu Integration and set menu location to Header.

Please follow the instructions below to replace BeTheme’s menu with HeroMenu. The menu within BeTheme will interfere with HeroMenu, so we have to remove some code in order to make sure BeTheme has no effect on HeroMenu.
Take Note
All changes are done within the header.php file. Start by making a backup of this file. Please also note in future that theme updates by the author will overwrite the header.php. So it is recommended to make changes through a child theme in order to avoide integration changes being overwritten.
If you are using any of the BeTheme demos, please note that this is only relevant for those with horizontal menus.
Replace the following code within header.php, lines 70 to 95.
if ('mhb' == mfn_header_style()) {
        // mfn_header action for header builder plugin
        do_action('mfn_header');
        echo mfn_slider();

    } else {
        echo '<header id="Header">';
    if ( 'header-creative' != mfn_header_style(true) ) {
        // NOT header creative
        if( 'header-shop' == mfn_header_style(true) ){
            // header style: shop
            get_template_part('includes/header', 'style-shop');
        } else {
            // default headers
            get_template_part('includes/header', 'top-area');
        }
    }
    if ( 'header-below' != mfn_header_style(true) ) {
        // header below
        echo mfn_slider();
    }
echo '<header>';

}
With the following:
wp_nav_menu( array( 'theme_location' => 'main-menu' ) );
Navigate to Hero Menu » Settings » Menu Integration and set menu location to Main Menu.

Please follow the instructions below to replace Braxton’s menu with HeroMenu. The menu within Braxton will interfere with HeroMenu, so we have to remove some code inorder to make sure Braxton has no effect on HeroMenu.
Take Note
All changes are done within the header.php file. Start by making a backup of this file. Please also note in future that theme updates by the author might overwrite the header.php. So make sure that when you do a theme update, also do this bit in the header.php file again.
Replace the following code within header.php:
<div id="nav-inner">
   <?php include_once( ABSPATH . 'wp-admin/includes/plugin.php' ); ?>
   <?php if (is_plugin_active('menufication/menufication.php')) { ?>
   <?php } else { ?>
   <div id="mobi-nav">
      <?php wp_nav_menu(array( 'theme_location' => 'main-menu', 'items_wrap' => '<select><option value="#">'.__('Menu', 'mvp-text').'</option>%3$s</select>', 'walker' => new select_menu_walker() )); ?>
   </div>
   <!--mobi-nav-->
   <?php } ?>
   <?php if(get_option('mvp_logo_loc') == 'Small in navigation') { ?>
   <div id="logo-small" itemscope itemtype="http://schema.org/Organization">
      <?php if(get_option('mvp_logo')) { ?>
      <a itemprop="url" href="<?php echo home_url(); ?>"><img itemprop="logo" src="<?php echo get_option('mvp_logo'); ?>" alt="<?php bloginfo( 'name' ); ?>" /></a>
      <?php } else { ?>
      <a itemprop="url" href="<?php echo home_url(); ?>"><img itemprop="logo" src="<?php echo get_template_directory_uri(); ?>/images/logos/logo-small.png" alt="<?php bloginfo( 'name' ); ?>" /></a>
      <?php } ?>
   </div>
   <!--logo-small-->
   <?php } ?>
   <div id="main-nav">
      <?php wp_nav_menu(array('theme_location' => 'main-menu')); ?>
   </div>
   <!--main-nav-->
   <div id="search-button">
      <img src="<?php echo get_template_directory_uri(); ?>/images/search-icon.png" />
   </div>
   <!--search-button-->
   <div id="search-bar">
      <?php get_search_form(); ?>
   </div>
   <!--search-bar-->
</div>
<!--nav-inner-->
With the following:
<?php wp_nav_menu(array('theme_location' => 'main-menu')); ?>
Navigate to Hero Menu » Settings » Menu Integration and set menu location to Main-Menu.

Before we can complete the integration, we need to add some styles to the style.css file within the root of the theme files. Navigate to Appearance » Editor » Select style.css from the right hand side.
Add the following CSS to the file:
#nav-wrapper{
	height:auto !important;
}
Please follow the instructions below to replace Bridge’s menu with HeroMenu. The menu within Bridge will interfere with HeroMenu, so we have to remove some code in order to make sure Bridge has no effect on HeroMenu.
Take Note
All changes are done within the header.php file. Start by making a backup of this file. Please also note in future that theme updates by the author will overwrite the header.php. So make sure that when you do a theme update, also do this bit in the header.php file again.
Replace the following code: This code snippet begins on line 65 and ends on line 80 within header.php.
if($enable_vertical_menu) {
 echo qode_get_module_template_part('templates/vertical-header', 'header', '', $params);
 }else{
 switch($header_bottom_appearance){
 case 'stick menu_bottom':
 $header_appearance_slug = 'stick_menu_bottom';
 break;
 case 'fixed fixed_minimal':
 $header_appearance_slug = 'fixed_minimal';
 break;
 default:
 $header_appearance_slug = $header_bottom_appearance;
 break;
 }
 echo qode_get_module_template_part('templates/header-appearance/header', 'header', $header_appearance_slug, $params);
 }
With the following code:
echo do_shortcode('[hmenu id=1]');
Take note
Remember that menu ID in shortcode is subject to change. Please make sure that you are referencing the correct menu ID.
The next change would be on the ‘Qode Options > Header’ page to set the ‘Header Type’ dropdown option to ‘Regular’.

Please follow the instructions below to replace Canvas’s menu with HeroMenu. The menu within Canvas will interfere with HeroMenu, so we have to remove some code in order to make sure the menu within Canvas has no affect on HeroMenu.
Take Note
All changes are done within the header.php file. Start by making a backup of this file. Please also note in future that theme updates by the author might overwrite the header.php. So make sure that when you do a theme update, also do this bit in the header.php file again.
Replace the following code.
<?php woo_header_before(); ?>
    <header id="header" class="col-full">
       <?php woo_header_inside(); ?>
    </header>
<?php woo_header_after(); ?>
With the following –
<header id="header" class="col-full">
   <?php echo do_shortcode( '[hmenu id=1]' ) ?>
</header>
Take note
Remember that menu ID in shortcode is subject to change. Please make sure that you are referencing the correct menu ID.
Documentation for Canvas will be extended.
Please follow the instructions below to replace Divi’s menu with HeroMenu. The menu within Divi will interfere with HeroMenu, so we have to remove some code in order to make sure Divi has no effect on HeroMenu.
Take Note
All changes are done within the header.php file. Start by making a backup of this file. Please also note in future that theme updates by the author might overwrite the header.php. So make sure that when you do a theme update, also do this bit in the header.php file again.
Replace the following code within header.php:
<header id="main-header" class="<?php echo esc_attr( $primary_nav_class ); ?>">
    <div class="container clearfix">
    <?php
        $logo = ( $user_logo = et_get_option( 'divi_logo' ) ) && '' != $user_logo
            ? $user_logo
            : $template_directory_uri . '/images/logo.png';
    ?>
        <a href="<?php echo esc_url( home_url( '/' ) ); ?>">
            <img src="<?php echo esc_attr( $logo ); ?>" alt="<?php echo esc_attr( get_bloginfo( 'name' ) ); ?>" id="logo" />
        </a>

        <div id="et-top-navigation">
            <nav id="top-menu-nav">
            <?php
                $menuClass = 'nav';
                if ( 'on' == et_get_option( 'divi_disable_toptier' ) ) $menuClass .= ' et_disable_top_tier';
                $primaryNav = '';

                $primaryNav = wp_nav_menu( array( 'theme_location' => 'primary-menu', 'container' => '', 'fallback_cb' => '', 'menu_class' => $menuClass, 'menu_id' => 'top-menu', 'echo' => false ) );

                if ( '' == $primaryNav ) :
            ?>
                <ul id="top-menu" class="<?php echo esc_attr( $menuClass ); ?>">
                    <?php if ( 'on' == et_get_option( 'divi_home_link' ) ) { ?>
                        <li <?php if ( is_home() ) echo( 'class="current_page_item"' ); ?>><a href="<?php echo esc_url( home_url( '/' ) ); ?>"><?php esc_html_e( 'Home', 'Divi' ); ?></a></li>
                    <?php }; ?>

                    <?php show_page_menu( $menuClass, false, false ); ?>
                    <?php show_categories_menu( $menuClass, false ); ?>
                </ul>
            <?php
                else :
                    echo( $primaryNav );
                endif;
            ?>
            </nav>

            <?php
            if ( ! $et_top_info_defined ) {
                et_show_cart_total( array(
                    'no_text' => true,
                ) );
            }
            ?>

            <?php if ( false !== et_get_option( 'show_search_icon', true ) ) : ?>
            <div id="et_top_search">
                <span id="et_search_icon"></span>
                <form role="search" method="get" class="et-search-form et-hidden" action="<?php echo esc_url( home_url( '/' ) ); ?>">
                <?php
                    printf( '<input type="search" class="et-search-field" placeholder="%1$s" value="%2$s" name="s" title="%3$s" />',
                        esc_attr__( 'Search …', 'Divi' ),
                        get_search_query(),
                        esc_attr__( 'Search for:', 'Divi' )
                    );
                ?>
                </form>
            </div>
            <?php endif; // true === et_get_option( 'show_search_icon', false ) ?>

            <?php do_action( 'et_header_top' ); ?>
        </div> <!-- #et-top-navigation -->
    </div> <!-- .container -->
</header> <!-- #main-header -->
With the following:
<?php wp_nav_menu(array('theme_location' => 'primary-menu')); ?>
Navigate to Hero Menu » Settings » Menu Integration and set menu location to Primary-Menu.

Before we can properly setup HeroMenu on Divi we need to add some css overwrites to the style.css file.
#page-container{
	padding-top:0px !important;
}
Please follow the instructions below to replace Enfold’s menu with HeroMenu. The menu within Enfold will interfere with HeroMenu, so we have to update the header.php file to make sure that Enfold has no effect on HeroMenu.
Take Note
All changes are done within the header.php file. Start by making a backup of this file. Please also note in future that theme updates by the author might overwrite the header.php. So make sure that when you do a theme update, also do this bit in the header.php file again.
Replace the following code within the header.php file:
<?php
   if(!$blank) //blank templates dont display header nor footer
   {
   	 //fetch the template file that holds the main menu, located in includes/helper-menu-main.php
     get_template_part( 'includes/helper', 'main-menu' );
   }
?>
With the following –
<?php
   if(!$blank) //blank templates dont display header nor footer
   {
   	 if(!class_exists( 'hmenu_frontend')){
   		//fetch the template file that holds the main menu, located in includes/helper-menu-main.php
        get_template_part( 'includes/helper', 'main-menu' );
   	 } else {
   	 	wp_nav_menu( array( 'theme_location' => 'avia' ) );
   	 }
   }
?>
Navigate to Hero Menu » Settings » Menu Integration and set menu location to Avia.

Before we can properly setup HeroMenu on Enfold we need add some css to the theme settings.
Navigate to Enfold » General Styling » Scroll down until you find the Quick CSS section and add the following styles to the provided input. Remember to save your changes!
.html_header_top #main{
	padding-top:inherit;
}
Take Note
The following file update takes place within the main Enfold Theme files.
Within the theme folder ‘Enfold’ Navigate to config-templatebuilder » avia-template-builder » php »pointer.class.php
Replace the following code:
public function __construct( $pntrs = array() ) {

	// Don't run on WP < 3.3
	if ( get_bloginfo( 'version' ) < '3.3' || !function_exists('get_current_screen'))
		return;

	$screen = get_current_screen();
	$this->screen_id = $screen->id;

	$this->register_pointers($pntrs);

	add_action( 'admin_enqueue_scripts', array( &$this, 'add_pointers' ), 1000 );
	add_action( 'admin_head', array( &$this, 'add_scripts' ) );

}
With the following –
Take Note: Theme Update
If you apply this fix, remember that when you update your theme, that all changes made to the pointer.class.php file will be lost.
public function __construct( $pntrs = array() ) {

	// Don't run on WP < 3.3
	if ( get_bloginfo( 'version' ) < '3.3' || !function_exists('get_current_screen'))
		return;

	$screen = get_current_screen();

        if(empty($screen)){ return; }

        $this->screen_id = $screen->id;
        $this->register_pointers($pntrs);

        add_action( 'admin_enqueue_scripts', array( &$this, 'add_pointers' ), 1000 );
        add_action( 'admin_head', array( &$this, 'add_scripts' ) );
}
Integration for the Genesis theme can be done by modifying the ‘header.php’ file in order to exclude the default theme header/menu and replace this with the shortcode of your Hero Menu.
The required change will be made to the ‘header.php’ file within the root of the theme folder. It would be necessary to edit the file to comment out or remove line 36. Below is an example of the code as it should look without any changes, the lines of code shown are 35 -37.
do_action( 'genesis_before_header' );
do_action( 'genesis_header' );
do_action( 'genesis_after_header' );
With line 36 removed this is then replaced with the ‘do_shortcode’ function which contains and executes the shortcode of your Hero Menu in order to display it. The modified snippet is shown below.
do_action( 'genesis_before_header' );
//do_action( 'genesis_header' );
echo do_shortcode('[hmenu id=1]');
do_action( 'genesis_after_header' );
As with all manual integrations its advised to make the above change through a child theme in order to maintain a backup of the original ‘header.php’ within the parent theme folder and to also prevent future theme updates from overwriting this change.
Please follow the instructions below to replace Karma’s menu with HeroMenu. The menu within Karma will interfere with HeroMenu, so we have to remove some code in order to make sure Karma has no effect on HeroMenu.
Take Note
All changes are done within the header.php file. Start by making a backup of this file. Please also note in future that theme updates by the author will overwrite the header.php. So make sure that when you do a theme update, also do this bit in the header.php file again.
Replace the following code within header.php.
<?php // Website Logo
if (('' == $ka_logo_text) && ('' == $true_logo_retina)){ //display uploaded logo image ?>
<a href="<?php echo home_url(); ?>" class="logo"><img src="<?php echo $ka_sitelogo; ?>" alt="<?php echo $truethemes_logo_text; ?>" /></a>

<?php } elseif (('' == $ka_logo_text) && ('' != $true_logo_retina)){ //display uploaded retina logo ?>
<a href="<?php echo home_url(); ?>" class="logo"><img src="<?php echo $true_logo_retina; ?>" alt="<?php echo $truethemes_logo_text; ?>" class="tt-retina-logo" width="<?php echo $true_logo_width_px; ?>" height="<?php echo $true_logo_height_px; ?>" /></a>

<?php } else { //display logo builder logo ?>
<a href="<?php echo home_url(); ?>" class="custom-logo"><img src="<?php echo get_template_directory_uri(); ?>/images/_global/<?php echo $ka_logo_icon; ?>" alt="<?php echo $truethemes_logo_text; ?>" /><span class="logo-text"><?php echo $ka_logo_text; echo '</span></a>';
} // END Website Logo ?>

<?php truethemes_before_primary_navigation_hook();// action hook ?>

<nav role="navigation">
<?php if('true' == $ubermenu):
	wp_nav_menu(array(
		'theme_location' => 'Primary Navigation' ,
		'depth'          => 0 ,
		'container'      => false ,
		'walker'         => new description_walker() ));
else: ?>
<ul id="menu-main-nav">
<?php wp_nav_menu(array(
		'theme_location' => 'Primary Navigation' ,
		'depth'          => 0 ,
		'container'      => false ,
		'walker'         => new description_walker() )); ?>
</ul>
<?php endif; //end uberMenu check  ?>
</nav>
<?php truethemes_after_primary_navigation_hook();// action hook ?>
With the following:
<?php echo do_shortcode( '[hmenu id=1]' ) ?>
Take Note
Remember that menu ID in shortcode is subject to change. Please make sure that you are referencing the correct menu ID.
Take Note
Requires Hero Menu version 1.3.11 or later.
Please follow the instructions below to replace Mobius’s menu with HeroMenu. The menu within Mobius will interfere with HeroMenu, so we have to remove some code inorder to make sure Mobius has no effect on HeroMenu.
Take Note
All changes are done within the header.php file. Start by making a backup of this file. Please also note in future that theme updates by the author will overwrite the header.php. So make sure that when you do a theme update, also do this bit in the header.php file again.
Remove <header></header> code and all code within:
<header id="header"></header>
Add the following line of code above <div id=”outer-container”></div>:
<?php wp_nav_menu(array('theme_location' => 'top-nav')); ?>
Please remove the following <div> from the header.php file, this should be at the bottom of the file:
<div id="header-spacer" style="height:<?php echo esc_attr($header_size); ?>px;<?php echo esc_attr($page_color); ?>"></div>
<?php wp_nav_menu(array('theme_location' => 'primary', 'theme_location' => 'top-nav')); ?>

<div id="outer-container" <?php echo $woo_version ?>>
	<div id="push-anim-overlay"></div>
	<div id="vc-spacer" style="height:<?php echo esc_attr($header_size); ?>px;"></div>
	   <div id="inner-container" class="<?php echo esc_attr($mobius['body-color']); ?>">
			<?php
			$page_id    = get_queried_object_id();
			$page_color = get_post_meta($page_id, 'themeone-page-bgcolor', true);
			if (!empty($page_color)) {
				$page_color = 'background:'. esc_attr($page_color);
			}
			?>
Navigate to Hero Menu » Settings » Menu Integration and set menu location to Top-Nav.

Please follow the instructions below to replace Salient’s menu with HeroMenu. The menu within Salient will interfere with HeroMenu, so we have to remove some code in order to make sure Salient has no effect on HeroMenu.
Take Note
All changes are done within the header.php file. Start by making a backup of this file. Please also note in future that theme updates by the author will overwrite the header.php. So make sure that when you do a theme update, also do this bit in the header.php file again.
Replace the following code:
get_template_part( 'includes/partials/header/header-menu');
With the following –
echo do_shortcode( '[hmenu id=1]' );
Take note
Remember that menu ID in shortcode is subject to change. Please make sure that you are referencing the correct menu ID.
Replace the following code in the header.php file:
<nav id="access" role="navigation">
   <h3 class="assistive-text"><?php _e( 'Main menu', 'twentyeleven' ); ?></h3>
   <?php /* Allow screen readers / text browsers to skip the navigation menu and get right to the good stuff. */ ?>
   <div class="skip-link"><a class="assistive-text" href="#content"><?php _e( 'Skip to primary content', 'twentyeleven' ); ?></a></div>
   <?php if ( ! is_singular() ) : ?>
   <div class="skip-link"><a class="assistive-text" href="#secondary"><?php _e( 'Skip to secondary content', 'twentyeleven' ); ?></a></div>
   <?php endif; ?>
   <?php /* Our navigation menu. If one isn't filled out, wp__nav_menu falls back to wp_page_menu. The menu assigned to the primary location is the one used. If one isn't assigned, the menu with the lowest ID is used. */ ?>
   <?php wp__nav_menu( array( 'theme_location' => 'primary' ) ); ?>
</nav>
With the following –
<?php wp_nav_menu( array( 'theme_location' => 'primary', 'menu_class' => 'nav-menu' ) ); ?>
Replace the following code in the header.php file:
<nav id="site-navigation" class="main-navigation" role="navigation">
   <button class="menu-toggle"><?php _e( 'Menu', 'twentytwelve' ); ?></button>
   <a class="assistive-text" href="#content" title="<?php esc_attr_e( 'Skip to content', 'twentytwelve' ); ?>"><?php _e( 'Skip to content', 'twentytwelve' ); ?></a>
   <?php wp_nav_menu( array( 'theme_location' => 'primary', 'menu_class' => 'nav-menu' ) ); ?>
</nav>
With the following –
<?php wp_nav_menu( array( 'theme_location' => 'primary', 'menu_class' => 'nav-menu' ) ); ?>
Replace the following code in the header.php file:
<nav id="site-navigation" class="navigation main-navigation" role="navigation">
   <button class="menu-toggle"><?php _e( 'Menu', 'twentythirteen' ); ?></button>
   <a class="screen-reader-text skip-link" href="#content" title="<?php esc_attr_e( 'Skip to content', 'twentythirteen' ); ?>"><?php _e( 'Skip to content', 'twentythirteen' ); ?></a>
   <?php wp_nav_menu( array( 'theme_location' => 'primary', 'menu_class' => 'nav-menu' ) ); ?>
   <?php get_search_form(); ?>
</nav>
<!-- #site-navigation -->
With the following –
<?php wp_nav_menu( array( 'theme_location' => 'primary', 'menu_class' => 'nav-menu' ) ); ?>
Take note: Menu location
If you choose to use the wp_nav_menu example, remember to set your menu location under the settings tab in the HeroMenu. Navigate to Hero Menu » Select Menu » Settings » Menu Integration
Example of menu location settings:

Replace the following code in the header.php file:
<div class="header-main">
   <h1 class="site-title"><a href="<?php echo esc_url( home_url( '/' ) ); ?>" rel="home"><?php bloginfo( 'name' ); ?></a></h1>
   <div class="search-toggle">
      <a href="#search-container" class="screen-reader-text"><?php _e( 'Search', 'twentyfourteen' ); ?></a>
   </div>
   <nav id="primary-navigation" class="site-navigation primary-navigation" role="navigation">
      <button class="menu-toggle"><?php _e( 'Primary Menu', 'twentyfourteen' ); ?></button>
      <a class="screen-reader-text skip-link" href="#content"><?php _e( 'Skip to content', 'twentyfourteen' ); ?></a>
      <?php wp_nav_menu( array( 'theme_location' => 'primary', 'menu_class' => 'nav-menu' ) ); ?>
   </nav>
</div>
<div id="search-container" class="search-box-wrapper hide">
   <div class="search-box">
      <?php get_search_form(); ?>
   </div>
</div>
With the following –
<?php wp_nav_menu( array( 'theme_location' => 'primary', 'menu_class' => 'nav-menu' ) ); ?>
Take note: Menu location
If you choose to use the wp_nav_menu example, remember to set your menu location under the settings tab in the HeroMenu. Navigate to Hero Menu » Select Menu » Settings » Menu Integration
Example of menu location settings:

To add HeroMenu to WordPress 2015 Theme, modify the header.php file so that it resembles the following:
<body <?php body_class(); ?>>
   <!-- START: HERO MENU -->
   <?php echo do_shortcode( '[hmenu id=1]' ) ?>
   <!-- END: HERO MENU -->
   <div id="page" class="hfeed site">
   <a class="skip-link screen-reader-text" href="#content"><?php _e( 'Skip to content', 'twentyfifteen' ); ?></a>
   <div id="sidebar" class="sidebar">
      <header id="masthead" class="site-header" role="banner">
         <div class="site-branding">
            <?php
               if ( is_front_page() && is_home() ) : ?>
            <h1 class="site-title"><a href="<?php echo esc_url( home_url( '/' ) ); ?>" rel="home"><?php bloginfo( 'name' ); ?></a></h1>
            <?php else : ?>
            <p class="site-title"><a href="<?php echo esc_url( home_url( '/' ) ); ?>" rel="home"><?php bloginfo( 'name' ); ?></a></p>
            <?php endif;
               $description = get_bloginfo( 'description', 'display' );
               if ( $description || is_customize_preview() ) : ?>
            <p class="site-description"><?php echo $description; ?></p>
            <?php endif;
               ?>
            <button class="secondary-toggle"><?php _e( 'Menu and widgets', 'twentyfifteen' ); ?></button>
         </div>
         <!-- .site-branding -->
      </header>
      <!-- .site-header -->
      <?php get_sidebar(); ?>
   </div>
   <!-- .sidebar -->
   <div id="content" class="site-content">
The only addition to the code above is the following. (This was added just below the opening body tag)
<?php echo do_shortcode( '[hmenu id=1]' ) ?>
Take note
Remember that menu ID in shortcode is subject to change. Please make sure that you are referencing the correct menu ID.
The following code is also added just after the opening body tag, instead of using the do_shortcode example, you can use this instead:
<?php wp_nav_menu( array( 'theme_location' => 'primary', 'menu_class' => 'nav-menu' ) ); ?>
Take note: Menu location
If you choose to use the wp_nav_menu example, remember to set your menu location under the settings tab in the HeroMenu. Navigate to Hero Menu » Select Menu » Settings » Menu Integration
Example of menu location settings:

Please follow the instructions below to replace U-Design’s menu with HeroMenu. The menu within U-Design will interfere with HeroMenu, so we have to remove some code inorder to make sure U-Design has no effect on HeroMenu.
Take Note
All changes are done within the header.php file. Start by making a backup of this file. Please also note in future that theme updates by the author might overwrite the header.php. So make sure that when you do a theme update, also do this bit in the header.php file again.
Replace the following code within header.php:
<div id="top-wrapper">
	<?php udesign_top_wrapper_top(); ?>
    <div id="top-elements" class="container_24">
     	<?php udesign_top_elements_inside( is_front_page() ); ?>
    </div>
    <!-- end top-elements -->
    <?php udesign_top_wrapper_bottom( is_front_page() ); ?>
</div>
With the following:
<div id="top-wrapper">
	<?php wp_nav_menu(array('theme_location' => 'primary')); ?>
</div>
Navigate to Hero Menu » Settings » Menu Integration and set menu location to Primary.

Please follow the instructions below to replace Ultimatum’s menu with HeroMenu. The menu within Ultimatum will interfere with HeroMenu, so we have to remove some code in order to make sure Ultimatum has no effect on HeroMenu.
Take Note
All changes are done within the header.php file. Start by making a backup of this file. Please also note in future that theme updates by the author will overwrite the header.php. So make sure that when you do a theme update, also do this bit in the header.php file again.
Replace the following code within header.php.
<?php do_action('ultimatum_print_header'); ?>
With the following:
<?php wp_nav_menu( array( 'theme_location' => 'primary-menu' ) ); ?>
Navigate to Hero Menu » Settings » Menu Integration and set menu location to Primary Menu.

To integrate HeroMenu within X Theme, follow the steps below very carefully.
Take Note
Start by making a backup of the files mentioned on this page. Please also note in future that theme updates by the author might overwrite the _nav_primary.php. So make sure that when you do a theme update, also do this bit in the _nav_primary.php file again.
Wrap the following code within _nav_primary.php.
File location: framework » legacy » cranium » headers » views » global »_nav_primary.php
<a href="#" class="x-btn-navbar collapsed" data-toggle="collapse" data-target=".x-nav-wrap.mobile">
	<i class="x-icon-bars"></i>
	<span class="visually-hidden"><?php _e( 'Navigation', '__x__' ); ?></span>
</a>
<nav class="x-nav-wrap desktop" role="navigation">
   	<?php x_output_primary_navigation(); ?>
</nav>
<div class="x-nav-wrap mobile collapse">
	<?php x_output_primary_navigation(); ?>
</div>
With the following:
<?php if( !class_exists( 'hmenu_frontend' )): ?>
	[ CODE TO BE WRAPPED ]
<?php else : ?>
	<?php wp_nav_menu( array( 'theme_location' => 'primary' ) ); ?>
<?php endif; ?>
Navigate to Hero Menu » Settings » Menu Integration and set menu location to Primary.

Navigate to Hero Menu » Settings » Advanced and add the following CSS:
.x-navbar-inner{
		min-height:inherit !important;
	}
	.x-navbar-inner .x-container{
		width:100% !important;
		max-width:100% !important;
	}
	.x-btn-widgetbar{
		display:none !important;
	}
	.x-navbar{
		-ms-transform: none !important;
		-webkit-transform: none !important;
		transform: none !important;
	}
header.masthead .x-brand.text { display: none; }
@media(max-width: 768px){
.hmenu_wrapper_state_1 { height: auto; }
}
NOTE: It's that festive time of year again and we will be taking a short break to recharge from the 16th of December 2020 until the 3rd of January 2021. During this time our support will be limited but we will try to respond to high priority tickets as best we can. Have a great holiday!
OUR HEROES WILL BE HANGING UP THEIR CAPES FOR A SHORT BREAK!
We'll be out of office from the 2nd of August until the 18th of August 2019. Please note that during this time we will not be available to assist with support queries but will be right back to assist from Monday the 19th of August 2019. We appreciate your patience and support!
While we will always do our best to get back to you within an hour or two, we ask that you please allow for a maximum of 24 hours for feedback.
Monday to Friday, 9am to 5pm in the UTC+2 Timezone.
Bug fixing
How to questions
Assistance with integration
Support for 3rd party plugins
Custom Coding
Theme customization
Stay informed about all new releases and product updates
